Showing posts with label Brusho paints. Show all posts

Friday, 19 February 2021

A Day At The Zoo!

Here are some more of my samples for Crafty Individuals. The new stamps, designed by Ellie Mulligan,  have now been released and will be on their website very soon. All stamps are by Crafty Individuals.

The background for this easel card was made with Distress Oxide inks using blending brushes. I hand cut a stencil for the footprints.


I had some lovely handmade paper in my stash, which I thought would go well with the elephants. I stencilled some hearts on to the background piece (stencil by Bee Crafty) and used the same paper, minus stencilling, to stamp the elephants on. I matted and layered them on to the background with some patterned paper from Crafty Individuals "Wonderfully Weathered 2" set of A5 papers.


Pink again for the flamingo, but this time with a stencil from Lavinia Stamps for the background. The feathers die was a magazine freebie.


Another Distress Oxide background, with a bit of shading on top using Arteza coloured pencils. The giraffe was coloured with Arteza Fineliner pens.


A simple Brusho background for this zebra portrait.


The elephants again! I was playing with some spray inks (Dylusions shimmer sprays and Distress Oxide sprays) and a stencil by That's Crafty (available from Crafty Individuals), and the resulting papers reminded me of Indian fabrics. I thought they would be perfect as a background for the elephants. I stamped them with Versafine Clair ink on Crafty Individuals white satin stamping card and embossed them with clear powder. I carefully coloured them with Arteza Fineliners, and then managed to smudge ink on to the white areas surrounding the image, having forgotten that it wouldn't dry over the embossed parts! What to do? I didn't want to just throw it away as it had taken ages to colour! I suddenly realised that it would be the perfect opportunity to try out my new Posca brush pen with gold ink, which I used to colour over all the white areas. I think it actually enhanced the image. Happy accident! A sentiment from Crafty Individuals CI-464 stamp set, and a little bit of bling, finished off the card nicely.


Hope you have enjoyed this little trip to the zoo! Thanks for looking!

Sunday, 20 January 2019

Footprints on the Moon

Hadn't used the Brushos for ages, so having a few spare minutes, and some lovely new stamps from Stamps By Me, I thought I'd get them out and have a play.

First I stamped and masked the moon, and then made the background with the Brushos using the sprinkle & then spray method, blotting it after spraying to lighten it up as it was quite dark. Some of the paint leaked under the mask a bit, but I quite liked the effect. I thought it looked like clouds over the moon and gave it some dimension. Serendipity!

The Stamps By Me set has the trees, the moon and two sentiments. I particularly liked the one I've used here, but I thought the picture needed something else to help tell the story, so I added the rabbit & buzzard, along with a few grasses at the bottom, all from Inkylicious.

I stamped the sentiment in Versafine Clair ink and embossed it with WOW Neutral Ultra Shimmer Regular powder, which has the most gorgeous sparkle, but the photo doesn't do it justice. You can perhaps see it a little better in the next one.


And here's the rabbit gazing at the moon! (And probably hoping the buzzard doesn't spot her!)


It's quite a while, well before Christmas in fact, since I had chance to make something just for the sake of it, rather than for a particular person, event or occasion, and I really enjoyed doing this one. When I make cards for family and friends, I tailor them to the recipient and usually know what I'm going to do before I begin. Not that I don't enjoy doing those too, of course, but I love having the creative freedom to pick out a few stamps and inks etc. and just see where they lead. When I started making this card I had no idea how it was going to turn out, but I'm happy with the result!

Sunday, 7 October 2018

Autumn Colours

The theme for our October challenge at Stamping Sensations is one which I'm sure will be a favourite for many people.What better to showcase at this time of year than the

* * * * * SHADES OF AUTUMN * * * * *

The subject of your entry can be anything you choose as long as the main element of the project is stamped and you have used typical autumn colours, such as greens, yellows, oranges, reds and browns.

Nothing says Autumn to me more than the changing leaves in all their multicolour glory, so that is what I have portrayed on my card.

I stamped various leaves (both solid shapes and outlines) from a set by Stamps By Me, leaving spaces to cut out three more leaves with a die by Concord & 9th. I made a background with Brushos, using autumn colours, and adhered it behind the stamped piece, after which I fixed the diecut leaves back into their cut out spaces so that the Brusho background showed through. I was quite happy with the result but felt that it just needed a little more, so I added the sentiment (Inkylicious) and stamped a few splatters (Concord & 9th) to finish it off.

There's a £25 voucher from our fab sponsors Stamp Addicts for our lucky October winner, and my lovely teamies have some gorgeous inspiration for you over on the Challenge Blog.

Whilst autumn is not my favourite season of the year (too close to winter and the cold weather!) I do love the autumn colours, so I'm really looking forward to seeing lots of lovely entries. Good luck everyone!

Sunday, 10 August 2014

"The Shire"

Proud Grandma alert!! My young grandson, Andrew, aged 5, saw the picture I made with my tree stamp and Brusho paints (see here) and he wanted to make one.


First he punched a circle from a post-it note to make a mask for the moon. Next  he made the Brusho background by dipping a paintbrush into the powders and tapping it over the paper where he wanted the colour. Then he sprayed water over the picture until the colours had merged to his satisfaction. He did all of that with instruction but no physical help.

Having finished his background, he compared it with mine and decided that my picture was too plain, as it only has the tree and a bird. We looked through my stamps, and he found the Hobbit Door (Lavinia Stamps) and said that he wanted his to be a picture of The Shire (from Lord of the Rings. He's a big LOTR fan!) He chose some other stamps to go with the Hobbit Door (from Lavinia, Inkylicious & Hobby Art) and decided where they all should go. I helped him to hold the stamps as he was stamping them, just to make sure that he didn't smudge the images, because it would have been a shame to spoil his lovely background, but everything else was entirely his own work. He finished by colouring the door surround and the tree with coloured pencils.

We both decided that his artwork was far superior to mine!

Saturday, 2 August 2014

Anything Goes at Stamping Sensations!

Summer certainly arrived last month at Stamping Sensations  and it was an absolute treat looking through all the beautiful entries full of gorgeous summer blooms! But now to this month, and we have an open theme for our August Challenge. It's

*****  ANYTHING GOES  *****

You can enter any project on a theme of your choice. The only stipulations is that as we are a stamping challenge it must contain some rubber (or polymer!) stamping done by hand. Any project which uses only digital "stamps" (which are of course not stamps but clipart) will unfortunately not be eligible for the prize. And it would be such a shame for you to miss out on the prize opportunity, because this month it's a stunner!

Our wonderful sponsors are Tonic Studios, and just look what they are offering the lucky winner! Absolutely gorgeous and newly released!


For my card I've gone with a Scottish theme. I took my inspiration from the thistles which have now replaced the spring bluebells on the bank across the road from my craftroom window, and also from this month's Commonwealth Games in Glasgow.
 
 
I'm still loving my Brusho paints, and have used them to make the background. I'm also trying to challenge myself to go outside my comfort zone a bit with my colour choices. Not too sure about this one but I *think* it works ok.....! I'd got in my head that the official Games tartan had orange in it, but when I checked later it's more pink! Oh well, never mind! The thistle silhouette (Chocolate Baroque) was stamped on to the background and surrounded with the Tonic Studios Celtic Circle die (from which I cut out the middle with a Spellbinders circle die to make it into a frame). The border at the side was made with the Tonic Studios Celtic Border Strip punch. The final touch was the tag with the sentiment (Chocolate Baroque) which I thought was quite appropriate to the ethos of the Commonwealth Games as the "friendly games".  I sponged around the edges of the tag with pigment ink, trying to match the Brusho colours as closely as I could.
 
I love open themes, as there are always some lovely surprises among the entries! I look forward to seeing yours!


Monday, 14 July 2014

The Tree - the sequel!

The Brusho has been put to one side for a moment while I tell you about something far more exciting!

For the background to this story you need to read my earlier posts about The Tree, see here (scroll to end of post) and here.

The Tree is an old beech tree which stands alone on top of a nearby hill. I see it every day from my house. It is quite a landmark, and, tree lover that I am, it has fascinated me ever since we came to live here. I have taken hundreds of photos of it. I don't know how old it is, but it must be quite old. It has been there through all seasons and withstood all weathers, buzzards and crows dwell in its leafy heights, the sheep and cows enjoy its shade and shelter. What a story it would tell if it could speak!

This is the view I see of it from my garden, up on its hill in the distance.

I managed to make one of my photos into a digistamp, but being a stamper at heart, I really wanted it in rubber. Chatting about it with my good friend and fellow Tree lover Sally, it occurred to us that Deby, the lovely lady who owns our favourite stamp company Inkylicious, and who is surely a kindred spirit as there are none of her stamps that we don't like, might be interested in turning my digi into a stamp. So when we saw her at Stamp Magic last month we asked her, and she was!

This is the photo which became my digi.

You can imagine my excitement when I received the stamp this morning! Not only has Deby made the tree into a stamp (and you can see from the photo above how faithfully she has reproduced it), she has also included two buzzards and two sentiments to make up a brilliant set! I love it! Of course, I had to ink it up straight away, and here's the result!

For the first card I wanted to show the image of the tree alongside a photo of it in its setting, so have kept it quite simple, with just some stamped greenery around the edges of the card as a backdrop. (All stamps by Inkylicious, of course!) The background to the tree was lightly coloured using ink dusters and Memento ink.

Back to the Brusho for my second card! I masked a circle for a moon, sprinkled and sprayed the Brusho over, stamped the tree, extended the base to fit the frame with a black pen, stamped the buzzard, and matted it with a black border on to a 7" x 7" card base. I think I will frame this one.

This will be a great design for a man's card. All the men in my family will probably be getting a variation on this theme for their birthdays for the next year!

Well, I have lots more plans for The Tree, but wanted to share these with you just now. I have to say a huge thank you to Deby for my fabulous set. She's a star! And by the way, if anyone else likes it, I think Deby will be putting it on the Inkylicious website in the near future.


Thursday, 10 July 2014

Brusho Meadow

On a roll with the Brusho now! This card took about 15 minutes to make!

Sprinkled various colours of Brusho on  to water colour paper, sprayed it with water & blotted it. Stamped over with Crafty Individuals stamps. Mounted it with a narrow black border on to a 6" x 6" blank card. Quick, easy and colourful!

Wednesday, 9 July 2014

One layer at the Butterfly Challenge

Challenge No. 10 at the Butterfly Challenge is One Layer. I decided to see whether I could recreate the card in my previous post in a one layer format. It involved a lot of masking! My base was a 7" x 7" blank card.


To begin with, I outlined the main image area very lightly with pencil, so that I could see where to place the masks. I used a waterproof masking film. The first ones went around the outside of the area so that I could stamp and clear emboss the grasses inside. With the masks still in place, I then sprinkled on some Brusho (this time sandstone rather than black, for a change), lightly sprayed it with water and blotted off the excess. The butterfly was then stamped with Versafine ink. As before, all stamps are by Chocolate Baroque.

I removed the outside masks and then masked the main panel instead. Next I stamped the grasses at the edge of the card. By this stage it was looking okay but a bit untidy where a bit of the Brusho had leaked under the mask. The final step was to draw the black frame around the main image with a drawing pen, which covered the untidy edges and pulled everything together.

Looking at the two cards side by side, I don't think this one is quite as crisp looking as the original version and I think I prefer the effect of the black Brusho rather than the sandstone. Perhaps brown ink rather than black would have gone better with the sandstone. However, given the limitations of the one layer format I was quite pleased with it, and it was an interesting exercise to try.

Monday, 7 July 2014

More Brusho

Here's another card I made while playing with my Brusho paints (see also my earlier post here).


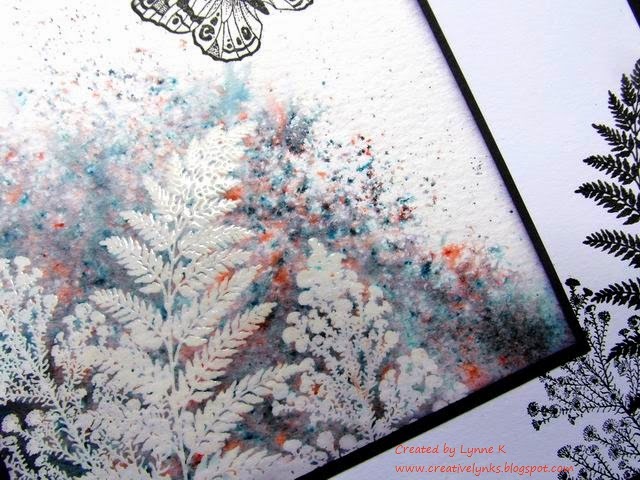
For this one I embossed the ferns first with Versamark ink and clear embossing powder on watercolour paper before sprinkling with the Brusho powder (I used black only) and lightly spraying with water. The embossing resisted the wet paint. I blotted it with a paper  towel to remove the excess ink. Next I stamped the butterfly, followed by the ferns again, this time with Versafine ink on the right hand side of the card blank. I had considered colouring the butterfly, as on my earlier card, but decided not to as I rather liked the graphic quality of the black and white, with just the hint of colour in the Brusho background. I matted the picture with a thin black border and stuck it to the card. All stamps are by Chocolate Baroque.

In this close up you can see the effect of the Brusho more clearly. It's great stuff to work with. Think I'll be playing with it again before long!


Saturday, 5 July 2014

Just playing

Woo hoo, it's the school holidays! No work to prepare, nowhere I needed to go, nothing I needed to do for the time being, so I decided it was time for a play!

Recently on Pinterest I've been admiring various artworks (some of which I've pinned on my Bister and Brusho Art board) using something called Bister, or Bistre. Having never heard of it before, I had to investigate! It seems to be popular in The Netherlands, and there are some great examples using it on the Stampinback Blog. I really fancied having a go at something similar, but I don't have any Bister. Then I remembered that, quite some time ago, I bought some Brusho powder paints, although I didn't do much with them at the time. As far as I can tell, Brusho and Bister appear pretty much to be the same kind of product. I'm not quite sure whether to call the Brusho paints or inks, as they behave similarly to both.

Right, I thought, I'll have a go with the Brusho and see whether I can get similar results. The trouble was, I couldn't find them! I knew they must be somewhere in my craft room. So I spent a whole day and a half (yes really!) going through all my stuff with a fine tooth comb, so determined was I to find them. I even looked in cupboards in other rooms in the house, just in case for some strange reason they had migrated elsewhere. By last night they still hadn't turned up, but at least I now have a very tidy craft room!

Anyway, to cut a long story short, I eventually realised there was one box I hadn't looked in, one I keep under my desk. It used to house a mixture of bits and pieces, a microcosm of my stash, if you like, that I could just pick up and take with me if I was going away anywhere. Since we moved up here there are very few occasions now when that would happen, so during my last reorganisation I had put all the bits and pieces away with their fellow bits and pieces and the box underwent a change of use. And, of course, that's where I finally found the Brusho!

It's brilliant stuff. So many different ways it can be used. I won't go into them all just now, but there's lots of info here. For my first card, I sprinkled some Brusho (sparingly - it's very concentrated) over watercolour paper and lightly sprayed it with water. The powder magically turned into paint and spread out over the paper.


I overstamped  it with stamps from Art Journey, Stampinback, Lindsay Mason and Hobby Art and filled in the gap at the side with a Memory Box diecut. I used a white gel pen to add highlights to the flowers.

For the second card my method was similar, except that I used plain smooth card instead of watercolour paper and coloured just part of the card with Brusho. The interesting thing here is that I only used black Brusho. When you mix it with water to use as a paint  it comes out black, but as a powder it's a composite of different colours which separate out when you spray it or drop it on to wet paper. The butterfly and grasses are by Inkylicious. I mixed a little turquoise Brusho with water to use as a paint to colour the butterfly.

The third card uses watercolour paper again, but this time I dampened the paper first before sprinkling the Brusho on to it. I stamped the flowers and butterflies (Lavinia Stamps) and painted the flowers as above. Sentiment is by Indigo Blu. Flower border punch by X-Cut.


The fun of the sprinkled backgrounds is seeing how they turn out. No two will be the same. I guess it may be possible with practice to control it a little more, but I'm not sure I'd want to. I like the randomness of it.

I've barely yet scratched the surface of what can be done with Brusho, and I'm sure I'll be doing some more experimenting, so thanks for looking, and watch this space!