Monday 9 December 2013

Calendar

I've seen lots of sticky note holders lately on Pinterest, and I think they're a great idea and make nice little gifts. I wanted to make some with calendars for Christmas presents. This is my own design.

The calendar, photo and sticky note pad are all removable so that they can be replaced. (The little girl's face is obscured in the photo as I didn't have permission from her parents to show it online.) Printed papers are by Provocraft (they must be about 10 years old!) and the butterflies are cut with Cheery Lynn dies. Here's a side view so you can see how it stands up.

Here you can see how the sticky note pad sits in a tray, so that it is easy to remove if required. A loop of tape, glued under the tray, holds the pencil in place.


 And here it is folded up.


This was my prototype, and I want to make a few more. On the others I may change the photo for a stamped or other type of picture, or the butterflies for different embellishments, but the style will remain essentially the same. Am also still in the middle of making Christmas cards. At the moment my desk looks like an explosion in a paper factory......... 

Sunday 1 December 2013

A Free and Easy end to our Challenge year

Well, it's time for our final challenge of 2013 at Stamping Sensations. If you're like me, you'll be frantically trying to get the Christmas preparations sorted at the same time as keeping up with all the regular stuff. Anyone who has finished making all their Christmas cards by now has my ardent admiration! The rest of you will, I'm sure, be grateful that our December Challenge has the theme of

***** FREE AND EASY *****

so anything goes! If you're still on with the Christmas cards (like me!), you could show us those. If not, we'd love to see what else you've been working on lately.

As usual we've got a fabulous sponsor to help us round off the year, Visible Image, an all-British company with a fantastic range of stamps, no less than 5 sets of which have been very generously donated by them for our prize.


Anyway, on to my card. It's a Christmas one, of course, 40 down, about another 30 still to go!


I treated myself to an early Christmas present of a couple of Memory Box dies which I've had my eye on for quite some time. The one I've used here is called Tessatina Border. I cut it out of both red and green card, and then inserted the green cut-out into the space left in the red card. It was then framed with the X-cut Poinsettia Border punch. That was another new buy! I was delighted recently when The Range opened a new branch not 10 miles away from me, a small oasis in the crafting desert in which I live! Had to go and check it out, of course, and couldn't resist the Poinsettia punch. So pretty, and needn't be confined to Christmas cards!

The card was finished with some flowers cut with the Marianne Design Mini Poinsettia die set, a Spellbinders bauble diecut overstamped with a Waltzing Mouse stamp, and a sentiment also by Waltzing Mouse. The background paper was a freebie from Making Cards Magazine.


My amazing teamies have some stunning samples to inspire you with. Do go and have a look at them on the Challenge Blog. We had a brilliant response to our Christmas theme last month, and I'm sure you'll all do us proud with your entries for December. Can't wait to see them!

Now, back to the Christmas card production line.......

Saturday 16 November 2013

Altered Domino Pendants

I made these recently as pay-it-forward gifts, and now I know they have all been received, I can blog them!

I bought the dominoes years ago (at least 10 years and probably more!) and they have been sitting in a drawer all this time waiting for me to find some inspiration to use them! They came as a full set, so could have been used to play the game with, but I think they must have been specially made for altering, as the reverse side is completely blank and smooth. They are quite small, just 1.5 x 3cm. I can't remember now what make they are or where I got them, but it was either at a show or in a craft shop. I wish I could find some more like them, as they are lovely to work with.


The first thing I did was drill a hole in the top and glue in a bail. Then I painted them with alcohol inks and stamped a picture on top (stamps by Chocolate Baroque and Stampscapes). The fact that the horizons all happened to line up was purely coincidental! The sides were painted with gold Lumiere paint, and I left the backs as they were.


The next step was to coat them with Diamond Glaze to protect them, and then to add some beads and a cord.


 I also made gift boxes to put them in. The one which went with the fir tree pendant was covered in paper from PSX, again bought years ago! The other papers were printed from the Essence of Nature CD from Chocolate Baroque.


I really enjoyed making these. Made a nice change from Christmas cards!

Sunday 3 November 2013

Christmas is coming!

Well, it's still a few weeks away yet (thank goodness!), but as far as Stamping Sensations Challenge is concerned, it's already here! We know this is a busy time of year for everyone, and most people will be well into Christmas card making mode now, so our theme for November is simply

*****   CHRISTMAS   *****

We would love to see your Christmas projects, whether cards, layouts, decorations, hand crafted gifts, or even creative wrapping.

I have made a simple card using a lovely stamp from this month's sponsor, Stamp Addicts.


The picture, having had a bit of shading added with a Promarker and some glitter glue, was cut out with a Spellbinders die. The background papers were part of a freebie from Making Cards magazine, and the top border was made with a Dovecraft corner punch with the corner guide removed. Here's a closer look.


The lovely people at Stamp Addicts have generously donated a whopping £35 voucher for this month's prize! That will cover a fair bit of crafty Christmas shopping! Should you need any inspiration for your entries, just take a look at the gorgeous projects my talented teamies are showing off on the Challenge Blog. We look forward to seeing yours!

Sunday 6 October 2013

Stamping Sensations October Challenge

We had some wonderful entries for our poppy photo inspiration challenge at Stamping Sensations last month, but for October we are moving from flora to fauna! Our theme for this month is

ALL CREATURES GREAT AND SMALL

Plenty of scope here, I think. Furry, feathered, scaled, creatures of land, sea or air, cute or realistic, the choices are endless.

We have a fantastic sponsor too - the well known and very popular Penny Black, who have donated a super prize.


For my sample I decided to go for something a bit different for a change and made a screen card.


 All the stamps I've used are by Penny Black, and so are the butterfly stickers. The patterned background papers are by Prima, and the flower diecuts are from Memory Box. The border punch at the top is one of my favourites and I've had it for many years, but I've no idea now where it came from. I used Woodware punches to make the little vellum flowers.


I'm sure this will be a popular theme, and I will look forward to seeing lots of lovely entries! Remember you can enter up to three times, combine with other challenges and make whatever type of project you like, as long as it follows our theme. The DT have some absolutely gorgeous samples for you, so don't forget to have a look at them on the Challenge Blog

Tuesday 3 September 2013

Vintage Nature

Thanks to Brenda and her gorgeous projects (see here and here) using their products, I've recently become a fan of Nicecrane Designs, owned by the lovely Ignacio. Once I saw his gorgeous butterflies, I knew I had to have them, and on browsing the site I discovered so many more equally lovely designs. They are all in the form of downloads (instant gratification!) and many have a vintage feel.

Like Brenda, it is unusual for me to make cards with little or no stamping on them, but Ignacio's designs are so pretty, I had to make an exception for them! I ordered several sets, and Ignacio also very generously sent me some freebie sets too. (NB. I have not been asked to promote his products, I'm just telling you about them because I like them!)

Anyway, once I'd got them downloaded, I set to work to make a few cards. Now, I struggle with cards for men. Or rather I did! Nicecrane has some lovely Old Map images. They're sold as bookmarks, but I made mine into a card.

I did do a bit of stamping here! The base card was stamped all over with an old freebie map stamp from Craft Stamper Magazine, with the bookmark image matted on to a thin gold border and placed on top. I didn't want to detract from the image, so the only embellishment is a little sentiment banner. (Banner stamp:Waltzing Mouse, sentiment: Clarity Stamp, a freebie from a show.)

Nicecrane has several sets on a nature theme, which is right up my street. My favourite is called "Colorful Nature", with vintage-style images of birds and animals. I used the four bird pictures to make a set of cards. It looks as though I cut them out with a Nestie label die, but though I have one of those it was the wrong size, so I just cut away each corner with a round hole punch.


The eagle-eyed amongst you will spot just a teeny-weeny bit of stamping (a tiny border by Waltzing Mouse)! Apart from that, the images are simply mounted on to a background cut with Martha Stewart punch-around-the page punches, and each is matted on different coloured Bazzil card which I inked around the edges to continue the vintage feel. I think they make a pretty set.


Thanks for looking!

Sunday 1 September 2013

Poppies

We have some poppy inspiration for our September Challenge at Stamping Sensations! A field of beautiful poppies (Brenda's favourite, of course!).


We'd like you to take inspiration from the photo for your projects, so for instance you could go for the colours, the general scene, or the poppies themselves. I've gone for all of those!

First of all I made the background scene. I hand drew the field and distant hills with watercolour pencils, overstamped the trees and drew the fence. Next I drew in the distant poppies, making them slightly more defined towards the foreground.


The main poppy image was then stamped over the background picture, coloured with Promarkers to make it stand out, and the flower centres dotted in with a black gel pen.


I hand cut a frame with an arch-shaped aperture from white card, drew a black border around it and mounted it over the picture. The whole thing was mounted on to the red patterned background paper, and finally on to an 8" x 8" base card. The frame was decorated with various diecuts, a stamped bee and some little butterflies, and a sentiment. Glitter glue was added to the insects' wings.


The gorgeous poppy stamp is by our lovely sponsor for September, Chloe Endean of Chloe's Creative Cards. Her "Stamps By Chloe" range has something for everyone, including Christmas stamps and a great selection of sentiments. Chloe has very generously donated a super selection of her products worth around £50 for our lucky winner this month!


The Design Team have produced some really lovely samples for you, so do go and have a look at them on the Challenge Blog. We are looking forward to seeing all your poppy-inspired projects!

Here's what I made my card with:

Main poppy image: Poppy Border from Stamps By Chloe. Tree stamps: Crafty Individuals. Bee stamp: Tonic Studios (by Ruth Hamilton). Tiny butterfly stamp and sentiment:  Hobby Art.
Diecuts - Prim Poppy, Chloe Stem, Fuchsia Sprig, all by Memory Box. Leaves (Flourish Leaf Strip) by Cheery Lynn. Sentiment cut out with Spellbinders label die. Background paper from my stash (very old!).

Sunday 18 August 2013

Marooned on a desert island!

We're half way through this month's Stamping Sensations Challenge, where the theme is Wings & Things With A Touch Of Vintage.


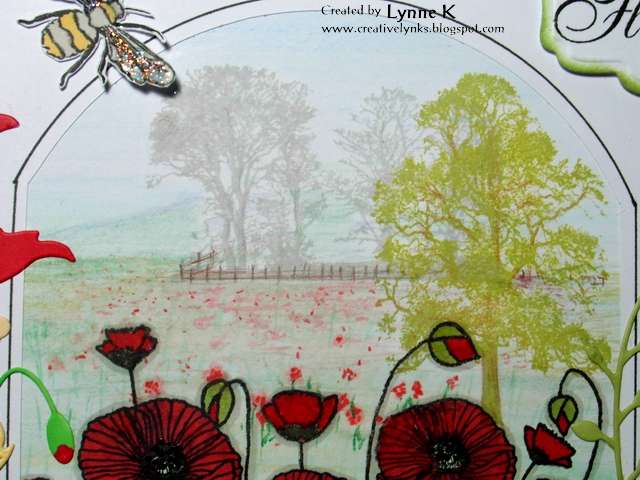
It's my turn to provide the mid-month inspiration, and I've used one of my favourite butterflies, by Prickley Pear Stamps, and coloured it with Distress markers. The doily is a Cheery Lynn die, and the background papers are magazine freebies, the top part being overstamped with a little butterfly from Hobby Art. The portrait is of my Great Grandmother, cut out with a Nestabilities die and mounted on to another Nestie diecut. The sentiment is by JustRite.


Over the next few months the DT members are taking turns to choose 6 crafting items which we would take to a desert island! I had to think long and hard about which items to take to my desert island! I tend to use quite a variety of materials and techniques in my crafting, so trying to choose just six items was very difficult. However, these are what I decided upon:

1) Colouring medium (we are allowed 5 colours). Distress Ink Refills - Salty Ocean, Mustard Seed, Bundled Sage, Picked Raspberry & Shaded Lilac. I've gone for the refills rather than the inkpads as they would be more versatile. I could stamp with them, paint with them in various dilutions, and mix them to make other colours.

2) Craft knife. The one essential item I couldn't be without! I use one daily. It would also be very practical on a desert island, as it could be used for all sorts of things besides crafting! (But please can it include an endless supply of spare blades too, Brenda??!)

3) Metal ruler. Again, an essential item! For measuring, and cutting along with the knife.

4) Water brush. To do my colouring with. Could be used wet or dry.

5) Set of butterfly stamps. Would have to have some butterflies! Don't mind which, as long as they are not cute!

6) Set of permanent ink drawing pens. I'd use my time on the island to learn how to draw! Then I could make a variety of cards, not just butterflies! I could sketch scenes on the island, flowers, etc., do Zentangle, pen and wash pictures, and because the ink would be waterproof, I could write a message and send it off in a bottle for someone to find and rescue me. On the other hand, with the sun, sea and sand, endless time to craft, and no housework, I might just decide to stay there!

It occurs to me that it would be an interesting exercise to see just what we could do with our six items. Thought filed at the back of my mind for future reference!

Along with the above we are allowed 50 sheets of card. I would want them all to be white, as I could colour any I wanted with the Distress ink refills. Hmm. 50 sheets would not last very long. Maybe I'd better be rescued after all!

There's still plenty of time to enter this month's challenge if you haven't already (or you could enter another project - we accept up to three per challenge!) There's more inspiration on the Challenge Blog, so do go over and have a look!

Wednesday 7 August 2013

Adirondack Sky!

We've had some amazing skies lately. Tonight's sunset was particularly stunning.


Sally will like it, it's her favourite colour combo! What do you reckon, Sal? Purple Twilight, Mountain Rose, and Peach Bellini?! Nearly as good as your ink-dusted backgrounds. Life imitating art, definitely!

Some more of this week's aerial artworks!


Sunday 4 August 2013

Stamping Sensations August Challenge

It's August, so time for another challenge at Stamping Sensations. This month our theme is right up my street! It's

*** WINGS AND THINGS AND A TOUCH OF VINTAGE ***

Another chance to get out the butterfly stamps, and I couldn't resist this gorgeous new one from Inkylicious. It's called "Vintage Butterfly" - what could be more perfect for the theme!

I stamped the image with Versamark ink on to patterned paper (Webster's Pages) and embossed it with clear ink to act as a resist. Then I painted over the whole thing with gesso, wiping it off where it was covering the embossing.


Next I cut a small panel of the patterned paper, matted it with a thin gold border and placed it alongside the image. Having slightly distressed the edges of the paper, I then matted the whole picture on to some Bazzil Basics card, the border being cut with a Martha Stewart punch. To embellish the card, I made some paper beads, using the same papers.

The card was completed with some ribbon (two separate pieces, one on top of the other). The yellow ribbon is quite old, being inherited from my mother, although I don't think it's actually vintage! Apart from the butterfly stamp, all the materials used are old stash. I'm trying very hard not to buy new stuff and to get some of the old used up (though some, like the butterfly, are simply NOT to be resisted!) and so far I'm not doing too badly!

Of course, you want to know about this month's prize, and it's a cracker! Our lovely sponsor is Crafty Devils, and they have generously donated a £35 voucher!  They are one of the UK's leading papercraft specialists, supplying over 10,000 products for card making, stamping, scrapbooking, die cutting and more, so the lucky winner will definitely be spoilt for choice when it comes to spending their voucher.


Please do pop over to the Challenge Blog to see what my talented teamies have made to inspire you this month. I think this is going to be a very popular theme, and I can't wait to see all your lovely entries. Don't forget, it doesn't have to be a card, it can be any type of project as long as it follows the month's theme, and you can enter up to three times, so more chances of winning that great prize or being in our top three!

Saturday 13 July 2013

80 years young

Our choir conductor is a lovely lady who has just celebrated her 80th birthday, though you wouldn't know it to look at her! She doesn't seem a day over 65! I can only wish to have her vitality and joie de vivre when (hopefully!) I get to her age!  I wanted to make her a special card, and this is what I came up with.

 I used a Go Kreate die to cut the components for an easel card, which I covered with papers from Crafty Individuals' Background Papers pad Book 1. The lilac stamp (Toomuchfun Rubber Stamps) is one I've had for nearly 20 years! It was coloured with Promarkers and it and the sentiment (Inkylicious) were cut out with Spellbinders Labels 4 dies. I kept the embellishments quite simple, as I didn't want to cover up too much of the pretty papers.  The butterflies are made with dies by Cheery Lynn, and the flowers with the Small Multi Flower Rose Die by Britannia Dies.

 Here's a closer look at some of the details.


Here's the card in its box.

And here's the box.

The only brief I had for the card was "She likes pink and lilac"! However, I'm pleased to say that she liked it!

Haven't made much else lately. I'm wilting in the hot weather! I suppose we shouldn't complain, but just a few degrees cooler would be lovely! One of the things I've been planning to do in the school hols is reorganise my craft room. My younger grandson (aged 4), who likes to come & do crafty things with me, told me the other day that my craft room needs a good tidy up! (I have a sneaking suspicion that his mum might have said something similar to him about his toys!) However, I must admit he's right. The shelves are all mixed up and things have started to creep on to the floor. Time to make a start, I think.......