Showing posts with label VersaFine inks. Show all posts

Sunday, 1 July 2018

Summer at last!

We are currently in the midst of what is, for Scotland, a most unusual heatwave! Wall to wall blue skies and sunshine! It won't last, of course, but for now we can make the most of it. And since the school hols have just started, there's plenty of opportunity to sit out in the garden with a glass of something cold and simply relax. That makes our July challenge theme at Stamping Sensations very appropriate, as it is

* * * * * IN MY GARDEN * * * * *

Floral images spring to mind, of course, but you could also depict garden birds, creatures or insects, the veggie plot, garden shed, tools, water features, or garden activities. I'm sure you could add plenty more to the list! But as usual, please remember that your main image must be stamped for your entry to be eligible for our prize or top 3.

We are sponsored this month by the fabulous Crafty Individuals, who have a wonderfully eclectic collection of rubber stamps and accessories. These include many garden related images, several of which I have used on my card.


All stamps by Crafty Individuals, except for the sentiment which was a magazine freebie. I used Versafine inks and pigment inks for the stamping, and Zig Cleancolor markers for colouring.

My teamies have some absolutely gorgeous inspiration for you over on the Challenge Blog. We are looking forward to seeing lots of lovely summery garden themed projects! Hope you enjoy the challenge!

Sunday, 6 August 2017

August at Stamping Sensations Challenge

Hi everyone, we have another easy theme for you this month at Stamping Sensations! For August it's a case of

* * * * * ANYTHING GOES * * * * *

Just a little reminder, however. Although the theme can be anything you like, your entry must still adhere to our challenge rules, which you can read here. We are a stamping challenge, so stamping (using either conventional rubber/polymer stamps or hand coloured digital images) must be the focal (ie. main element) of your project. 


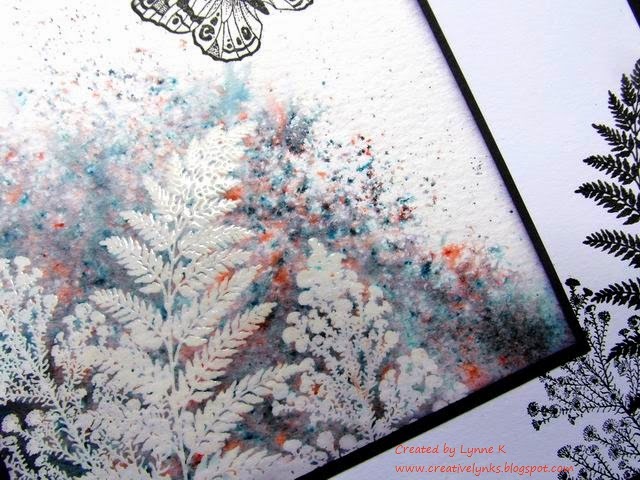
For my card, I decided to go with something old (the large butterfly, by Prickley Pear, small butterflies in background, by Crafty Individuals, and sentiment by The Craft's Meow), something new (Distress Oxide inks) and something new but old (the flourish frame by Bee Crafty) which I've had for quite a while but never used before!

I coloured the background first with the Oxide inks, and then overstamped the butterflies with the same inks. Stamped the frame on top with Versafine ink and cut out the middle. Stamped the sentiment on a separate piece of card and glued it behind the aperture. Stamped and diecut the large butterfly and attached it with a line of glue (used a Be Creative Wonder Glue pen) down the body only, so that the wings could be raised up for display, but would lie flat for posting. Finally matted it with a black border on to a 6" x 6" white card.

We have a brand new sponsor this month - Swedish House Crafts! This is a relatively new company run by the lovely Suha, and she has some fabulous designs! Check them out, along with the rest of her stock, in her online shop on the above link. She has very generously donated not just one but three prizes for our lucky winners! A £25 voucher top prize and two £10 vouchers for the runners up!

As you might expect, given that Anything Goes this month, our DT samples are delightfully diverse, and really showcase my teamies' varied talents! Do go and have a look at them on the Challenge Blog, and it would mean a lot to them if you were able to visit their individual blogs too.

I hope you can join us this month, and thanks for looking!

Sunday, 18 June 2017

Poppies & Daisies

Couldn't resist the beautiful new set from Hobby Art: Floral Mix, designed by Janie Burnett-Bleach.

To make this card, I first stamped the flowers with Versafine ink (in Smokey Gray as I didn't want harsh black outlines), masking as necessary, and then, with all masks still in place, coloured the background by sponging with pigment inks. Next the leaves were stamped, after which I removed the masks. The flowers and leaves were coloured with watercolour pencils, and the bee and dragonflies were stamped and coloured. Finally, I added some shading around the images and some glitter glue to the insects' wings. All stamps by Hobby Art.


Our garden is full of poppies just now, so I didn't have far to look for inspiration when making my card. The poppy flowers only last a day; by evening all the petals will have fallen off, but next morning there will be as many if not more new flowers. Gorgeous!


They will be flowering for several weeks, hopefully, but then they will be gone until another year, so I think I will keep this card as a reminder of their beauty.

Thanks for looking!

Thursday, 11 September 2014

Been doing the dusting....!

Inspired by Sally's fabulous new Inkylicious ink duster video tutorial and her stunning sample cards, I decided to have a go at doing something similar with my Inkylicious tree.


I kept it quite simple, a) because that's how the tree looks, up there on its hill all by itself, and b) because I needed to make it quickly and get it in the post for a friend's birthday!

Having first cut a circle mask for the setting sun, I made the ink dusted background using the colours of Memento Inks which Sally used, but substituting Danube Blue for the Bahama Blue, which I don't have. An Inkylicious Mountain Valley Stencil helped to produce the receding hills. I love these durable and reusable masks, much better than fiddling about with torn pieces of paper.

Once I was happy with the background I stamped the tree and buzzards with black Versafine ink. I wanted the base of the tree to go right across the card so I extended it using a black pen. The sentiment was ideal for filling in the space at the top left of the picture. All stamps are from the Inkylicious Old Beech Tree set.

Wednesday, 9 July 2014

One layer at the Butterfly Challenge

Challenge No. 10 at the Butterfly Challenge is One Layer. I decided to see whether I could recreate the card in my previous post in a one layer format. It involved a lot of masking! My base was a 7" x 7" blank card.


To begin with, I outlined the main image area very lightly with pencil, so that I could see where to place the masks. I used a waterproof masking film. The first ones went around the outside of the area so that I could stamp and clear emboss the grasses inside. With the masks still in place, I then sprinkled on some Brusho (this time sandstone rather than black, for a change), lightly sprayed it with water and blotted off the excess. The butterfly was then stamped with Versafine ink. As before, all stamps are by Chocolate Baroque.

I removed the outside masks and then masked the main panel instead. Next I stamped the grasses at the edge of the card. By this stage it was looking okay but a bit untidy where a bit of the Brusho had leaked under the mask. The final step was to draw the black frame around the main image with a drawing pen, which covered the untidy edges and pulled everything together.

Looking at the two cards side by side, I don't think this one is quite as crisp looking as the original version and I think I prefer the effect of the black Brusho rather than the sandstone. Perhaps brown ink rather than black would have gone better with the sandstone. However, given the limitations of the one layer format I was quite pleased with it, and it was an interesting exercise to try.

Monday, 7 July 2014

More Brusho

Here's another card I made while playing with my Brusho paints (see also my earlier post here).


For this one I embossed the ferns first with Versamark ink and clear embossing powder on watercolour paper before sprinkling with the Brusho powder (I used black only) and lightly spraying with water. The embossing resisted the wet paint. I blotted it with a paper  towel to remove the excess ink. Next I stamped the butterfly, followed by the ferns again, this time with Versafine ink on the right hand side of the card blank. I had considered colouring the butterfly, as on my earlier card, but decided not to as I rather liked the graphic quality of the black and white, with just the hint of colour in the Brusho background. I matted the picture with a thin black border and stuck it to the card. All stamps are by Chocolate Baroque.

In this close up you can see the effect of the Brusho more clearly. It's great stuff to work with. Think I'll be playing with it again before long!


Thursday, 13 June 2013

A great weekend

I went down to Nottingham last weekend to stay with Sally so we could go to Stamp Magic at the Doncaster Dome on Sunday. In other words, so I could get one of my twice yearly doses of crafty retail therapy! It began on Saturday with a little trip to Ik*a. Whilst there I noticed they were selling some lint rollers. Very cheap! On Pinterest I had seen a suggestion to use a lint roller to pick up all the fiddly little bits left in a die after you've been diecutting, so Sally & I both bought one, along with a pack of 4 refills. Suffice it to say, it didn't work! However, we now have enough roller tape each to keep our clothes free of bits until kingdom come!

Anyway, the serious shopping was on Sunday at Stamp Magic. Great show, as usual. Top of my list were some of the gorgeous new stamps from Inkylicious. I then left Sally doing a bit of demoing on the Inkylicious stand while I went for a wander round. I bought some stencils to use with my Gelli Plate, plus a few other bits and pieces, and watched Barbara Gray doing a great demo on the Gelli Plate. Haven't had chance to try what she was doing yet, but I have had a play with some of my new stamps.

One of my favourites from the new Inkylicious ones is called Poppy Lea. I like the way all the flowers except the poppies are solid, and just the poppies are open so that they can be coloured in. I happened to have some small pieces of watercolour paper already cut, so I stamped different sections of Poppy Lea on to each one and made a set of three cards.

 The backgrounds were coloured with Distress Stains, then Poppy Lea was overstamped with Versafine ink. The poppies were then coloured with Promarkers.  I stamped the first base card down one side with Delicate Vines, the second all over with Worn Paint, and the third with French Style Script across the centre. The Poppy Leas were then attached with foam pads, and each card finished with a simple sentiment. All stamps by Inkylicious.


On the way from the car park to the Dome, we came across this mother coot feeding her babies on the grass next to the lake, right by the path! They weren't a bit bothered by all the people walking past. Cute coots!


Sunday, 13 February 2011

All Creatures Great and Small

That's the title of the Sir Stampalot February'11 Challenge. Of course, for me that had to mean butterflies. I have very few other animal stamps. Here I've used the huge Elusive Images butterfly, on an 8" x 8" card. The background is sprayed with Glimmer Mists (after masking a circle for the sun) and then stamped with Hero Arts grasses and some tiny butterflies from Crafty Individuals. The text stamp is by Katzelcraft.


To colour the big butterfly, I laid the uninked, unmounted stamp on the paper and drew a faint pencil line around its outline, and filled it in by sponging with various pigment inks. Then I stamped the butterfly on top with Versafine Onyx Black ink. Had I stamped first and then coloured, the black would have been subdued. I could have stamped first and embossed with clear powder to protect the black before colouring, but I think it would have been more difficult then to get a smooth blending of colours. I was pleased with the result, anyway. Hope you like it too!

Thursday, 13 January 2011

Any left-handers out there?

I made a card! My first of 2011! I wouldn't say I'm back in the groove quite yet, but at least it's a start. Although there's no lack of inclination - I want to do it - I'm still struggling to find motivation. I don't think they are one and the same.

Anyway, here's what I made. I really like the clean and simple cards which Joanne Wardle showed in her article in the October 2010 Craft Stamper, and which were so beautifully demonstrated by the Craft Stamping Quartet in their challenge showcasing Joanne's work. The link goes to Lesley Ebdon's post, but see also the three subsequent posts.

I also love the masked landscape technique which I first saw done by Barbara Gray a few years ago, and which I first tried back here. Recently there have been several people doing something similar, linking back to Heather Telford, who has some wonderful examples on her blog, including a tutorial. Do go and have a look at it.

I didn't want just to copy what other people had been doing, so I sort of combined the two techniques and came up with this:

I *think* it works - what do you think? To make the shape of the landscape I cut a mask out of acetate (so that I would be able to see where I was placing things) large enough to cover the card, and then sponged the design with VersaMagic inks and torn paper masks. The tree stamps are by Clarity Stamp, the small and medium versions. The landscape was made entirely with the small tree, using just the edge to stamp the little bushes. The larger tree and the sentiment (Personal Impressions) were then stamped with VersaFine ink.

I was quite pleased with the outcome, considering how long it is since I made anything, except for one thing. You can tell it's been a while. The finished card turned out like this!!


I'd totally forgotten to check which way the card opened before I started stamping on it! The perils of stamping straight on to the card! I was so annoyed! I thought the best way to redeem it would be to cut off the picture side and mount it on to another card, but that wouldn't be the perfect solution. Then it occured to me that it might just be appreciated as it is by someone who is left handed! I'll have to test the theory on a left handed friend......