Showing posts with label Cheery Lynn dies. Show all posts

Saturday, 18 April 2020

And More Rainbows!

We're midway through the month but there's still plenty of time to enter our April Challenge at Stamping Sensations, where our theme is "Somewhere Over The Rainbow", quite appropriate at the present time. Full details over on the challenge blog.

I've been taking advantage of the extra spare time, during this period of lockdown, to explore some different artforms, one of which is pyrography. I bought a kit a while ago but hadn't had much chance to try it out until now. I've been inspired by Richard Dickson who, as The Pyronautist, does some fabulous work. Do go and have a look at his Facebook page. He mentioned on his page that he had been burning designs on watercolour paper, which made it possible to produce cards with pyrography designs, so I thought I would have a go at that. It works a treat!

I stamped the flowers (Woodware) on to the watercolour card with Desert Sand Memento ink, and then outlined and shaded the design with my pyrography tool. I wanted to add the rainbow background but didn't want the flowers to be coloured, so I used a Versamark pen to cover them completely and clear embossed them to act as a resist.

I sprayed the card with clean water and brushed various shades of Distress inks over in a rainbow shape, drying it with a heat gun so that the colours didn't continue to spread. I wiped away the excess colour from the flowers with a damp cloth.

The watercolour card, which I thoroughly recommend, is Cass Art Hot Press 300gsm. It's called "paper" but 300gsm is actually quite thick, more like card. I don't think I would want to risk burning on to anything thinner! It also takes the water very well and is perfect for stamping on as it is smooth. I wanted to keep the design clean and simple, so I just added a die cut butterfly (Cheery Lynn) and a sentiment (magazine freebie). For a first try, I was quite pleased with how it turned out, and will definitely be doing more.

We have had some absolutely gorgeous entries for our Rainbow challenge so far, but we would still like to see lots more. Let's fill blogland with this symbol of hope!

Sunday, 1 March 2020

Roll on Spring!

Well, I'm glad February is over and done with. What a dreary and dismal month it turned out to be. It is still very cold, very wet and very windy up here in the north, but there are signs of spring at last. The snowdrops are glorious, our daffodils are not far off flowering, we even have a few primroses out and the local birds have been seen gathering nesting materials. I just wish it would hurry up and get a bit warmer.

Talking of spring flowers brings me to our new challenge at Stamping Sensations, where our March theme is

* * * * * SPRING FLORALS * * * * *

We want to see lots of lovely floral creations to brighten up these dull days! To comply with our challenge rules and be in with a chance of winning, please ensure that flowers are the main subject of your project (a few tiny ones in a corner won't be eligible, flowers must be the focal image), and that they are hand stamped (or hand coloured digis).

We have a fab new sponsor this month - Thirsty Brush, who have a gorgeous range of  hand drawn stamps, along with an extensive range of accessories to complete your designs. I have used a stamp from their "Modern Floral" stamp set for my card, along with the matching die.

I coloured the image with Arteza coloured pencils, diecut it and adhered it with foam pads to a tag die from Stamps By Me. I matted the tag on to two layers of coloured card which I cut out by hand. The sentiment is also from Stamps By Me (diecut with a magazine freebie die), the butterfly die is by Cheery Lynn, and the background paper is from The Works.

My teamies have some blooming gorgeous inspiration for you over on the Challenge Blog! We hope you enjoy our March Challenge, and we are really looking forward to seeing your floral creations.

Wednesday, 18 July 2018

Another garden card

Just a quick reminder of our July challenge at Stamping Sensations, where our theme, sponsored by Crafty Individuals, is "In My Garden".


Again, I've used stamps by Crafty Individuals, along with some of their masks and one of their gorgeous new background sheets. The sentiment is by Personal Impressions, the butterfly die by Cheery Lynn.


There's still plenty of time to enter the challenge. For full details, challenge rules, and more stunning samples from my talented teamies, check out the challenge blog at Stamping Sensations.

Friday, 5 February 2016

News and New Stamps!

As a very proud member of the Be Creative Design Team, I'm delighted to announce that we now have our own Be Creative DT Blog, where we will be featuring our Be Creative projects and cards, along with hints and tips and product news. We'd love you to take a look at the new blog and become a follower. Justin has promised that when we reach 100 followers we can have a blog candy draw, so what's not to like?!

It's a close run thing, but I think my favourite Be Creative product is probably the alcohol markers, as they are such good quality and there is so much you can do with them. I've used them on the card I want to show you today.

Ever since I saw on Pinterest some stunning cards using Altenew stamps, just about all their floral sets have been on my wishlist! I managed to resist their lure for quite a while, but eventually gave in and ordered the Vintage Flowers and Painted Poppy. Couldn't wait to try them out, so here's my first card, using the Vintage Flowers.

As you will see, I need more practice in lining up the stamp layers, which I found quite tricky, but I think it's not too bad for a first attempt.

The roses and leaves were stamped with Versamagic inks in Sea Breeze, Turquoise Gem and Ocean Depth, and the small flowers with Versacolor Heliotrope, Violet and Grape. All other colouring on the card (except for the ribbon) was done with Be Creative alcohol markers.

Having completed all the stamping, I masked all the flowers and leaves. To make the speckled background, I scribbled the markers on to my glass mat and mixed the ink with Spray M Boss (Once Upon A Stamp), which has, amongst its many other uses, the effect of turning the alcohol ink into paint. I picked it up on an old toothbrush and flicked the paint on to the card, then removed the masks. I wanted the edges of the picture to be a bit darker, so I dabbed some ink directly from a marker on to a felt pad and stippled it around the edges.

The matting layers were cut from white card and coloured with the markers, as were the butterflies (Cheery Lynn dies). A little bit of sparkle was added to the small flower centres and butterflies with some Be Creative glitter glue. The border was cut with a Martha Stewart punch.

I love the versatility of the Be Creative markers, in that they can be used to co-ordinate all parts of a project. I don't know whether by accident or by design, but the two colours I used here, Pale Blue (which is actually purple!) and Peacock Green, perfectly match the ink colours Violet and Turquoise Gem! Probably coincidence, but a lucky one!

Anyway, I'm off to get some more practice lining up the layers. Think a MISTI would be very useful. Did I mention that's on my wishlist too...........?!

Sunday, 5 April 2015

Pink!

April already! A very busy last few weeks of term have meant I've had little time for blogging, or indeed crafting, but the Easter holidays are here at last, and so is our April Challenge at Stamping Sensations. I think our latest theme will be very popular, as it is

* * * * * PRETTY IN PINK * * * * *

Making a welcome return visit as our sponsor this month is PDA Card & Craft,


who are giving the lucky winner a fantastic £40 voucher to spend on their website or in their shop, where you will most definitely be spoilt for choice!

Pink is not one of my preferred colours, even though it does occasionally make an appearance on my cards, albeit in small amounts. However, I wouldn't normally use it as a main colour, so I had to step outside my comfort zone a bit here!

The focal image was created with Card-io Majestix stamps, from the Secret Garden set and Golden Daffodils set, both sets available from PDA here. I lightly sponged a background with pigment inks on a circular diecut while the paper was still in the die, and then stamped the scene with various stamps from the two sets. This was then matted on to a scalloped circle cut from patterned paper. Both it and the background paper were magazine freebies. The sentiments were also freebies (Simply Cards & Papercraft magazine). Plain Circle and Scallop Circle dies are by Spellbinders, Butterfly by Cheery Lynn and Bluebell by Wild Rose Studio.

It may not be my favourite colour, but I am certainly hoping to see lots of lovely pink creations for our challenge! The DT have some gorgeous samples for you over on the Challenge Blog, so do go and have a look at them and while you're there say hello to our two brilliant new teamies, Gerrina and Viv.

Happy Easter everybody!

Tuesday, 27 January 2015

Butterfly Jewels

It's ages since I had chance to enter the Butterfly Challenge, but I noticed that the current theme is Butterflies and Brads and having a few spare minutes, decided to make a card.

I've just bought the Joy Crafts corner die, and was itching to use it. Using four together makes a pretty frame for the butterflies (a Cheery Lynn die) and the sentiment (Inky Doodles). I cut off part of the diecuts (it has a pointy sticky out bit in the middle!) so they didn't take up so much room in the square, and attached them to some patterned paper (Melissa Francis) along with some pearl brads. This was then matted onto some pink pearlescent paper. That's about it really.


It was a rush job because I started making the card and then realised I had about 30 minutes to finish it, get it photographed and upload it in time to meet the challenge deadline! I think I just made it! Phew! Thanks for looking!


Sunday, 18 January 2015

Five Favourite Stamps!

Our current mid-month challenge for the DT at Stamping Sensations is to choose our five favourite stamps and make something using some or all of them. This month it's my turn. Five stamps??! I have hundreds, if not thousands of stamps in my collection! How can I possibly choose just five favourites?! If I were to think in terms of favourite stamps, it would probably be my newest, or whatever I happened to be working with at the time. However, let's try and narrow it down a bit.

My favourite topics are nature themed - trees, butterflies, flowers, grasses, country scenes, etc.  so my preferred stamps are likely to come from those categories. I could pick any of Chocolate Baroque's flowers or butterflies, for instance, or just about anything at all by Inkylicious. I tried to make a shortlist, but by the time I was on to the third A4 sheet (of narrow-lined paper!) I gave up!

In the end I decided to think about which stamps I find myself reaching for most often and have selected five of those. That was today. Tomorrow it could well be a different five!

Anyway, here's what I've made. As well as the stamps, three of my cards also use diecuts, to reflect this month's challenge theme of Dies and Punches. Don't get me started on favourite dies.....!

My first card uses one of my oldest stamps, a butterfly by Hero Arts. The original is wood mounted, since then I have also acquired the later clear and cling versions! To me it's just the perfect butterfly, both in shape and in scope for colouring.

Backing paper  - Docrafts Papermania, diecuts - Spellbinders, music stamp - Stampington, sentiment - Technique Tuesday, butterfly coloured with watercolour pencils and cut out by hand.

Next another oldie, by Funstamps, bought over 20 years ago in 1994! I still often use this anemone stamp as its fine lines and open areas make it ideal for one of my favourite techniques; using a waterbrush to draw the ink out of the stamped image to colour it in, as I have done here.

Backing paper - Prima, circle die - Joycrafts, border die - Die-namics, butterfly die - Cheery Lynn, sentiment - Prickley Pear, image stamped with Distress Inks.

My third stamp is probably in danger of becoming worn out, I have used it so often! It makes a regular appearance not just on Christmas cards, but all year round, although sometimes you wouldn't recognise it as it can make excellent little bushes or shrubs when turned on its side. The background tree group is from the same set, and I almost chose that stamp as my favourite instead of the single tree. But I think I've used the single one more.

Both tree stamps are from the "Lovely As A Tree" set by Stampin' Up, Sentiment by Inkylicious. I used a Spellbinder die as a mask to make the background, along with my Inkylicious Ink Dusters and Mountain Valley Stencil, and Memento inks.

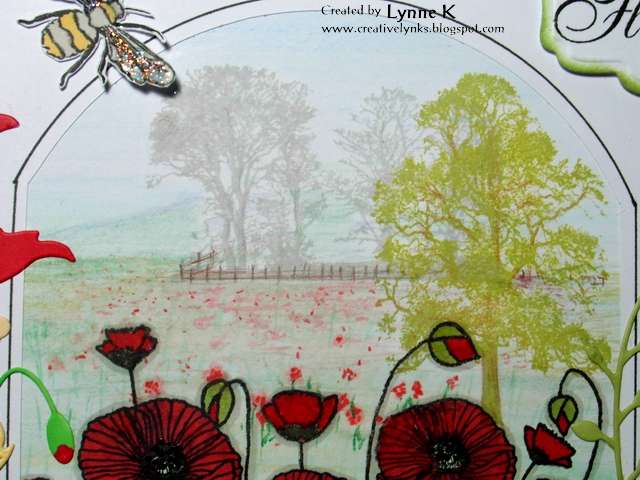
My final two choices are both by Inkylicious. It was really hard just to pick two of theirs, as I love ALL their nature stamps. Stamp No. 4 is a fairly new one, which combines trees and grasses into a scene but which can have different looks according to how the background is done, so it was high on my list.


Again, I used an Inkylicious Mountain Valley Stencil along with the ink dusters and Memento Inks to make the background before stamping the image. The pheasant is by Clarity Stamp, and it was cut out and added afterwards.

Finally, Stamp No. 5. I've saved the best till last! You probably won't be surprised to find that this one was top of my list right from the start, and if I had to choose my single most favourite stamp ever, this would be it! It is, of course, the Old Beech Tree - "my" tree, (not really mine, sadly, but I see it every day across the fields from my house), which Deby at Inkylicious so cleverly made into a stamp for me.

I used a Spellbinders die as a mask to make the ink dusted background, cut it out with the same die and adhered it to the card with foam pads. "Delicate Vines" stamped around the edge of the card, sentiment cut out with a Spellbinders ribbon tag die (I cut off the ribbon slots).  All stamps by Inkylicious.

Hard though it was, I've really enjoyed choosing my five "favourite" stamps and making my cards with them, and thanks for looking at them. There's still plenty of time to enter the Stamping Sensations January Challenge and be in with a chance of winning the fabulous Sizzix dies. We hope to see you there!


Sunday, 5 October 2014

Mists and Mellow Fruitfulness

Although my favourite season is spring, I do love the glorious autumn colours and misty mornings. And evenings, come to that. When I looked outside last night just before bedtime, it was like looking at a fantasy world. The sky was quite clear, but there was a low mist lying over the fields, with just the tops of the trees peeping above it. Lit by the moonlight, it was an eerily beautiful scene. Just wish I could have photographed it, but my camera sadly isn't up to the job. On Friday we had a day and night of torrential rain, quite a shock after such a dry September, and the river here flooded over its banks for the first time in several months. The weather has turned decidedly chilly too, time to break out the winter woollies, methinks!

Anyway, let's warm things up with our October challenge at Stamping Sensations, where we are celebrating the season with a theme of

WARM AUTUMN COLOURS

We would like to see lots of lovely greens, browns, yellows, oranges and reds.

Our sponsor this month is the fabulous Imagination Crafts, who are donating a very generous £35 voucher to the lucky winner.

I've used the Lillies Decoupage Stamp Sets by Imaginations Crafts for my card.

I began by stamping the image with black Brilliance ink and heat embossing it with clear embossing powder. The background was then coloured with Distress inks. I decided to leave the flowers uncoloured so that they would stand out. The Decoupage stamp sets are, obviously, ideal for 3D decoupaging, which would also have given more prominence to the lillies, but as the card was to be posted, I wanted to keep it quite flat.

I matted the image on to a piece of textured green card and layered it with a diecut by Britannia dies on to to the base card, which had been stamped with one of the stamps from the set, in the same Distress ink colours. The same stamp and inks were also used on the tag, along with a sentiment from the set. Some diecut leaves (Cheery Lynn) and autumn-hued threads completed the card.

For some truly gorgeous autumn inspiration, do hop over to see the wonderful projects my talented teamies have posted on the Challenge Blog. Thanks for looking!

Wednesday, 9 April 2014

A Butterfly Stepper Card

Following my win on the Butterfly Challenge, I was thrilled to be invited by Mrs A to make something for a guest DT slot. So here it is. The theme for the challenge is to use a charm on your project (along with a butterfly, of course!). I haven't made many stepper cards before, and the design for this one evolved by trial and error!

Having got the base sorted, I covered it with papers by Prima (Fairy Belle collection) and then simply added various elements to complete the design. The circle & butterfly circle were cut with Nestability dies, the larger butterfly dies are by Cheery Lynn, and the tiny one is a Dovecraft punch. Leaf punch by Leone Em, flowers by Prima. The sentiment was a freebie from Simple Cards & Papercraft magazine. I added some glitter glue to the butterflies, and brads to the flower centres. The little charm says "believe". I've had it in my stash for years, just waiting for the right project to add it to!


I really enjoyed making this project, so thanks, Mrs A for letting me be a guest DT for you!


Friday, 4 April 2014

Spring Butterflies

 It's a Spring theme for the Butterfly Challenge No. 4, so Mrs. A would like to see yellow on our projects. Had to think about this one for a while, as yellow is not a colour I use very often. However, though I don't like bright acid yellows, I do love the spring flowers, such as daffodils and tulips, and I think that the more muted shades of yellow, coupled with fresh spring green, can be very pretty.


I decided to use a technique which I first saw done by Julie Hickey in her book "Flower Power Papercrafts". Julie used punched flowers for her card, but I have used my favourite butterfly dies (by Cheery Lynn) to make the openwork panel. A simple sentiment (Hero Arts) was all that was needed to complete the card.

Here's a closer look at the butterfly panel.


And another view of the card.


The daffodils are all out here now, both in our garden and along the bank across the road from our house. Not much sun in evidence lately though, so the cheery daffs are doing a sterling job of brightening up the view!


Saturday, 15 February 2014

Tissue Box Covers

I saw these pretty tissue box covers, by Angela Barkhouse on the JustRite Stamps blog and thought what lovely gifts they would make.


Angela shares her tutorial for making them on the JustRite blog (see link above), but my tissue box wasn't quite the same size as hers, so I decided to design my own.


They are actually very simple to make. I assembled the box from offcuts of mountboard and covered it with scrapbook paper (K & Co. and Hot Off The Press). I used Nestie dies (Labels 5) to cut the hole in the top and make the side decorations, along with a Cheery Lynn die (the butterfly) and Leone Em punch ( the fern). The sides opposite each other are identical. The top and bottom borders were cut with the Die-namics Scallop Ribbon Border which makes a double sided strip, but I wanted just a narrow border so I cut it in half lengthways.

And that was it done! Easy peasy! The scrapbook papers were some I had had for years, and everything else was offcuts and snippets, so I even managed to use up some more old stash!


It would make a great gift, but I think I might just keep this one! However, I'm entering it in ValeryAnne's inaugural Butterfly Challenge, which began last week and which will be running fortnightly. I really hope it takes off (!), it's the perfect challenge for me!

Thanks for looking.

Sunday, 2 February 2014

Fairy Nuff!

We have a new challenge for you at Stamping Sensations, one which I've really enjoyed making a card for, and I hope you will too! A bit of escapism, just the thing to take our minds off the miserable weather we've been having lately! We'd like you to show us your creations on the theme of

*** WINGS, FANTASY AND FICTION ***

We're thinking butterflies, fairies and mythical or fictional characters here, but you are of course free to interpret the theme however you like.

Our fantastic sponsor this month is Crafty Devils, see the Challenge Blog for details of the prize they have generously donated.

Anyway, on to my card. I bought the Lavinia Stamps Hobbit Home stamp ages ago, but had been waiting for a suitable occasion to use it. It was perfect for this challenge!


All the stamps I've used here are by Lavinia Stamps. As you can see, I partially cut around the door so I could open it, and made a little scene to put behind it. (The tree, hill and birds are hand drawn.)

 Background papers are Bo Bunny "Autumn Song", butterfly and leaf dies by Cheery Lynn, and sentiment by Stampingallday. Circle and scallop circle dies are Nestabilities.


Butterflies and fairies are two of my favourite things, so I can't wait to see all your gorgeous projects! Thanks for looking at mine, and keep those entries coming in!

Monday, 9 December 2013

Calendar

I've seen lots of sticky note holders lately on Pinterest, and I think they're a great idea and make nice little gifts. I wanted to make some with calendars for Christmas presents. This is my own design.

The calendar, photo and sticky note pad are all removable so that they can be replaced. (The little girl's face is obscured in the photo as I didn't have permission from her parents to show it online.) Printed papers are by Provocraft (they must be about 10 years old!) and the butterflies are cut with Cheery Lynn dies. Here's a side view so you can see how it stands up.

Here you can see how the sticky note pad sits in a tray, so that it is easy to remove if required. A loop of tape, glued under the tray, holds the pencil in place.


 And here it is folded up.


This was my prototype, and I want to make a few more. On the others I may change the photo for a stamped or other type of picture, or the butterflies for different embellishments, but the style will remain essentially the same. Am also still in the middle of making Christmas cards. At the moment my desk looks like an explosion in a paper factory......... 

Sunday, 1 September 2013

Poppies

We have some poppy inspiration for our September Challenge at Stamping Sensations! A field of beautiful poppies (Brenda's favourite, of course!).


We'd like you to take inspiration from the photo for your projects, so for instance you could go for the colours, the general scene, or the poppies themselves. I've gone for all of those!

First of all I made the background scene. I hand drew the field and distant hills with watercolour pencils, overstamped the trees and drew the fence. Next I drew in the distant poppies, making them slightly more defined towards the foreground.


The main poppy image was then stamped over the background picture, coloured with Promarkers to make it stand out, and the flower centres dotted in with a black gel pen.


I hand cut a frame with an arch-shaped aperture from white card, drew a black border around it and mounted it over the picture. The whole thing was mounted on to the red patterned background paper, and finally on to an 8" x 8" base card. The frame was decorated with various diecuts, a stamped bee and some little butterflies, and a sentiment. Glitter glue was added to the insects' wings.


The gorgeous poppy stamp is by our lovely sponsor for September, Chloe Endean of Chloe's Creative Cards. Her "Stamps By Chloe" range has something for everyone, including Christmas stamps and a great selection of sentiments. Chloe has very generously donated a super selection of her products worth around £50 for our lucky winner this month!


The Design Team have produced some really lovely samples for you, so do go and have a look at them on the Challenge Blog. We are looking forward to seeing all your poppy-inspired projects!

Here's what I made my card with:

Main poppy image: Poppy Border from Stamps By Chloe. Tree stamps: Crafty Individuals. Bee stamp: Tonic Studios (by Ruth Hamilton). Tiny butterfly stamp and sentiment:  Hobby Art.
Diecuts - Prim Poppy, Chloe Stem, Fuchsia Sprig, all by Memory Box. Leaves (Flourish Leaf Strip) by Cheery Lynn. Sentiment cut out with Spellbinders label die. Background paper from my stash (very old!).

Sunday, 18 August 2013

Marooned on a desert island!

We're half way through this month's Stamping Sensations Challenge, where the theme is Wings & Things With A Touch Of Vintage.


It's my turn to provide the mid-month inspiration, and I've used one of my favourite butterflies, by Prickley Pear Stamps, and coloured it with Distress markers. The doily is a Cheery Lynn die, and the background papers are magazine freebies, the top part being overstamped with a little butterfly from Hobby Art. The portrait is of my Great Grandmother, cut out with a Nestabilities die and mounted on to another Nestie diecut. The sentiment is by JustRite.


Over the next few months the DT members are taking turns to choose 6 crafting items which we would take to a desert island! I had to think long and hard about which items to take to my desert island! I tend to use quite a variety of materials and techniques in my crafting, so trying to choose just six items was very difficult. However, these are what I decided upon:

1) Colouring medium (we are allowed 5 colours). Distress Ink Refills - Salty Ocean, Mustard Seed, Bundled Sage, Picked Raspberry & Shaded Lilac. I've gone for the refills rather than the inkpads as they would be more versatile. I could stamp with them, paint with them in various dilutions, and mix them to make other colours.

2) Craft knife. The one essential item I couldn't be without! I use one daily. It would also be very practical on a desert island, as it could be used for all sorts of things besides crafting! (But please can it include an endless supply of spare blades too, Brenda??!)

3) Metal ruler. Again, an essential item! For measuring, and cutting along with the knife.

4) Water brush. To do my colouring with. Could be used wet or dry.

5) Set of butterfly stamps. Would have to have some butterflies! Don't mind which, as long as they are not cute!

6) Set of permanent ink drawing pens. I'd use my time on the island to learn how to draw! Then I could make a variety of cards, not just butterflies! I could sketch scenes on the island, flowers, etc., do Zentangle, pen and wash pictures, and because the ink would be waterproof, I could write a message and send it off in a bottle for someone to find and rescue me. On the other hand, with the sun, sea and sand, endless time to craft, and no housework, I might just decide to stay there!

It occurs to me that it would be an interesting exercise to see just what we could do with our six items. Thought filed at the back of my mind for future reference!

Along with the above we are allowed 50 sheets of card. I would want them all to be white, as I could colour any I wanted with the Distress ink refills. Hmm. 50 sheets would not last very long. Maybe I'd better be rescued after all!

There's still plenty of time to enter this month's challenge if you haven't already (or you could enter another project - we accept up to three per challenge!) There's more inspiration on the Challenge Blog, so do go over and have a look!