Showing posts with label Penny Black. Show all posts

Friday, 18 October 2019

The Leaves Are Beginning To Turn...

...but there's still plenty of time to enter our October Challenge at Stamping Sensations, where our theme is Trees and/or Leaves and/or Autumn.

This time I've used a stamp by Penny Black. I stamped it with Memento "Desert Sand" ink so I could use the no-line colouring method. I coloured the image with my Arteza coloured pencils. Background paper is by Dovecraft, sentiment by Inkylicious. Silk ribbon and button from my stash.

The challenge runs until 30th October, and my lovely teamies have even more gorgeous inspiration for you over on the Challenge Blog. We have some beautiful entries already; why not add yours and be in with a chance of winning a fab £25 voucher from our sponsor Stamp Addicts. Please just remember, though, that the focal element of your project must be stamped and fit the theme, otherwise it will not be eligible for the prize.

Sunday, 2 October 2016

Autumn Glory


Well, it doesn't seem five minutes since September arrived, and here we are at the start of October! This year is flying by! It means, of course, that it's time for our next challenge at Stamping Sensations, and this month we have one of my favourite themes -

* * * * * AUTUMN GLORY * * * * *

Not my favourite season of the year, as it reminds me that we are getting closer to winter (hate the cold and the long dark nights) but I do love the autumn leaves, trees and colours. So I will be hoping to see lots of those in our challenge entries. As usual, you may interpret the theme however you wish, but please do remember that stamping (rubber, clear or non-pre-coloured digi) must be the focal or predominant element of your project.

Our October sponsor is the wonderful Penny Black, and we have a fab selection of their products for our winner.


Recently I came across Andy Skinner's video showing how to do the alcohol ink float technique. Haven't used my alcohol inks for ages, so I decided to try the technique for my Autumn card. It was very easy to do!

The effect, produced on porous paper or card, is much softer than that obtained by using the inks on non-porous surfaces, and it makes lovely backgrounds. Having made mine, I stamped over it with Inkylicious leaf stamps, which I then coloured with diluted distress inks. Being water based, the DIs didn't affect the alcohol ink background. The next step was to stamp some of the flowers and the butterfly from Penny Black's "Enamor" set, which I also coloured with distress inks. The sentiment is from the same set. 

I added some shading around the leaves, flowers and butterfly with a Spectrum Noir pencil to make them stand out a bit more. The finished picture was then mounted with various layers on to a 7" x 7" card. The patterned paper is by Bo Bunny. A snippet of ribbon, a few punched leaves and a flower button were the finishing touches. I didn't look in my button box for a suitable button until after I had coloured the flowers, and it is a lucky coincidence that I just happened to have one in the same style and colour, which I'd forgotten I had!

I thoroughly enjoyed trying out the technique, and it's one I think I'll be using again. If you'd like to try it too, you can watch Andy's video tutorial here.

 My lovely teamies have some gorgeous projects to inspire you on the Challenge Blog, so do pop over and take a look, and we will look forward to seeing lots of awesome autumn entries!


Sunday, 7 August 2016

August at Stamping Sensations

We're keeping up our easy challenges for the summer months at Stamping Sensations, although up here in the frozen north one might dispute that it's summer! Ok, I exaggerate a bit. Not quite frozen, but a few nights lately have come close. Actually, we did have summer the other week. Just the one day. The temperature on our outside thermometer hit 30C, in the shade, but the next day it reverted to type. Since then it's been cool, grey, wet, misty, with just the odd dry and bright spell. Still, at least the midges haven't been quite so bad as usual here. Always a silver lining!

Anyway, our August Challenge couldn't be easier, since it's

* * * * * ANYTHING GOES * * * * *

So, whatever you like, with the one proviso that as we're a stamping challenge, we need to see stamping - rubber, polymer or digi (not pre-coloured) - as the focal part of your project.

I always find it quite difficult to decide what to do for an "anything goes" theme. Too much choice! So this time I thought I would close my eyes, pull out one of my stamp binders at random (I keep my stamps in A5 ring binders on shelves), and use a stamp or stamps from the first page in the binder. As luck would have it, I picked my Penny Black binder, and the first page contains the "Enamor" set which I bought some time ago but hadn't yet used. Been dying to get the stamps inked up, as they are so pretty, but hadn't had chance. Next question was how to use them.


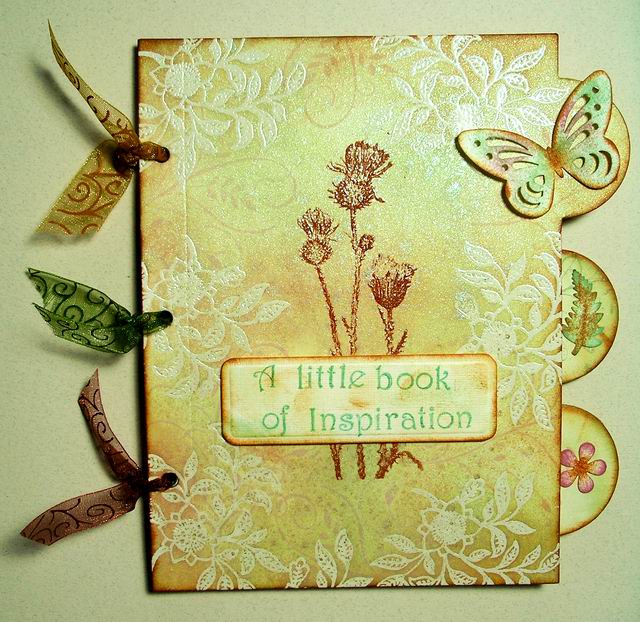
One of my favourite techniques is to stamp with Distress Inks and colour the image by pulling the colour from the image lines with a water brush. However, this time I decided to add a twist. Instead of colouring in, I pulled the colour away from the flower image to make the background, leaving the image itself uncoloured. The butterfly and sentiment are from the same set. I mounted the picture on to a Spellbinders diecut and backed it with patterned paper by Prima. Nice and simple, job done!

Here's the finished card.

I'm hoping to see lots of gorgeous entries this month to brighten up our dull days! And with the prize on offer, there's no reason not to get busy with your projects! Our lovely sponsors for August are Foil Play, who have donated a fantastic £35 voucher to be spent in their online shop. They have a huge selection of items for your cardmaking and crafting, not just foils. What's not to like? So get those entries in and good luck everyone!

Sunday, 6 October 2013

Stamping Sensations October Challenge

We had some wonderful entries for our poppy photo inspiration challenge at Stamping Sensations last month, but for October we are moving from flora to fauna! Our theme for this month is

ALL CREATURES GREAT AND SMALL

Plenty of scope here, I think. Furry, feathered, scaled, creatures of land, sea or air, cute or realistic, the choices are endless.

We have a fantastic sponsor too - the well known and very popular Penny Black, who have donated a super prize.


For my sample I decided to go for something a bit different for a change and made a screen card.


 All the stamps I've used are by Penny Black, and so are the butterfly stickers. The patterned background papers are by Prima, and the flower diecuts are from Memory Box. The border punch at the top is one of my favourites and I've had it for many years, but I've no idea now where it came from. I used Woodware punches to make the little vellum flowers.


I'm sure this will be a popular theme, and I will look forward to seeing lots of lovely entries! Remember you can enter up to three times, combine with other challenges and make whatever type of project you like, as long as it follows our theme. The DT have some absolutely gorgeous samples for you, so don't forget to have a look at them on the Challenge Blog

Monday, 1 August 2011

Stampalot August Challenge

Another "anything goes" theme for Sir Stampalot Challenge this month with

WHATEVER YOU FANCY

I decided to use one of my favourite Penny Black stamps, the poppy, embossed on to an alcohol inked background and coloured with Promarkers. This was then attached over some Papermania background paper with some lace to trim the edges. The sentiment, by The Craft's Meow, was stamped on to a Nestie label.


The prize on offer for August is this fabulous selection of goodies!


So good luck everyone! I'm sorry this is such a short post, but I'm just about to head off up to Scotland to do some house hunting. Wish me luck!

Friday, 6 May 2011

Less is More Week 13

Lucky dip this week at Less is More, with the theme of either Thank You or Congratulations. I'm just scraping in with my entry! I'm very busy at the moment, and haven't had time for much card making, let alone blogging. (I'll get there eventually, I hope!)  My hubby asked me to make him some simple thank you cards to send out after his father's funeral last December, and I haven't blogged them before, so I hope they'll be acceptable.


The first one has a vase of flowers by Penny Black, stamped on a Nestie label, using Versamagic dew drop inks, and attached with foam pads. The sentiment is by Anna Griffin.


The second is even more simple - the same Anna Griffin sentiment inside a frame also by Anna Griffin.


Phew! Just got them in in time! Sorry I haven't had chance to comment this week, but glancing at the thumbnails I can see lots of great entries. I haven't missed a week of LIM so far, and didn't want this to be the first one. Now what will tomorrow's be .........?

Monday, 11 April 2011

Another great Blog Girl Day at Sir Stampalot

This was our third get-together, and it was lovely to see some familiar faces again and some new ones too, especially Lisa Jane, who I'd been looking forward to meeting for ages. As usual, Brenda and Chris had designed some beautiful projects for us to make, and not only that but they had each made us little gifts. A wallet filled with flowers from Brenda, and a butterfly bookmark from Chris. Thanks, both of you, they are gorgeous! Here they are.


Our first make of the day was a twisted easel card, by Chris. I'd never made a twisted easel before, so I was really pleased to learn how to do it. Next was a card by Brenda, featuring a Penny Black stamp (which was the first thing into my shopping basket!) and a flower (made with Tim Holtz Tattered Floral dies) dipped in UTEE using a Meltpot. A fabulous effect, but I don't think I'll be buying a Meltpot. Sally & I reckoned that we could do it by melting some UTEE in a tinfoil dish with a heatgun. Haven't tried it yet, but I'll let you know if it works when I get round to it!


Once again, Brenda and Chris co-ordinated a delicious lunch, to which we all contributed, but the highlight of it had to be Chris's amazing raspberry cheesecake, which didn't last very long!

Hunger pangs banished, we went back to work on two more pretty cards (which I've yet to finish off), and finally a delightful little divided box designed by Chris for holding stamped images waiting to be used, or paper snippets, or recipes, or photos, etc etc. Chris had put Molly Bloom on the front of hers, but not being a fan of cute characters I decided to be different and have a butterfly on mine instead. We made the flowers with the Cuttlebug quilling dies, which are good but very expensive! (They didn't make it into my shopping basket!) A Marianne swirl die completed the decoration.


The day flew by, but we managed to save a bit of time for some retail therapy at the end! Huge thanks to Brenda and Chris (and Janice and Andy) for another fantastic Blog Girl Day. Can't wait for the next one!


Saturday, 5 March 2011

Story of an Ink Pad

Many years ago, I bought the most gorgeous ink pad, I remember not where from. I think it was probably at a show somewhere. It's called "Splendor", a rainbow pad with twelve narrow strips of pigment ink in lovely pastel shades.


As soon as I saw that the challenge for Week 5 of Less is More is to use pastel colours, I knew just which ones I was going to choose. All of them!


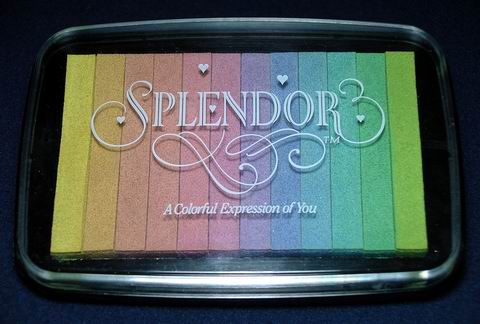
This must be one of the quickest cards I have ever made! I used the ink pad as a stamp and simply pressed it gently down on to the card. I stamped the butterfly (Penny Black) and the sentiment (Clarity Stamp, I think, it was a freebie at a show) and that was it.

The Splendor ink pad was made by Tsukineko. It has been well used over the years, and a few years ago I emailed Tsukineko to ask them what colours I would need to re-ink it, as it doesn't say on the pad what the colours are. Sadly, I never received a reply. I've never seen any similar pads, and I guess they are long discontinued, but I was hoping that their current range of Versacolor inks would have equivalent colours. I could probably guess them, but the shading from one colour to the next is so delicate that I would hate to spoil it by getting the wrong colour.

I've just emailed Tsukineko again, although their website seems to be unavailable at the moment. I haven't heard of any problems with the company, so I will just have to keep my fingers crossed.....


Thursday, 12 August 2010

So that's where my desk is!

The decluttering is going well. Most of my craft stuff is stored in the spare bedroom, as my work room is too small to hold much and still leave room to work in. I can now see the spare room carpet, and the bed! Three bags of rubbish went to the tip (yes, three!). Old magazines and stash I no longer need went to fellow crafters. Strangely, there doesn't seem to be any more room in the cupboards, but at least everything is tidy now and I know where it all is. Not quite finished yet, but enough done to make me feel a lot better.

I have also managed to make a bit of space on my desk, just in time. A friend who has recently had a bereavement asked me to make her a set of thank you cards, and she needed them quickly. So yesterday I made 15 cards, which must be a record for me all in one day! She asked me to deliver them through her letterbox, so not knowing how far they'd have to fall I thought they'd better go in a box to protect them. Didn't have one suitable, so I made one.

The brief was: Irises, shades of lilac/purple, black borders, and MS doily lace punch. Not having time to do lots of colouring, I used a printed picture of irises from the Dreamy Flowers CD by Hinny Bop Designs, and a Penny Black iris stamp. The sentiment is a very old one from Make Your Mark. I covered the box with some wrapping paper bought quite some time ago from Ikea.


My daughter and family are coming to stay overnight tonight on their way back from holiday, and then on Sunday I'm going up to Scotland to stay with them for a few days. After all my hard work of the past few weeks, I'm really looking forward to the break. Not that it will be a rest with my two young grandsons around (aged 5 years and 18 months) but we always have lots of fun. Because they live so far away we don't see nearly enough of them so any time spent with them is precious. They grow up far too quickly.

When I come home, my next job is to make a start on decluttering the kitchen. Hmm.....

Sunday, 6 June 2010

Brilliant Day!

Well, the day finally arrived, and Sally, Megan and I set off to Sir Stampalot for our eagerly anticipated Blog Girl Get-together. It was lovely to be able to put faces to names (and blogs!) and spend the whole day playing, although with all the talking and laughing going on, not to mention eating (at lunchtime a delicious buffet appeared as if by magic!) some of us didn't get quite as much crafting done as we might have!

Brenda and Chris had prepared some wonderful projects for us to make, and since we wanted to try as much as possible, many of them were started and then put carefully aside to finish off at home. Chris's first demo was a really neat little album for recipes, photos, etc, with mini envelopes for pockets, then Brenda showed us how to make a lovely book/album using a new Sizzix Bigz Pro die using distressing and resist techniques. Other projects used brayering, masking and decoupage. I have yet to complete my little photo album, but have just finished the book.


(I used Distress Inks, and stamps by Hero Arts, Penny Black, Magenta, Inkadinakdo, and Crafty Individuals. The flourishes were cut with a die by Marianne Design.)

It was a very warm day, but the atmosphere of fun and camaraderie was even warmer. So to Brenda, Chris, Jules, Linda, Hayley, Rosie, Amanda, Sally and Megan, thanks for your company, and I hope you all enjoyed the day as much as I did. Thanks also to Janice and Andy for keeping the shop open for us to indulge in some retail therapy afterwards (not to mention during as well!) to everyone who contributed to lunch (Jules's heart shaped cheese scones were just to die for!) and huge thanks to Brenda and Chris for teaching us some gorgeous projects and for all their hard work which made the day such a success. Here's to the next time!

Sunday, 28 February 2010

A lovely day out

Yesterday Sally took me for a ride in her new car, destination Peterborough, so we could visit Sir Stampalot's new premises. We met up with Brenda there and had a nice cup of tea and some of Sally's delicious Bran Loaf while we admired the spacious new shop. It was lovely to see Brenda again & chat to her and Janice. Naturally we took the opportunity to spend some money, with some of the gorgeous new Penny Black and Hero Arts stamps being top of my list.

I intended to put them to use today, but in trying to decide where in my crowded craft room to accommodate them, I got sidetracked into re-organising my storage, a job certainly long overdue! I'm still in the process, and it's likely to take me a while longer yet, but hopefully when I've finished I'll actually be able to find things when I want them!

I have a (very!) large number of wood mounted stamps, some of which I've had for many years. A lot haven't been used for a long time, some of them because my style has changed over the years and they no longer suit what I do. They have now been put in a box for sale. (If anyone is  interested in them (Nottingham area), email me for details via the address in my profile!). Others don't get used because they are put away in drawers in another room, and since they're not to hand where I work I tend to forget about them. So I'm going through them and unmounting the ones I really want to use again. It's like rediscovering old friends!

I may not have any pictures to post for a few days (and apologies if I don't get round to looking at everyone's blogs), but I'm hoping that once I've got everything sorted it will give me some fresh inspiration. That's the theory anyway!

Monday, 12 October 2009

Experimenting

I'm still intrigued by the notion that it's possible to create interesting backgrounds by taking colour off rather than putting it on. This time, using the same materials as in my previous post, (Distress Inks and encaustic art card) I wanted to see whether I could make a pattern with the Victoria Cuttlebug embossing folder. I inked up the card as before, and then lightly sprayed the open Victoria folder with plain water on the side with the raised (as opposed to indented) pattern. Then I laid the inked side of the card over the wet side of the folder, closed up the folder, gently smoothed it over and straightaway removed the card before it got too wet. NB. I didn't put it through the Cuttlebug! I blotted it with a piece of kitchen roll and was pleased to see that the pattern had transferred to the card pretty well.

From the patterned card I cut and embossed a Nesties Labels 2. I wanted to put a border around it, but the next size up would have made one too wide. So I coloured around the edge, following the embossed line, with a Promarker instead. Because the lighter areas of the pattern showed through, it gave the effect of a shadow. To complete the card I added a panel of white card embossed with the Victoria folder in the usual way, a few Prima flowers and punched leaves and some sheer ribbon. The sentiment is by Penny Black.

Monday, 13 July 2009

Butterflies 2

As I said in my previous post, the dearth of butterflies in our garden has prompted me to put some on my cards instead.


A fairly simple one to begin with. I didn't want too much to detract from the main image, which is an old Penny Black stamp from 1999, but still one of my favourites. I coloured it with Promarkers (my first attempt with them!)


This one uses an Inkadinkadoo stamp. The butterfly is diecut & mounted with the Cuttlebug, with my Martha Stewart punch for the borders.


Next a set of four Hero Arts patterned butterflies, stamped over My Mind's Eye papers.


Another criss-cross card, using papers from the Butterfly Bliss CD from Graphicus. The stamps are Elusive Images, also from Graphicus, except for the sentiment which is by Rubber Stamp Tapestry. The white butterfly, which appears when the insert is removed, is punched.


Finally, a mini landscape card. I cut a square mask, along with a few butterflies, and then sponged over them with pigment inks to make a background, adding the stamped images (Elusive Images) after removing the butterflies but before removing the square. The result was then cut out and embossed on the Cuttlebug, before being mounted on to a card stamped with more Elusive Images (from the Wild Meadow set). Of the five, I think this is my favourite. I may not have many butterflies in my garden these days, but they'll never be far away from my cards!

Monday, 15 June 2009

Challenging!

Well, here's my entry for Phill's blog candy Challenge. This one certainly exercised my brain! The criteria seemed simple enough, except that no die cutting tools were to be used, although punches were allowed. So no Cuttlebug! Hmmm. It had to be square, use a Penny Black stamp, ribbons and fibres, matting and layering, and spring colours.

It's taken me until now, less than two hours before the deadline, to come up with something that (hopefully!) fits. The base card is one of the BIG 8" squares from Craftwork Cards. The bird is the Penny Black stamp, the tree and blossom are Elusive Images from Graphicus. The flowers are punched from pearlescent paper and overstamped with the polka dots. They have glitter glue centres. The die cut butterfly is also from Craftwork Cards (ie. not cut by me!) and the quote on the left was printed on to acetate via my computer.


The finished card turned out nothing like I had envisaged it to begin with, and it's unlike anything I've done before, but then I guess that's what a challenge is all about!

Tuesday, 5 May 2009

Punch cards

High on my wish list of future purchases is a Martha Stewart border punch. Well, okay, several Martha Stewart border punches. Their attraction for me lies in the crispness and fine detail which most other brands struggle to emulate. Unfortunately, they seem very difficult to get hold of here in the UK, and they are very expensive to order direct from the USA. So until such time as I can find a supplier who isn't going to want a month's wages for one, I thought I'd see whether I could get a similar effect with punches I already have.

All the punches I used are corner punches. The flower one is by Dovecraft, and it comes with removable corner guides, so it is easy to make borders with it also. The other two I have had for a long time and neither has a maker's name on it. The corner guides on these two were fixed, but it is possible to remove such guides by carefully inserting a thin object (I used a metal nail file) and gently pushing them out. I was then able to make borders with them.

The first card uses a background paper by
Crafty Individuals, who also make the flower stamp. The quote is from Penny Black. Each daisy on the label is made from two tiny punched flowers stuck together with the petals offset. I then tinted the tips of the petals with Distress ink. A jewel forms the centre. The label is one of the Spellbinders Ribbon Tags Trio, from Once Upon A Stamp.


The second card also uses stamps from Crafty Individuals, except for the background lettering, which is by Judikins.


I made a background (seen behind the punched border) for the third card by sponging Distress inks on to shiny card and then lifting off some of the colour by dabbing it with a babywipe. The embossing above the border is the Cuttlebug Swiss Dots folder. Above that is a butterfly background paper from PDA Cards and Crafts. The flowers, by Craftwork Cards, are stamped on to a Nestabilities Large Label, again from Once Upon A Stamp. I coloured the label using Distress ink and a brayer. This had the effect of leaving a thin white border around the embossed part of the panel. A ribbon to hide the join and a couple of punched butterflies added the finishing touches.

They may not be Martha Stewart, but I wasn't too unhappy with the results. (Still saving up for a genuine MS though!)