Monday 14 July 2014

The Tree - the sequel!

The Brusho has been put to one side for a moment while I tell you about something far more exciting!

For the background to this story you need to read my earlier posts about The Tree, see here (scroll to end of post) and here.

The Tree is an old beech tree which stands alone on top of a nearby hill. I see it every day from my house. It is quite a landmark, and, tree lover that I am, it has fascinated me ever since we came to live here. I have taken hundreds of photos of it. I don't know how old it is, but it must be quite old. It has been there through all seasons and withstood all weathers, buzzards and crows dwell in its leafy heights, the sheep and cows enjoy its shade and shelter. What a story it would tell if it could speak!

This is the view I see of it from my garden, up on its hill in the distance.

I managed to make one of my photos into a digistamp, but being a stamper at heart, I really wanted it in rubber. Chatting about it with my good friend and fellow Tree lover Sally, it occurred to us that Deby, the lovely lady who owns our favourite stamp company Inkylicious, and who is surely a kindred spirit as there are none of her stamps that we don't like, might be interested in turning my digi into a stamp. So when we saw her at Stamp Magic last month we asked her, and she was!

This is the photo which became my digi.

You can imagine my excitement when I received the stamp this morning! Not only has Deby made the tree into a stamp (and you can see from the photo above how faithfully she has reproduced it), she has also included two buzzards and two sentiments to make up a brilliant set! I love it! Of course, I had to ink it up straight away, and here's the result!

For the first card I wanted to show the image of the tree alongside a photo of it in its setting, so have kept it quite simple, with just some stamped greenery around the edges of the card as a backdrop. (All stamps by Inkylicious, of course!) The background to the tree was lightly coloured using ink dusters and Memento ink.

Back to the Brusho for my second card! I masked a circle for a moon, sprinkled and sprayed the Brusho over, stamped the tree, extended the base to fit the frame with a black pen, stamped the buzzard, and matted it with a black border on to a 7" x 7" card base. I think I will frame this one.

This will be a great design for a man's card. All the men in my family will probably be getting a variation on this theme for their birthdays for the next year!

Well, I have lots more plans for The Tree, but wanted to share these with you just now. I have to say a huge thank you to Deby for my fabulous set. She's a star! And by the way, if anyone else likes it, I think Deby will be putting it on the Inkylicious website in the near future.


Thursday 10 July 2014

Brusho Meadow

On a roll with the Brusho now! This card took about 15 minutes to make!

Sprinkled various colours of Brusho on  to water colour paper, sprayed it with water & blotted it. Stamped over with Crafty Individuals stamps. Mounted it with a narrow black border on to a 6" x 6" blank card. Quick, easy and colourful!

Wednesday 9 July 2014

One layer at the Butterfly Challenge

Challenge No. 10 at the Butterfly Challenge is One Layer. I decided to see whether I could recreate the card in my previous post in a one layer format. It involved a lot of masking! My base was a 7" x 7" blank card.


To begin with, I outlined the main image area very lightly with pencil, so that I could see where to place the masks. I used a waterproof masking film. The first ones went around the outside of the area so that I could stamp and clear emboss the grasses inside. With the masks still in place, I then sprinkled on some Brusho (this time sandstone rather than black, for a change), lightly sprayed it with water and blotted off the excess. The butterfly was then stamped with Versafine ink. As before, all stamps are by Chocolate Baroque.

I removed the outside masks and then masked the main panel instead. Next I stamped the grasses at the edge of the card. By this stage it was looking okay but a bit untidy where a bit of the Brusho had leaked under the mask. The final step was to draw the black frame around the main image with a drawing pen, which covered the untidy edges and pulled everything together.

Looking at the two cards side by side, I don't think this one is quite as crisp looking as the original version and I think I prefer the effect of the black Brusho rather than the sandstone. Perhaps brown ink rather than black would have gone better with the sandstone. However, given the limitations of the one layer format I was quite pleased with it, and it was an interesting exercise to try.

Monday 7 July 2014

More Brusho

Here's another card I made while playing with my Brusho paints (see also my earlier post here).


For this one I embossed the ferns first with Versamark ink and clear embossing powder on watercolour paper before sprinkling with the Brusho powder (I used black only) and lightly spraying with water. The embossing resisted the wet paint. I blotted it with a paper  towel to remove the excess ink. Next I stamped the butterfly, followed by the ferns again, this time with Versafine ink on the right hand side of the card blank. I had considered colouring the butterfly, as on my earlier card, but decided not to as I rather liked the graphic quality of the black and white, with just the hint of colour in the Brusho background. I matted the picture with a thin black border and stuck it to the card. All stamps are by Chocolate Baroque.

In this close up you can see the effect of the Brusho more clearly. It's great stuff to work with. Think I'll be playing with it again before long!


Sunday 6 July 2014

Summer at last!

Just hoping the last two weeks aren't all we're going to get! For once, Scotland seems to have had better weather than the rest of the country but as we start our school holidays this week, I fear things will probably revert to form before long!

Anyway, it's a new month, and at Stamping Sensations we are brightening things up whatever the weather with a theme of

***** SUMMER BLOOMS *****

Garden glories or wildflowers or weeds, we don't care which, just show us flowers galore! But please do remember, as we are a stamping challenge there must be some hand rubber stamping on your project. Entries containing only digital images will not be considered for the prize or top 3.
 
Making a return visit as our sponsor for July is the wonderful Heartfelt Creations, who are generously offering a voucher to the value of $60 to spend in their online store.
 
 
They have asked us to point out that should the prize winner live outside the USA, a charge for postage, packing and shipping will apply.
 
For my card I've taken inspiration from the masses of beautiful wildflowers adorning our hedgerows just now.
 
The background was colour washed with diluted Distress Inks on water colour paper, then various flowers and a couple of butterflies were stamped over. Some of the flowers were coloured with Inktense watercolour pencils. Stamps used were from Lavinia Stamps, Chocolate Baroque and Crafty Individuals. The sentiment is by Inkylicious.
 
Flowers are, of course, one of my favourite topics for cards, so I am really looking forward to seeing lots of lovely entries full of summer blooms! My fabulous teamies have definitely excelled themselves this month with their gorgeous creations, so don't forget to check them out on the Challenge Blog if you are in need of inspiration. Thanks for looking!

Saturday 5 July 2014

Just playing

Woo hoo, it's the school holidays! No work to prepare, nowhere I needed to go, nothing I needed to do for the time being, so I decided it was time for a play!

Recently on Pinterest I've been admiring various artworks (some of which I've pinned on my Bister and Brusho Art board) using something called Bister, or Bistre. Having never heard of it before, I had to investigate! It seems to be popular in The Netherlands, and there are some great examples using it on the Stampinback Blog. I really fancied having a go at something similar, but I don't have any Bister. Then I remembered that, quite some time ago, I bought some Brusho powder paints, although I didn't do much with them at the time. As far as I can tell, Brusho and Bister appear pretty much to be the same kind of product. I'm not quite sure whether to call the Brusho paints or inks, as they behave similarly to both.

Right, I thought, I'll have a go with the Brusho and see whether I can get similar results. The trouble was, I couldn't find them! I knew they must be somewhere in my craft room. So I spent a whole day and a half (yes really!) going through all my stuff with a fine tooth comb, so determined was I to find them. I even looked in cupboards in other rooms in the house, just in case for some strange reason they had migrated elsewhere. By last night they still hadn't turned up, but at least I now have a very tidy craft room!

Anyway, to cut a long story short, I eventually realised there was one box I hadn't looked in, one I keep under my desk. It used to house a mixture of bits and pieces, a microcosm of my stash, if you like, that I could just pick up and take with me if I was going away anywhere. Since we moved up here there are very few occasions now when that would happen, so during my last reorganisation I had put all the bits and pieces away with their fellow bits and pieces and the box underwent a change of use. And, of course, that's where I finally found the Brusho!

It's brilliant stuff. So many different ways it can be used. I won't go into them all just now, but there's lots of info here. For my first card, I sprinkled some Brusho (sparingly - it's very concentrated) over watercolour paper and lightly sprayed it with water. The powder magically turned into paint and spread out over the paper.


I overstamped  it with stamps from Art Journey, Stampinback, Lindsay Mason and Hobby Art and filled in the gap at the side with a Memory Box diecut. I used a white gel pen to add highlights to the flowers.

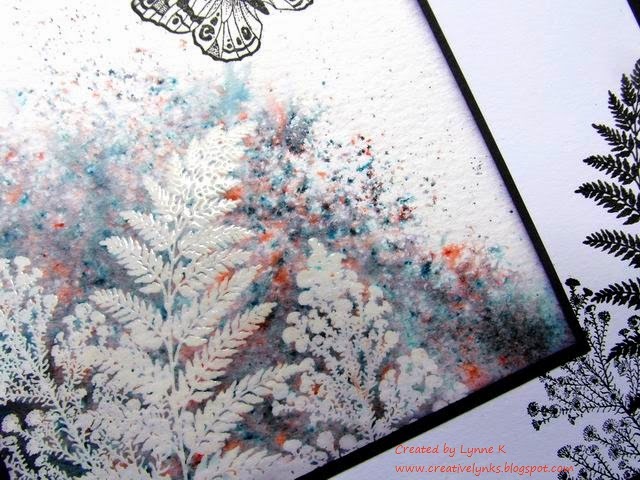
For the second card my method was similar, except that I used plain smooth card instead of watercolour paper and coloured just part of the card with Brusho. The interesting thing here is that I only used black Brusho. When you mix it with water to use as a paint  it comes out black, but as a powder it's a composite of different colours which separate out when you spray it or drop it on to wet paper. The butterfly and grasses are by Inkylicious. I mixed a little turquoise Brusho with water to use as a paint to colour the butterfly.

The third card uses watercolour paper again, but this time I dampened the paper first before sprinkling the Brusho on to it. I stamped the flowers and butterflies (Lavinia Stamps) and painted the flowers as above. Sentiment is by Indigo Blu. Flower border punch by X-Cut.


The fun of the sprinkled backgrounds is seeing how they turn out. No two will be the same. I guess it may be possible with practice to control it a little more, but I'm not sure I'd want to. I like the randomness of it.

I've barely yet scratched the surface of what can be done with Brusho, and I'm sure I'll be doing some more experimenting, so thanks for looking, and watch this space!