Saturday, 5 July 2014

Just playing

Woo hoo, it's the school holidays! No work to prepare, nowhere I needed to go, nothing I needed to do for the time being, so I decided it was time for a play!

Recently on Pinterest I've been admiring various artworks (some of which I've pinned on my Bister and Brusho Art board) using something called Bister, or Bistre. Having never heard of it before, I had to investigate! It seems to be popular in The Netherlands, and there are some great examples using it on the Stampinback Blog. I really fancied having a go at something similar, but I don't have any Bister. Then I remembered that, quite some time ago, I bought some Brusho powder paints, although I didn't do much with them at the time. As far as I can tell, Brusho and Bister appear pretty much to be the same kind of product. I'm not quite sure whether to call the Brusho paints or inks, as they behave similarly to both.

Right, I thought, I'll have a go with the Brusho and see whether I can get similar results. The trouble was, I couldn't find them! I knew they must be somewhere in my craft room. So I spent a whole day and a half (yes really!) going through all my stuff with a fine tooth comb, so determined was I to find them. I even looked in cupboards in other rooms in the house, just in case for some strange reason they had migrated elsewhere. By last night they still hadn't turned up, but at least I now have a very tidy craft room!

Anyway, to cut a long story short, I eventually realised there was one box I hadn't looked in, one I keep under my desk. It used to house a mixture of bits and pieces, a microcosm of my stash, if you like, that I could just pick up and take with me if I was going away anywhere. Since we moved up here there are very few occasions now when that would happen, so during my last reorganisation I had put all the bits and pieces away with their fellow bits and pieces and the box underwent a change of use. And, of course, that's where I finally found the Brusho!

It's brilliant stuff. So many different ways it can be used. I won't go into them all just now, but there's lots of info here. For my first card, I sprinkled some Brusho (sparingly - it's very concentrated) over watercolour paper and lightly sprayed it with water. The powder magically turned into paint and spread out over the paper.


I overstamped  it with stamps from Art Journey, Stampinback, Lindsay Mason and Hobby Art and filled in the gap at the side with a Memory Box diecut. I used a white gel pen to add highlights to the flowers.

For the second card my method was similar, except that I used plain smooth card instead of watercolour paper and coloured just part of the card with Brusho. The interesting thing here is that I only used black Brusho. When you mix it with water to use as a paint  it comes out black, but as a powder it's a composite of different colours which separate out when you spray it or drop it on to wet paper. The butterfly and grasses are by Inkylicious. I mixed a little turquoise Brusho with water to use as a paint to colour the butterfly.

The third card uses watercolour paper again, but this time I dampened the paper first before sprinkling the Brusho on to it. I stamped the flowers and butterflies (Lavinia Stamps) and painted the flowers as above. Sentiment is by Indigo Blu. Flower border punch by X-Cut.


The fun of the sprinkled backgrounds is seeing how they turn out. No two will be the same. I guess it may be possible with practice to control it a little more, but I'm not sure I'd want to. I like the randomness of it.

I've barely yet scratched the surface of what can be done with Brusho, and I'm sure I'll be doing some more experimenting, so thanks for looking, and watch this space!

Sunday, 15 June 2014

Magic Weekend!

Last weekend I made one of my biannual visits back down south for the Stamp Magic show at Doncaster, staying overnight with Sally. The June one is always a flying visit, as it's not during the school hols, unlike the October one, but it's amazing how much we can pack into the weekend.

I wasn't particularly looking forward to the journey down, as thunderstorms and torrential rain had been forecast, but apart from some good downpours along the A66, the rest of the way wasn't too bad and by the time I got to Sally's it had brightened up enough for us to sit out in her garden with a cuppa. The next day dawned warm and sunny, and we were soon on our way to Doncaster. Stamp Magic is definitely our favourite show, just the right size, great selection of exhibitors including many of our favourite companies, and everyone is so friendly and helpful.

Our first port of call was the Inkylicious stand, which usually accounts for the greater part of my show spending. True to form, Deby had some gorgeous new stamps, which soon found their way into my basket. I also stocked up on her silk art card, which is perfect for using with ink dusters, and a few other bits and pieces. For a long time I have debated whether to get a stand for my ink dusters, thinking I would use them a lot more if I had them to hand all the time, instead of put away in a drawer. This time I really wanted one, but having decided on my budget, and being determined to stick to it, it was either the stamps or the stand, and the stamps won. I reasoned that I couldn't make the stamps, but if I put my mind to it, I should be able to make myself a stand. Another factor was that the commercial stands hold eight dusters, and I have nine!

By the time I got home, an idea was beginning to take shape. I scouted around in my craft room for some raw materials. Some offcuts of thick cardboard and a good strong cardboard tube, both which had been in my stash for about a million years. (Well, at least 30, which just goes to prove the value of never throwing away anything which might one day come in handy.)

I also found a sheet of paper (K & Company) with a lovely butterfly design all over it, rolls of self adhesive tin foil, clear self adhesive film and green baize, an old cotton reel and a button.

I cut five circles from the thick card, stuck three together to make a firm base, and the other two for the top. The trickiest part was cutting the slots for the ink dusters to hang in. Once I had all the elements cut to size and shape, I neatened all the edges with the tin foil and then covered the pieces first with the butterfly paper, followed by the clear film for durability. The base was covered with the green baize. I painted the cotton reel and stuck a button on top to hide the hole. Finally, everything was ready to assemble. Some glue seeped out at the bottom when I was joining the base to the cardboard tube, so I stuck a diecut (Spellbinders) round to cover it up. It looks quite pretty, so if anyone asks I'll just say it was part of the original design.

And here's the result.


And here it is with its cargo.


I must admit to being quite pleased with it, not least that it cost only pennies to make, with the added bonus that I've freed up a bit of drawer space and used some old stash too!

It so happens that it fits with the theme for the Butterfly Challenge No. 8, which is "Butterfly Bingo", so I am entering it there. My stand has used the line Die Cut - Butterflies - Designer Paper.

Now to go and put those ink dusters to use ........

Sunday, 1 June 2014

Animal Antics

My goodness, isn't this year flying by! The first of June already, and being a Sunday that means it's time for another challenge at Stamping Sensations. We had a fantastic amount of entries for our anything goes theme last month, and a big thank you to everyone who entered, it was a real treat looking through all your gorgeous projects.

For this month, however, we have narrowed things down a bit, although I think our topic will be equally popular as it is

***** ANIMAL ANTICS *****

We would like to see your depictions of creatures from the animal kingdom.

NB. Please remember that we are a stamping challenge. If you wish your entry to be considered for the prize it must include hand stamped elements. Digital stamps (which are in effect clipart) do not qualify. Sadly there were several entries last month that were ineligible because we could not see any hand stamping on them, so please do make sure that your project includes some hand stamping. You can check out our full challenge rules here 

For our sponsor this month we are delighted to welcome back Crafty Individuals, who are very generously inviting the lucky winner to choose anything from their website up to a value of £35! Besides their fabulous stamps, they also have a gloriously eclectic range of papers, printed images, masks & dies and many other crafting accessories and "must haves", so the winner will truly be spoilt for choice.

I've made two cards for this month. Inspired by the fact that we live next door to a farm, and it is so lovely to be able to watch all the animals out in the fields, I've used some of the gorgeous images from the Crafty Individuals Miniatures Book "Nature's Beauty". and stamps from their "Winter Trees" Elements plate (code CI-209).


My second card is completely different!

Of course, I don't normally do cute, but I couldn't resist the "Max & Whiskers" paper pad by Basic Grey when it came out, as it is just so bright and cheerful. Unfortunately it is now discontinued, so I am hoarding the sheets I have left! Fortunately there are two sheets of each design, so I could use one of the cat backgrounds here! The large cat stamp (Funstamps) has been in my stash for years, and gets an airing every now and then if I have to make a card for a cat lover. I cut and mounted it with Spellbinders Nestabilities dies. The small cats, words, and the cheeky dog in the corner are from a freebie set from Papercraft Inspirations magazine. All the cats were coloured with Promarkers.

Lots of delightful animal antics going on in the DT's samples, so do go and take a look at them on the Challenge Blog. Thanks for looking at mine, and I look forward to seeing yours!

Tuesday, 20 May 2014

Bluebells

This is proving to be an excellent year for bluebells. Indeed, there are some growing on the bank opposite my craft room window.

The photograph was taken one evening last week. The dramatic lighting was accounted for by the fact that the sun, low and bright, was shining over us, but a rainstorm was rapidly approaching.

I was inspired to make a bluebell card for Butterfly Challenge No 7, the theme for which is butterflies and a doily.

I used my Wild Rose Studio bluebell die, and one of the papers from the "Bluebell" paper pack, also by Wild Rose Studio. One of the papers in the pack is a gorgeous all-over bluebell design, which I had thought to use, but it would have overwhelmed the focal elements. Instead I stamped some bluebells and a little butterfly (both Chocolate Baroque) on one of the plainer sheets from the pack, and coloured them with Promarkers. The die-cut butterflies (Cheery Lynn)  and the bluebell diecut were also coloured with Promarkers. The doily is the French Pastry die, again by Cheery Lynn.


I was hoping to give the impression of butterflies fluttering amongst the bluebells, just as they have been doing on the bank outside my window this week, but they are mostly Orange Tips, which I haven't managed to photograph yet as they rarely settle for long. I was able, however, to capture this beautiful song thrush today as it surveyed the garden from its vantage point on the shed roof.


Sunday, 18 May 2014

And the prize is....... !

Time to reveal the gorgeous goodies which will be winging their way to this month's lucky winner at Stamping Sensations!


There's still plenty of time to enter, and as our May theme is "ANYTHING GOES" (as long as it includes some stamping, as we are of course a stamping challenge) it couldn't be easier. The DT have some extra mid-month inspiration for you over on the Challenge Blog, so if you're stuck for ideas, do have a look.

My project is a Post-It Note cover. I really like making these, they make such lovely little gifts.


Hadn't made one in this style before, so I followed Kimberley Crawford's tutorial here. I used Wild Rose Studio papers, and the butterfly stamp, die and sentiment are all by Prickley Pear. I coloured the butterfly with Promarkers.


Think I will have to make some more of these! Thanks for looking!

Monday, 5 May 2014

Glamorous Butterflies

Just flying in by the skin of my teeth with an entry for this fortnight's Butterfly Challenge. The theme is "Glamorous Butterflies", so they have to glitter and sparkle!

I began by spraying the card with diluted Chipped Sapphire Distress Ink, then stamped the flowers and sentiment with the same ink (undiluted). The butterfly was stamped on a separate piece of card and cut out with the matching Hero Arts Framelits die to give a bit of dimension. I used a water brush to draw some of the ink into the flowers and the butterfly for a hint of colour.

 All that remained then was to add the glamour! I tend not to use a lot of shiny stuff on my cards, preferring a subtle sparkle to bags of bling, so I just added a bit of glitter glue to the spots and body of the butterfly and the centres of the flowers. I hope that's enough for Mrs. A! You can see it better in the following detail shots.


The flower and butterfly stamps are by Hero Arts and the sentiment by Stampingallday. Thanks for looking!

Sunday, 4 May 2014

May Challenge at Stamping Sensations

Wow, what a lot of fantastic entries we had for last month's challenge at Stamping Sensations I guessed it would be a popular theme, and I think the same will apply this month, because for May:

*****  ANYTHING GOES  *****

Your project must include some stamping, as we are of course a stamping challenge, but other than that it can be anything you like, on any theme. You can enter up to three times, and combine your entry with any other challenges.


For my card I've used some Crafty Individuals stamps which I bought ages ago but have never inked up until now. I don't know why, as they are really very pretty. Probably just didn't have a suitable occasion to use them. The patterned backing paper is from a recently released Papermania pad called Bellissima, again very pretty in lovely soft shades.

I stamped the main image twice so that I could cut out and decoupage the two hearts. Then I stamped the perfume bottles on a Spellbinders Lacy Circles diecut, having sponged some colour around the inside edge of the diecut with pigment ink.


I added a few glittery highlights here and there with a clear Wink of Stella pen, and some liquid pearls on the "jewels" and in the corners. Other supplies used were a Martha Stewart punch-around-the-page set, a Dovecraft tiny butterfly punch and Promarkers to colour the images.


We're going to keep you guessing for a while as to this month's prize! Rest assured, however, that it will be fabulous as always, and all will be revealed later in the month!


In the meantime, don't forget to check out my lovely teamies' gorgeous samples on the Challenge blog, and we look forward to seeing your entries. Thanks for looking.


Tuesday, 29 April 2014

Baby Cards!

No, not congratulatory notes for newborns. It's the missives themselves that are miniature! I found some cute little 3" x 3" blank cards in The Range the other day and couldn't resist them. I like making things on a miniature scale. I also wanted to try out some new stamps I got recently, from Art Journey and Stampinback, so I decided to see if they and the cards would work together.

The cards are so small that they would be swamped by lots of embellishments. Instead, I opted for one-layer designs. Having first masked a border around each card, I sponged the backgrounds with pigment inks and then, with the masks still in place, stamped over with various meadow/grasses type stamps (mostly by Inkylicious apart from one which I've had for years which has no ID, though several companies now produce the same image in varying sizes).

Next I removed the masks and stamped the main foreground images. The bottom ones in the above picture are by Stampinback, the top ones are by Art Journey. Had to have a butterfly in there somewhere (Justrite), and finished the cards with sentiments by Personal Impressions.

 Here are a couple of them close up.


Having finished the baby cards I thought I would make a larger version. Same details, except that the sentiment is by Hobby Art.

 And here is the big one and a baby one! Cute or what?!


Wednesday, 9 April 2014

A Butterfly Stepper Card

Following my win on the Butterfly Challenge, I was thrilled to be invited by Mrs A to make something for a guest DT slot. So here it is. The theme for the challenge is to use a charm on your project (along with a butterfly, of course!). I haven't made many stepper cards before, and the design for this one evolved by trial and error!

Having got the base sorted, I covered it with papers by Prima (Fairy Belle collection) and then simply added various elements to complete the design. The circle & butterfly circle were cut with Nestability dies, the larger butterfly dies are by Cheery Lynn, and the tiny one is a Dovecraft punch. Leaf punch by Leone Em, flowers by Prima. The sentiment was a freebie from Simple Cards & Papercraft magazine. I added some glitter glue to the butterflies, and brads to the flower centres. The little charm says "believe". I've had it in my stash for years, just waiting for the right project to add it to!


I really enjoyed making this project, so thanks, Mrs A for letting me be a guest DT for you!


Sunday, 6 April 2014

Dies and Punches at Stamping Sensations

For our April Challenge at Stamping Sensations we would like you to show us what you can do with your

***** DIES AND PUNCHES *****

Your project can be anything you like as long as it uses punched and/or diecut elements. And some stamping, of course!

Our fab sponsor this month is once again PDA Card & Craft, who have very generously donated a whopping £40 voucher to be spent either online or in their shop in Langley Mill, which is on the Notts/Derbyshire border.


PDA are well known for their quality cardstock, which they supply in just about every shade and type you could possibly want, but they also sell a huge variety of craft materials, so the winner of this fantastic prize will be spoilt for choice!

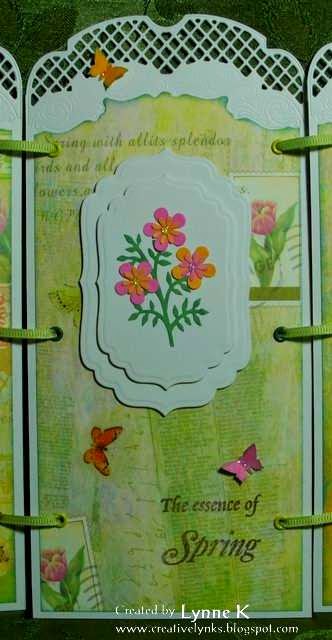
Anyway, on to my project. I've called it "Spring Triptych", and have used both dies and punches.

I began by cutting an A4 sheet of card into three equal pieces and trimming one end of each with the Britannia Dies Small Lattice Edge. While looking through my patterned paper stash, I came across some that I've had for so long I'd forgotten all about it! If I remember correctly it came from Lakeland, when they had a craft section, in a pack with some glittered butterfly and flower stickers. I thought it would be perfect for a Spring project, with its tulips and butterflies, and pretty Spring colours. I traced around the edge of the lattice die to hand cut the paper to fit the top of each panel. (The die only cuts the outer edge.) I didn't want to cover up the paper too much, so I just added some diecut shapes (Spellbinders Labels 4) and some tiny punched butterflies. On the two outer panels I stamped a tulip (Stampin' Up)  and the centre one has some punched flowers and leaves and a sentiment (Inkylicious).


Once each panel was complete, I inserted some eyelets and joined the panels together with narrow ribbon. A spot of glitter glue on the punched butterflies and flower centres provided the finishing touch.

A little aside here! When the trend for diecutting first started, I wasn't interested. I certainly didn't intend to spend a lot of money on something that I might use once or twice and then stick in a cupboard, never again to see the light of day. At the time, I was running a card making class, and some of the members had bought Cuttlebugs. They were soon raving about them, and wanting to use them in the classes. I resisted for a while, but then I discovered Spellbinders dies and was impressed by the effects you could get with them. I gave in and got a 'bug of my own. And promptly fell in love with it! Of course, since then the variety of types and styles of dies has just grown and grown, not to mention that of machines, both manual and electronic. I remain faithful to my 'bug, though. I don't feel any need for larger dies, or electronic cutting. I can do everything I want to with the Cuttlebug, and a great many of my projects contain at least one element produced by it. It has never let me down. I can't see why on earth I would want to trade it in for a smarter model .....


My creative teamies have a gorgeously eclectic selection of samples for you over on the Challenge Blog, so do go over and be inspired. Last month's Pink theme was very popular, and I reckon this one is going to be equally so. I'm really looking forward to seeing lots of entries, so dig out those dies and punches and get cracking! Thanks for looking.

PS. Just realised this also fits the Butterfly Challenge (No. 4), so I'm going to enter it there.