Wednesday, 6 January 2016

Post Christmas play!

Now that Christmas is over, I'm being creative again with Be Creative! Been doing some more experimenting with the alcohol markers, and also tried out the Wonder Tape. The alcohol markers are not yet on the website, but in the meantime you can order them by contacting the shop directly.

My first project of 2016 was a card, on which I used the alcohol markers, a tag, background papers and the Wonder Tape.

I had some foil tape in my stash, bought originally from a DIY shop to make my grandson a Roman spear, for which it worked very well! I thought it might also work well as an embellishment for cards, and wondered whether it would take the ink from the alcohol markers, and as you can see, it did!

The foil is very thin and delicate, so the first task was to stick a length of it on to some card. I found the best way to colour it was to scribble directly on the foil with the markers (I used 3 different colours in light, medium and dark shades) and then to blend the colours by dabbing very lightly (so as not to muddy the colours) with the ink blending tool to which I had added a drop of isopropyl alcohol (you can of course use alcohol ink blending solution if you have it, but you only need a very small amount).

Having coloured the foil I then embossed it with a Cuttlebug embossing folder and stuck it with Wonder Tape to another piece of card which I had coloured with the darkest shade I'd used on the foil. I do like how you can use the pens to make everything co-ordinate. I then trimmed it down to leave a narrow border on each side. The butterflies (Cheery Lynn dies) and sentiment panel were coloured with the markers in the same way as the foil. Sentiment is by Hobby Art.

With the exception of the butterflies, which were fixed with a spot of glue from the Be Creative glue wand, everything else was adhered with the Wonder Tape, which, I have to say, is every bit as good as it is claimed to be! Very easy to use, but you need to be accurate with placing it, as once stuck, it certainly isn't going anywhere else!

For my second project of the New Year I have been back in jewellery making mode, but I'll save that for another post!


Sunday, 3 January 2016

Happy New Challenge!

Happy New Year everyone! Our first challenge of 2016 at Stamping Sensations is a nice easy one for you!

* * * * * ANYTHING GOES WITH A STAMP AND DIE/S * * * * *

You choose the subject, we just need to see one or more diecuts and as always, as we are a stamping challenge, some stamping on your creations.

I seem to recall that one of my crafty resolutions for last year was to try and use up old stash. As you'll see from my project, I'm still trying!
Whether you're like me and have past purchases that need to be employed, or whether you received some lovely new crafty goodies for Christmas which you can't wait to try out, you could put them all to good use by entering our challenge this month! And just in case you need any further persuasion, we have an amazing prize on offer!


Our fab sponsors Tonic Studios have kindly given us the full range of their new colours of NUVO Crystal Drops (which are similar to Liquid Pearls) along with pots of glitters for the very lucky winner! Who wouldn't want to add those to their stash? I could definitely make room for them!

Anyway, on to my card. The weather has been so depressing lately that I decided to make something to remind myself that this dismal season won't last forever!


My stamp is from the "Picture Perfect 2" set, and the sentiment from the "Spring Awakening" set, both by Inkylicious. The main image was framed with Spellbinder dies, the sentiment was hand cut. I coloured the background of the image with Memento inks using Inkylicious Ink Dusters, masking each section of the image in turn.

The tree die (my new favourite die!), which I cut twice, is by Frantic Stamper (available from Once Upon A Stamp). The background is embossed with a Cuttlebug embossing folder.


I finished the design with some ribbon and some tiny leaf embellishments which have been in my stash for years!


The DT have some gorgeous inspiration for you over on the Stamping Sensations Challenge Blog, and remember you can enter up to three times with any type of cards/projects. Good luck!

Sunday, 6 December 2015

Final challenge of the year at Stamping Sensations

We have a nice and easy challenge for you for December at Stamping Sensations! The theme is

* * * * * ANYTHING GOES WITH A STAMP AND RIBBON * * * * *

The subject of your project is entirely up to you, but we need to see a stamp and a ribbon (or ribbons!) somewhere on it. Who doesn't like ribbons?! So useful as pretty embellishments.  And we have a fab ribbon prize this month from our lovely sponsors Crafty Ribbons


And that's not all, as we also have an extra prize of two tickets to the February Hobbycrafts show in Manchester.


Anyway, on to my card, on which I have used stamps by Inkylicious, and ribbons from Crafty Ribbons.

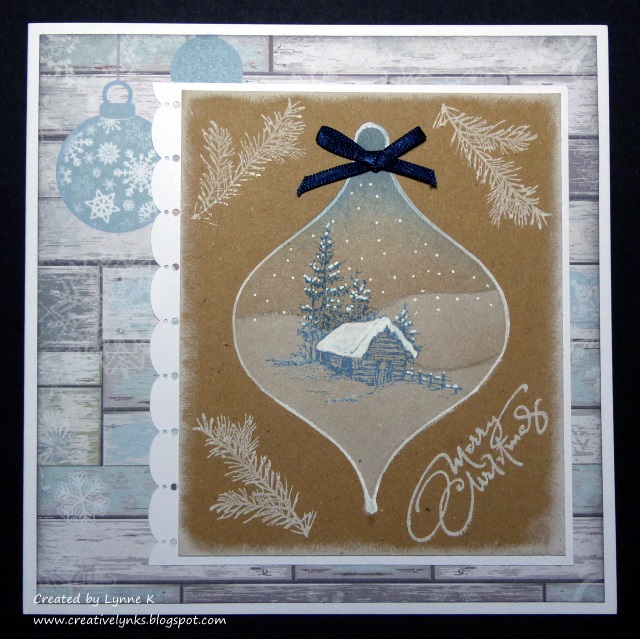
First I cut the bauble with a Spellbinders die, keeping the diecut in the die until I had created the background using Inkylicious ink dusters and mountain and valley stencil. Next I stamped the Winter Cabin. The tiny trees in the background were made using just part of another Inkylicious stamp (from the Winter's Tale set). I inked up only the very top of the tree and stamped it over a torn paper mask. I used a white gel pen to add highlights to the cabin and trees, followed by some Be Creative glitter glue for the star and to define the snow banks.

The bauble was then mounted over some Be Creative DP and Crafty Ribbons grosgrain ribbon, with a bow of narrow satin ribbon to complete it. The deer and tree diecuts are part of a bauble die by Frantic Stamper.

There's plenty of inspiration over on the Stamping Sensations Challenge Blog, and my lovely teamies would really appreciate it if you visited their individual blogs too. We hope you enjoy creating your projects for our December challenge. We can't wait to see them!

Sunday, 29 November 2015

Krafty Christmas!

Well, I managed to make a few Christmas cards at last! At Stamp Magic in October, I loved the cards being demonstrated by Deby from Inkylicious, using kraft card and white pigment ink to create a faux parchment effect. Naturally I had to buy the necessary supplies to have a go at making my own!

I won't go into details of how they are done, as Deby has a brilliant tutorial on her blog, which you will find here. These are the cards I've made so far.

1. Stencils and all stamps: Inkylicious. Border punch: Martha Stewart. DP: Be Creative

2. Stencils and Winter Cabin stamp: Inkylicious. Sentiment: Stamps by Chloe. Corner punch: Fiskars

3. Stencils, Trees & deer stamps: Inkylicious. Sentiment: Stamps By Chloe. Corner stamp: Magazine Freeie (Simply Cards & Papercraft). Border punch: X-Cut. DP: Grafix

4, Winter Cabin stamp: Inkylicious. Tiny snowflake (part of larger stamp) & sentiment: Stamps By Chloe. Corner punch: Dovecraft. Mountain & valley stencil: Inkylicious. Oval stencil cut with Spellbinders die.

5. Winter Cabin stamp, branch stamp & mountain & valley stencil: Inkylicious. Sentiment Stamps by Chloe. DP: Grafix. Circle stencil cut with Spellbinders die.

6. Winter Cabin & branch stamps: Inkylicious. Sentiment: Stamps by Chloe. Oval stencil cut with Spellbinders die.


7, Winter Cabin stamp, branch stamp, bauble stencil & mountain & valley stencil: Inkylicious. Sentiment: Stamps by Chloe. Deer & trees diecuts (cut from a larger die): Frantic Stamper. DP: Be Creative.
For all cards I used ColorBox Frost White pigment ink, Memento die ink and Sakura Gelly Roll white gel pen.

Until I saw Deby's cards, I wasn't really a fan of kraft card, but I really like the effect with this technique. It's also easy to do. I'm definitely a fan of that! Thanks for looking!


Wednesday, 25 November 2015

How shall I colour thee? Let me count the ways!

Here's a card. And before you scroll down to see how I made it, here's a question. How many different types of colouring media do you think I used on it?

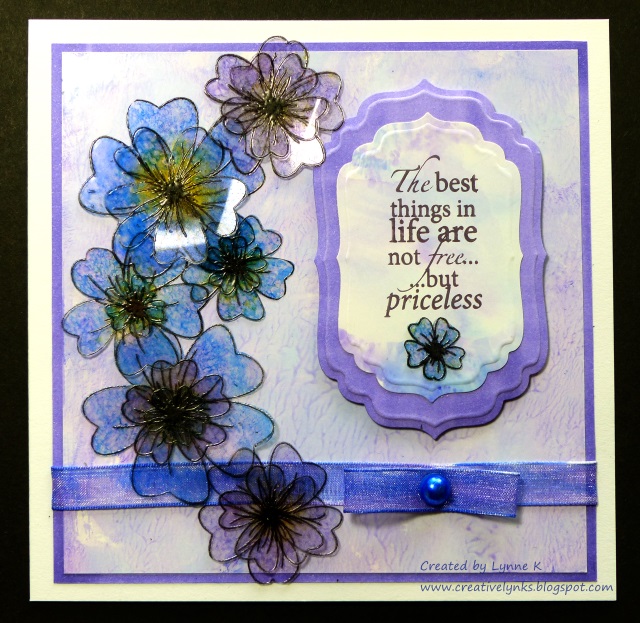
 The answer is just one! I've been having a play with my Be Creative alcohol based markers, and I wanted to see if I could create a card using only those to colour all the various elements. Of course, I had to use a water based ink to stamp the flowers and sentiment otherwise they would have been smudged by the markers, but everything is coloured with the markers.

I stamped the flowers (Honey Doo Crafts) with black Brilliance ink on to heat resistant acetate, embossed them with clear embossing powder and cut them out. I coloured them by attaching a piece of felt to a Be Creative mini ink blending tool, rubbing ink from the markers on to the felt, and then dabbing it on to the flowers.

To make the main background paper, I scribbled some colours on to my glass mat, added a few drops of hand sanitiser and smooshed it around with my finger to swirl the colours together. Then I pressed a piece of shiny card (eg. encaustic art card) over it to transfer the colour. An added bonus, (depending on the brand of sanitiser!) is that your card will smell nice!

The next job was to make the background for the sentiment. Again, I used the glass mat method, but instead of the hand sanitiser I sprayed the colours lightly with isopropyl alcohol to merge them, which gave a smoother result. Alcohol ink blending solution would work well, but I didn't have any, and anyway, isopropyl alcohol is much cheaper. You can buy it from the chemist, but they may have to order it for you, and you may be required to explain to them what you want it for!

SAFETY NOTE! If using either the hand sanitiser or alcohol spray methods, make sure your work area is well ventilated and do not use near naked flames. Also please note I cannot be held responsible for any problem resulting from your use of my methods.

For the outer border and that around the sentiment I simply coloured a piece of ordinary white card with a marker.The ribbon was coloured in the same way using two complimentary colours. Finally I used a marker to colour the self adhesive pearl (Be Creative), stamped the sentiment (Woodware) with Memento ink and diecut it with Spellbinders Label 4 dies.


I hope my experiment shows the versatility of the Be Creative Alcohol Markers, and also that you don't need lots of fancy stash to create something beautiful!

Sunday, 1 November 2015

It's getting nearer.....

.... and I have made hardly any Christmas cards yet! Still, at least I have made a start, with a card for our November theme at Stamping Sensations, which is

* * * * * FESTIVE FLOWERS AND FOLIAGE * * * * *

Can't really go wrong with this one - Christmas roses, holly and ivy, poinsettias, mistletoe, winter jasmine, even amaryllis, snowdrops and more! You may use any materials you choose, from any company. All we ask is that you use a stamp as the main focus of your design.

We are sponsored this month by be Creative!, who very kindly have donated a fantastic prize: a great selection (around £60 worth!) of their products, including papers, glitter glues, blending tools and refills, glue wand, tags, loads of embellishments and, to top it all, one of their fabulous totes to keep everything in!


Be Creative! are a new company, in fact so new that their website is not scheduled to go live until December, but you can check them out on their Facebook page. However, if you can't wait that long to get your hands on their stuff, you can buy it now from Once Upon A Stamp. Only some of the products are on their website, but they are all available from their shop, if you're local to them, or by telephoning your order to them on 01623 818910.

I am very impressed by the Be Creative paper pads. The paper is such good quality, and it's also double sided. I used a sheet from the "Winterland" pad for my card.

To echo the printed trees on the paper, I stamped and cut out a tree (from Stampin' Up's "Lovely As A Tree" set) and affixed it to the card with foam pads. I diecut the poinsettias (Marianne Design) from one of the "Winterland" papers and punched out the fern leaves (Leone Em) from metallic green paper (from my stash). I used a Be Creative glue wand to assemble the poinsettias and fasten them and the fern leaves in place. As the glue wand has a fine ball tip, it is very easy to apply the glue to small, delicate or fiddly items. It sticks really well too! I dotted the centres of the flowers and the stamped tree with glitter glue (also from Be Creative) and finished the design with a sentiment from Personal Impressions.

If, like me, you are still needing inspiration for your Christmas makes, you'll find plenty over on the Stamping Sensations Challenge Blog. Please do visit my teamies' individual blogs too, they would really appreciate it. I look forward to seeing all your lovely Festive Floral creations!

Sunday, 25 October 2015

Paper Bead Bracelet

I do like making paper beads. They are very simple to make and with the vast array of beautiful patterned papers on the market it's easy to find whatever colours or designs you desire. Alternatively, you can, of course, use recycled paper, wrapping paper, magazines, newspaper, etc. or even make them with plain paper and decorate them yourself. Haven't tried that yet but it's on my to-do list!

Having made my easel card the other day using Be Creative papers, I wanted to make a bracelet with the matching papers. Here are the materials I used. (I also used Diamond Glaze to seal the beads, but forgot to put it in the photo!)  The crochet hook, around which the paper is rolled, is size 6.00mm.

The Be Creative paper pads are 8" x 8". For each bead I cut a strip of paper 1cm wide using the full length of the paper. Fortuitously, 8" is just the right length for the type of bead I wanted to make, which was a "Pandora" style bead with metal end pieces. The diameter of the finished bead will also depend on the weight (thickness) of the paper, and again, the Be Creative papers are such that my bead turned out exactly the right size to fit my end pieces, which have a 5mm diameter hole and are basically large eyelets. For different sizes of eyelets you would use a crochet hook (or it could be a knitting needle, or any cylindrical implement)  the diameter of which was 1mm larger than the diameter of the eyelet hole.

I thought it might be fun to see whether I could do a photo tutorial (my first ever!) to show how I made my beads, so here it is!

1. First stretch the paper strip by holding it between your thumb and the crochet hook (wrong side next to the hook) and pulling it through from one end to the other so that the paper starts to curl. This will make it easier to roll, especially when using thicker paper.


 2. Decide which end of your paper strip will form the outside of the finished bead, ie, the end which will still be showing after you've rolled it up. At that end, using your finger nail or (very carefully!) the tip of a craft knife blade, separate the two layers of paper (the Be Creative papers are double sided) and tear off about a centimetre of the inside (or wrong side) layer.


Then, with the wrong side facing you, tear off a tiny piece of the right side (as little as possible so the strip isn't shortened too much). This will prevent a harsh edge on the finished bead. If using thinner paper, Step 2 could be omitted.


3. Begin rolling the paper strip around the crochet hook, keeping it as tight and as even as possible. After the strip has gone round once and met itself, secure the end with a thin layer of glue. You  only need a little. I used the Be Creative Glue Wand. The fine roller ball tip makes precise placement very easy. Make sure you stick the paper just to itself and not to the crochet hook, otherwise it will be very difficult to remove the bead from the hook. I speak from experience! It is important to glue down the inside end so that it will not distort when you insert the end pieces.


4. Continue rolling the paper around the hook. There is no need to use more glue until you get to the end. About a centimetre from the end, stop rolling, add a thin layer of glue making sure the end is covered, and then complete the roll up. You may need to hold it in place for a few seconds until it is stuck.


5. Slide the bead off the hook, and if necessary stand it on its end and gently press down on it with something flat, eg. an acrylic mount, to even it up.


6. Put a small blob of blutack or similar just inside the bead (see photo) to secure it to a cocktail stick.


Seal the bead with a non-yellowing glaze or varnish, eg. Diamond Glaze for a glossy finish, or Ranger Glue n Seal Matte if you prefer a matte finish. Set aside to dry, then repeat with a second coat.


7. Finally, glue an eyelet into place in each end and admire your finished bead!


I needed six paper beads interspersed with various other beads (see first photo) to make my bracelet. Having decided on my design I simply threaded them on to a length of clear stretchy bracelet elastic (from good craft shops or available online, eg. from eBay or Amazon, as are the eyelets) knotted the ends tightly together and tucked them inside a bead. If you're worried about it coming undone, a spot of superglue on the knot should do the trick, but make sure it doesn't touch the beads before it's dry.

My next task was to make a gift box for the bracelet.


The patterned papers I used are all from the same Be Creative paper pad from which I made the beads, also the card in my previous post. Here are some close ups of the details.


 The bracelet being modelled (after some persuasion!) by my grandson, who just happened to be there so he got the job!

Finally a photo of the complete set: bracelet, box and card.

I can definitely see myself making more of these, I think they will make lovely Christmas presents.

The brand new Be Creative website is scheduled to be launched this coming December, but if you can't wait until then, all the products I've used are available now from Once Upon A Stamp. Some of the products are on their website, but others, eg. the paper pads are not yet. However, Once Upon A Stamp will be very happy to take orders for any of the products by telephone. Contact details are on their website.

Anyway, I really enjoyed making my bracelet and doing the tutorial. I hope someone out there may find it useful. Any feedback will be gratefully received, positive or otherwise, especially ideas for how I could improve it, should I ever do another one! Thanks for looking!

Edit: Several people have asked where I got the eyelets from. Here are a few eBay links.

http://www.ebay.co.uk/itm/231260446206?_trksid=p2060353.m1438.l2649&var=530488202265&ssPageName=STRK%3AMEBIDX%3AIT

http://www.ebay.co.uk/itm/111669243791?_trksid=p2060353.m1438.l2649&ssPageName=STRK%3AMEBIDX%3AIT

http://www.ebay.co.uk/itm/291579550145?_trksid=p2060353.m1438.l2649&ssPageName=STRK%3AMEBIDX%3AIT

And from Amazon:

http://www.amazon.co.uk/gp/product/B012N775D2?colid=EHZ5CTBE45YL&coliid=I1ZTOTZ7ZRFWU7&psc=1&ref_=wl_it_dp_o_pC_nS_ttl

http://www.amazon.co.uk/gp/product/B013844P3M?colid=EHZ5CTBE45YL&coliid=I2KWYNGGBACGMP&ref_=wl_it_dp_o_pC_nS_ttl

Thursday, 22 October 2015

New Stash!!

Had a lovely weekend staying with Sally, so we could go to the Be Creative Open Day at Once Upon A Stamp and also the Stamp Magic show in Doncaster. Sally was doing some make & takes for Be Creative, and I endeavoured to assist her, which meant I got to play with some of their lovely new goodies! I'm certainly impressed with the quality of the new range, particularly of the alcohol markers and the paper pads. I was delighted to be asked by Gordon & Justin to make some samples for them, and here is my first card!

I've used both the alcohol pens and some of the papers. The paper pads (8" x 8") are a good weight (180g) and double sided, and the designs are gorgeous. The pens are comfortable to hold, the ink is top quality and they blend beautifully.

I made an easel card, which I covered with two different designs of papers. They are so pretty that I didn't want to cover them up too much. I stamped the large rose (by Woodware) with Memento ink and coloured and shaded it with the alcohol markers. The stamp wasn't made to go with the papers but it could have been, they co-ordinate so well!

I don't have the full range of markers (yet!) but by blending several colours I managed to get the rose to tone with the papers. I found the Blue Grey (code BG5) extremely useful. By shading with it first where I wanted the shadows to be, and then blending over it with other colours, I was able to achieve the depth I wanted. (At least I hope I did!)

Being alcohol based, the markers are very versatile of course. In the new Be Creative range there are some beautiful embellishments, including tags, buttons, pearls and clear gems. No need to buy lots of different colours, they can be coloured with the markers! I tinted some of the gems blue to act as stoppers and scattered a few more randomly on the card. The tag wasn't quite the right colour, being mostly pink and green, so I sponged some Chipped Sapphire Distress Ink over it and then it matched perfectly! A sentiment by Chocolate Baroque, a length of sparkly ribbon and a butterfly cut from one of the papers completed the card. Here's a side view.

The papers are a perfect weight for making paper beads, so I'm thinking a bracelet and gift box to go with the card might be nice. Watch this space!

Sunday, 4 October 2015

Fall in for our latest challenge at Stamping Sensations!

I can't say that autumn is my favourite season of the year (mainly because it's followed by winter!) but it does have aspects that I appreciate, including the misty mornings and mellow fruitfulness. Most of all, though, I like the colours. It's quite strange, as normally I prefer the cooler shades: blues, purples and greens. I think it is the combination of the autumn hues which appeals to me. So this month's theme at Stamping Sensations is right up my street, as it is

qti   AUTUMN COLOURS  tq s

Naturally you can interpret this in any way you like, as long as we can see some stamping as the main element of your project, along with typical autumn shades of green, yellow, orange, brown and red.

Our fab sponsor for October is Foil Play, who have a massive selection of products for card making and crafts, and they have very generously donated a £35 voucher for the lucky winner to spend in their online shop.

The main image on my card is the gorgeous Year Of Stamping Issue 9 - September stamp from Chocolate Baroque.

 I coloured the poppy pods with pencils (for some reason the colours are much brighter in real life than they appear on the photo) and added just a little colour at the top and bottom behind them to give a bit of depth to the background. I used Promarkers on the butterfly to make it stand out. The large poppy pod stamp is also by Chocolate Baroque and the sentiment is by Inkylicious. Leaves die by Cheery Lynn, and the background paper is from the Autumn Song Collection by Bo Bunny. Real poppy pod tops from my garden.

You'll find plenty of autumn inspiration over on the Stamping Sensations Challenge Blog, and my teamies would love it if you would visit their individual blogs too, where you will find all the details of how they created their beautiful projects. I look forward to seeing yours!