Tuesday, 27 March 2012

Get ready for the hop!

Just a quick reminder that this Sunday (April 1st) will be Sir Stampalot Challenge's 2nd birthday, and we'll be celebrating with a Blog Hop!


There'll be lots of fantastic prizes, and lots of fun. It would be great if you could help us spread the word and put the logo in your sidebar. Hope you can come and join in on Sunday. See you there!

Sunday, 18 March 2012

Challenged to Inspire, Part 2

Happy Mothering Sunday, everyone! It's a beautiful morning here, hope the sun is shining for you too. I've just watched a pair of buzzards fly past the kitchen window, and a pair of exceptionally cute baby bunnies are keeping the grass tidy at the back!


Here is the card I made from the second kit which the Stampalot DT were given for this month's "Take Inspiration" Stampalot Challenge. This kit (details of which are on the Challenge Blog) is entitled "A Krafty Affair". I loved these DPs (by My Mind's Eye), which were chosen by Janice, and they and all the items in the kit are available from Sir Stampalot. The papers are double sided, so I took photos to show each side.


I made an easel card, and turned the diecut hinges into posts to hold the bunting, which I cut with Whimsy dies.


I decided I wanted to use the celebrate sentiment, which was a Craft Stamper freebie (I masked off the border which surrounds it), and then searched through my stamps for something suitably celebratory. The only one which seemed to fit the bill was my one and only House Mouse! (Inherited from my late MIL  - as you know, I don't do cute!) The Happy Birthday is by Papermania. The scalloped borders were cut with Nestabilities, and the one around the Happy Birthday was cut by hand.


 Anyway, that's the second part of this month's Challenge. If you haven't entered yet, there's still plenty of time, and Janice has now revealed the prize, which is as stunning as usual!

And I can also let you in on the exciting news that was hinted at earlier. The 1st of April will be Stampalot Challenge's 2nd birthday! It's been a fantastic two years, and the fact that the DT has remained substantially the same since the beginning says a lot about what a great challenge it is, and I'm honoured to be part of such a fab team. However, much of our success is down to Brenda's inspirational leadership and the tremendous amount of work she puts into it. So thanks, Brenda,  and here's to many more Stampalot Challenges. We're going to be celebrating, so don't forget to look in on April 1st and join in the fun!

Sunday, 4 March 2012

Challenged to inspire!

Something a little different for this month's Stampalot Challenge. Brenda sent all the DT members two kits, the brief being to come up with something using the materials in each kit. There were slight variations in the papers and ribbons (although they were all from the same family of items) but each member's kits were substantially the same, so it is fascinating to see how different are the things we made. As an added twist, you will only get to see one project from each of us today, but you will be able to see the second batch of DT work on 18th March, when we will also be sharing a bit of exciting news with you!

Anyway, you obviously want to know what the challenge actually is for you this month! It's simply

                         * Take Inspiration*

We want you to take your inspiration from any of the DT's pieces of work or the kit itself. You can make anything you like and choose where you take your inspiration from........... perhaps some of the kit colours, pearls and swirls, or maybe one of the DT card designs and go with your own colours. All we ask is that you remember to tell us in your post where you took your inspiration from and of course follow the rules at the top of the Challenge Blog.

The first kit we are showing is called "Pearls and Swirls". This is the kit I received. Details of it are on the Challenge Blog. (I inked the edges of the base card before I remembered to take the photo!)


And this is the card I made from it.


I stamped Hero Arts "Old French Writing" stamp over the background paper, and used Memory Box dies to cut the butterfly, and punches for the flowers. The little dots at the top were cut with an ordinary hole punch, and given a bit of dimension by shaping them with an embossing tool.


The prize for this month is........


......... being carefully selected by Janice right now! But you know it will be fabulous, as always!

So go and take a look at the inspiring work by the rest of the team on the Challenge Blog, and don't forget to check back on the 18th of March for Part Two!


Wednesday, 29 February 2012

Just because

It's the first time for ages that I've had chance to make something just for its own sake, rather than for a particular occasion. Some of the ladies at one of the schools I work at are keen to set up a craft club, just amongst themselves to begin with, but with the intention of opening it up to parents and the local community once it gets going. They asked me if I'd like to join them. I said yes, of course!

They hadn't heard of teabag folding, so I made a couple of cards to show them what it is. I used to do a lot of teabag folding at one time, but that was a long time ago. I really enjoyed going back to it. There are many websites which have free papers to download, and one I really like is Derek's Teabag Tiles which has loads of lovely designs. The butterfly papers I've used here are from Derek's.

The first card has the teabag design backed with a Nestie Butterflies Circle.


I love the butterfly circle but it's very difficult to get it out of the die! I found that putting a layer of waxed paper between the die and the paper you're cutting works wonders! The butterfly corner is a punch I've had for years, in fact one of the first punches I ever bought.

The second card uses a simple kite fold, with the same papers from Derek's and a Nestie Lacey Circle. The corner stamp was from Elusive Images (now Chocolate Baroque) and the centre message from Craftwork Cards.


Having made my teabag cards, I started to put my things away and noticed the Butterflies Circle cut from the wax paper, still on my desk. Loth to throw it away I sat and looked at it for a moment, wondering what I could do with it. Then I remembered the faux batik technique. Very carefully so as not to tear it, I crumpled up the circle and smoothed it out again. Then I ironed over it on to a piece of glossy card so that the wax was transferred to the card. Next I brayered over the card with ink from a Big And Juicy inkpad (Spice). The wax resisted the ink and the pattern was revealed.


I finished the card with a banner stamp by Waltzing Mouse, sentiment by Chocolate Baroque and two of the tiny butterfly cutouts from the punched corners.

It feels great to be back crafting again because I want to, rather than because I have to. I had got out of the habit, I think, with all the upheaval of moving house and settling in to a new job, and indeed a new way of life, but I'm pleased to say my enthusiasm is returning. Watch this space!

Sunday, 5 February 2012

In The Garden

You can't see much in our garden at the moment, because it's covered with snow!


That is actually a colour photo! However, underneath the snow, the snowdrops are out, and the daffodil shoots are already well up. The weather since we moved up to Scotland has been quite miserable, on the whole, although we have had a few lovely days too. I doubt we have finished with winter yet, but when the spring bulbs start to appear, they always lift my spirits.

And what better theme for Stampalot's February Challenge than

IN THE GARDEN

Guaranteed to lift everyone's spirits! Here's my take on the subject.

Having rediscovered old stash when sorting out my new room, and realised the extent of it, I decided that I must try and use as much as possible! So - the background for this card is a paper napkin I've had for at least ten years. The stamped image is part of an equally old Hero Arts set, and it and the sentiment (Hobby Art) are stamped and matted on scraps. I have to confess that the butterfly and border dies are new (Memory Box - couldn't resist them) but the ribbon is old! I mounted the butterfly over a scrap of Crafty Individuals background paper which is a bit old!


The Design Team have produced some really beautiful samples this month, so do go over to the Challenge Blog and take a look. And the prize is just as stunning - the most gorgeous selection of garden-themed goodies!
I can't wait to see the entries this month. I'm sure this will be a very popular theme.

Friday, 20 January 2012

A work in progress!

I think this is going to be a long post! The craft room is pretty much done, so I thought I'd show you how it's looking now. Just needs a few finishing touches, and there may be some rearranging done as I see how the layout works, but at long last I have everything to hand and space to work. Space!! What luxury! This was my room in the old house, barely 6 feet by 7 feet.


My stash and equipment were spread over various rooms, and much of it never got used because it took so long to find what I needed. The consequence of that was that I didn't realise just how much stuff I have. Now, with it all in one place, I do! Oo-err!! I think my 6 year old grandson's comment summed it up. "Grandma," he said, "It's like a shop!"

In my defence, I hasten to add that I've been collecting stuff for at least 20 years now, and  there's a lot which I'm very lucky to have been given or inherited. For instance, my mum, bless her, used to make her own duvet covers and various other things, which she trimmed with ribbon or lace. She bought miles of it, far more than she could ever have used in her lifetime, so now I've got it all. I'll probably never use it all either....

Anyway, let me take you on a tour. The new room is 11 feet square. This is how it looked when we first came to view the house.


When I initially moved my stuff into the room, I think the best way to describe it was chaos!


This was my desk at one point. Can't show you a photo of the floor then because you couldn't see it!


The transformation began with phase 1 of the new shelves........


....... which was soon followed by phase 2.


When it came to filling them, well, talk about getting a quart into a pint pot....!


But I did it!


Eventually there will be something to cover the shelves and hide all the clutter,  but I haven't decided what yet. Probably roller blinds.

No longer is my laptop hidden under piles of stuff on the desk.


My unmounted stamps are all neat and tidy in folders, instead of spread around in boxes and bags.


My ink pads are all to hand in smart little drawers.


And this is what I look out on when I sit at my desk.


Which now looks like this! (Although it'll probably never be this tidy again!)


But best of all is the space. Finally I have a room in which I can work comfortably and walk around without having to climb, or fall, over things.

Behold ........... the floor!!!


Sunday, 1 January 2012

Happy New Year! In Monochrome!

Happy 2012 everyone! I hope you all had a great Christmas. My resolution for this year will be to get back to the blogging and blog hopping as often as possible! Thank you to all my lovely blogging friends, who have stuck with me even though I haven't been able to reciprocate. We're still busy getting things sorted in the new house, but I should have a bit more spare time before very much longer. My DH has almost finished the final phase of the shelves in my craft room, and I'm looking forward to being able to get all my stuff organised. Photos will follow in due course!

Anyway, being the first Sunday of the month, it's time for the first Stampalot Challenge of the year. For January, our theme is

Monochromatic

In other words, your entry must use a single colour, though of course variations of that colour from light to dark are fine, as long as they are all of the same colour "tone" (eg. all blue-purple rather than a mixture of blue-purple and pinky purple). I chose Adirondack "Eggplant" dye ink for all the stamping on my card, coloured the ribbon with Promarker "Lilac", and used a dark purple toning paper for the scalloped frame.


All the stamps I've used are by Hero Arts. The dogwood flowers and the butterfly are from a HA Stamp & Die Cut set (Antique Flowers and Butterflies), and I diecut the butterfly to add a bit of dimension. I could have cut out the flowers too, but the card will eventually be posted so I didn't want too much depth. To colour the flowers and butterfly I employed one of my favourite techniques - using a paintbrush and clean water to draw the colour from the stamped image, and just adding a spot more colour picked up from the inkpad where it needed to be a bit darker. The words on the punched circle tag are from an old set called "Conversation Dots", which I keep coming back to every now and then. The corner pieces are also punched. I've distressed various edges with the Adirondack ink.

There will, of course, be the usual fantastic Stampalot Challenge prize up for grabs this month, but for the moment it's a secret!


The lovely Stampalot crew are having a well earned break, but I'm sure they'll reveal the goodies very soon! Anyway, I'm really looking forward to seeing all your monochromatic designs, and if you need any inspiration, just hop over to the Stampalot Challenge Blog and have a look at the DT's gorgeous creations.

I hope 2012 will be a wonderfully crafty year for everyone. I wonder what's going to be the big crafting trend this year.....

Sunday, 4 December 2011

Stampalot December Challenge

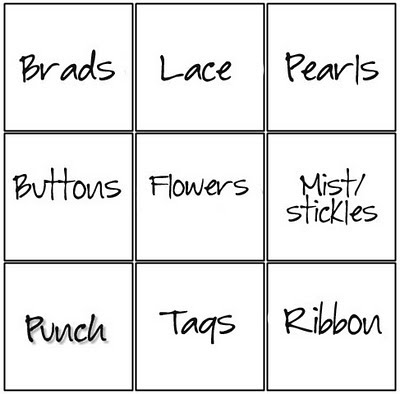
Here we are with the first Sunday in December, and so it's time for the last Stampalot Challenge of the year. This month we're playing Bingo and here's your Bingo Card!


The idea is to select one line (in any direction) from the grid and use those items on your creation and tell us in your post which line you have followed.


For a change, I decided to make a criss-cross card, and I've followed the bottom line : Punch - Tags - Ribbon.

The papers are part of a freebie from Simply Cards & Papercraft magazine. I've used a Fiskars border punch, an unidentified large snowflake and tiny Tonic Studios snowflake punches. The sentiment was also a freebie, from Cardmaking & Papercraft magazine, and I've stamped it on a Nestie Ribbon Tag.


This just happens to be the first Christmas card I've made this year! And so far, the only one! We're still busy sorting out the new house, but slowly getting organised.

Anyway, I'm sure you want to know all about this month's prize! Well, it's a cracker! Who wouldn't want to find these goodies in their Christmas stocking? Janice & Andy have really surpassed themselves this time.

To be in with a chance of winning, just get playing Bingo, and if you need any inspiration, pop over to the Challenge Blog and have a look at the gorgeous creations the DT have made for you. I look forward to seeing yours!

Sunday, 6 November 2011

Changes afoot at Sir Stampalot Challenge, and we've moved in at last!

As from this month, Sir Stampalot Challenge is looking a little different! The starting date of each challenge will now be the first Sunday of the month, (instead of the first day of the month) which means that most months, our challenge will run until the end of the month................unless the first Sunday falls on the first of the month...............but if this all sounds rather complicated, don't worry, as there is list of exact dates on the challenge blog sidebar so you will be able to check when each challenge begins.

Apart from that everything remains the same, fun themes, great prizes from Sir Stampalot, our monthly Top 3 and of course inspiration from the Design Team.

Anyway, on to the theme for November, which is

BLUE & GREEN

The task is to use those two colours on your entry, with a stunning selection of stash for this month's prize!
 

We have now moved into our new house, and are currently unpacking boxes and trying to decide where to put things! I am in the process of organising my new craft room, with many boxes yet to be opened, so I was rather limited in my choice of materials, not to mention desk space, to make my sample this month! I decided on a simple easel card to celebrate our move to Scotland.


The background was coloured with Chipped Sapphire and Bundled Sage Distress Stains, stamps used were by Heritage Rubber Stamp Co. (the  castle) and Chocolate Baroque (thistle). Unfortunately I can't remember where the sentiment is from (may have been a magazine freebie). I stamped it on a Nestie shape. Some tartan ribbon (for which many thanks, Sally!) completed the Scottish look. 

This is what my craft room looked like until yesterday!


Now, however, I have some lovely new shelves, built by my DH, so I will be able to get a bit more organised. This is Phase One, along the back wall!

Phase Two will be similar, along the adjoining wall! More photos to follow in due course!

I am loving being here. It's so peaceful and green (mostly thanks to all the rain we've been having since we got here!) and I keep getting distracted from the sorting out by the wonderful views and the local wildlife. Many varieties of birds, as well as rabbits, a mouse and a stoat, are regular visitors to our garden. Heron and flocks of geese fly over. There have been a few dry days! This was one of them. The view is from our garden.

I even managed to get a picture of the sunrise!

It feels good to be posting on the blog again, and I hope it won't be too long before I can get back to visiting and commenting again. Hope to see you all soon!