Sunday, 28 March 2021

Sneaky Peeks & More Bluebells

Just popping in with a few sneaky peeks for Crafty Individuals' new stamp release, which will be shown this Friday April 2nd on Hochanda (which will be changing its name on Thursday to The Craft Store!) .


The gorgeously quirky images have been designed by the very talented Sharron Bates, and I am sure they will be very popular. I'll be posting a few more sneaky peeks before the big reveal on Friday!

In the meantime, here's another card using the lovely new "Counting Bluebells" from Crafty Individuals, beautifully drawn and designed by the equally talented Jean Hardy. I made it with the remainder of the background piece I created with Pretty Gets Gritty Explosion Powders for the card in my previous post, stamping the image three times directly on to the background (having masked off the parts of the image I didn't want to show) and colouring them with Arteza coloured pencils..

The sentiment is from the "Woodland Words" stamp. Again, I masked the rest of the stamp before inking up just the words I wanted to use, and then die cut them with a Spellbinders die. The bee and butterfly are also by Crafty Individuals.

Hope you will be able to tune in on Friday to see the fab new stamps, at 10.00am and 2.00pm!

Thursday, 25 March 2021

Bluebells

I've been busy making samples for Crafty Individual's next Hochanda show (which will be on April 2nd) so I'm afraid my blog has been a bit neglected. Will be posting sneak peeks very soon, but in the meantime, here's my first play with their beautiful new Bluebell stamp, which they have just released.


I made the background with Pretty Gets Gritty Explosion Powders, which I discovered only recently and I just love them! They are like Brushos with bling! You can just about see a bit of their gorgeous shimmer in the photo. I also used a Tando Creative mini mask "Flourish" which I thought echoed the curve of the flower petals. I painted the bluebells with Radiant Pearls. Remember those? Hadn't used them for many years and was quite prepared to find out when I opened them that they had dried up, but they were still as good as new! I felt very virtuous about having used some old stash. Don't think I made much of a dent in my stock, though!


Friday, 19 February 2021

A Day At The Zoo!

Here are some more of my samples for Crafty Individuals. The new stamps, designed by Ellie Mulligan,  have now been released and will be on their website very soon. All stamps are by Crafty Individuals.

The background for this easel card was made with Distress Oxide inks using blending brushes. I hand cut a stencil for the footprints.


I had some lovely handmade paper in my stash, which I thought would go well with the elephants. I stencilled some hearts on to the background piece (stencil by Bee Crafty) and used the same paper, minus stencilling, to stamp the elephants on. I matted and layered them on to the background with some patterned paper from Crafty Individuals "Wonderfully Weathered 2" set of A5 papers.


Pink again for the flamingo, but this time with a stencil from Lavinia Stamps for the background. The feathers die was a magazine freebie.


Another Distress Oxide background, with a bit of shading on top using Arteza coloured pencils. The giraffe was coloured with Arteza Fineliner pens.


A simple Brusho background for this zebra portrait.


The elephants again! I was playing with some spray inks (Dylusions shimmer sprays and Distress Oxide sprays) and a stencil by That's Crafty (available from Crafty Individuals), and the resulting papers reminded me of Indian fabrics. I thought they would be perfect as a background for the elephants. I stamped them with Versafine Clair ink on Crafty Individuals white satin stamping card and embossed them with clear powder. I carefully coloured them with Arteza Fineliners, and then managed to smudge ink on to the white areas surrounding the image, having forgotten that it wouldn't dry over the embossed parts! What to do? I didn't want to just throw it away as it had taken ages to colour! I suddenly realised that it would be the perfect opportunity to try out my new Posca brush pen with gold ink, which I used to colour over all the white areas. I think it actually enhanced the image. Happy accident! A sentiment from Crafty Individuals CI-464 stamp set, and a little bit of bling, finished off the card nicely.


Hope you have enjoyed this little trip to the zoo! Thanks for looking!

Monday, 8 February 2021

Sneaky Peek No. 2!

Here's another of my samples for Crafty Individual's latest stamps, which will be on Hochanda TV this Friday, 12th February. Or to be precise, two samples, but using the same stamp!


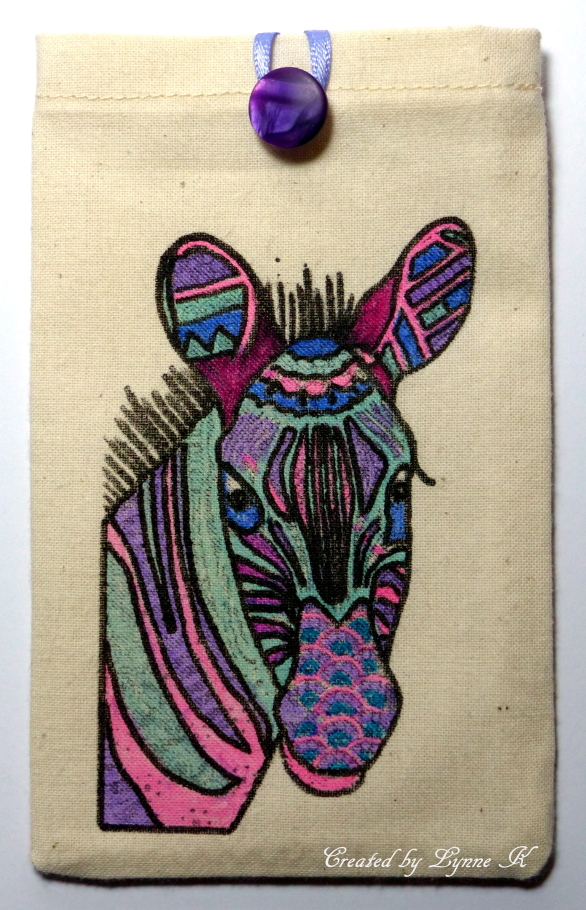
The round thing on the right is a handbag mirror, which was a magazine freebie. I simply stamped and coloured part of the zebra image and cut it to fit the mirror. Then I stamped the image (again, not the full image, as it would have been too big), with Versacraft Ink on to a piece of calico, and heat set it, after which I coloured it with Arteza fabric markers, which also need to be heat set. Then I made it into a pouch for the mirror.A quick and fun little project.


A few more sneaky peeks to come before Friday, so watch  this space!

Saturday, 6 February 2021

The Big Day Approaches!

This Friday, 12th February, Crafty Individuals will be on Hochanda TV for their first shows since I became a Design Team member, and hopefully a few of my samples will be shown! Am excited! The new release features more amazing designs by the very talented Ellie Mulligan, and they are fabulous and a joy to colour.

Here'a sneak peek of one of my cards. 

I made a background with Dylusions spray inks and hand cut leaf stencils. The toucan was stamped 3 times on heat resistant acetate, twice on one side and once on the reverse, so that I could have one toucan looking the opposite way to the others. All three were clear embossed and coloured with permanent markers. They were then mounted over a piece of white card to show up the colours. A few die cut leaves (magazine freebie) and a computer generated sentiment completed the design.

Between now and Friday my fellow DT members will be posting lots of their sneaky peeks on the Crafty Individuals Facebook Group page, so do take a look. And don't miss the Hochanda shows, which will be at 10am and 2pm. You won't be disappointed!

Wednesday, 16 December 2020

An Announcement!

 It was just an ordinary Wednesday afternoon. I'd been making a few Christmas cards, and watching Jean Hardy's Facebook Live on the Crafty Individuals Facebook Page, when my phone pinged. It was a message from Jean, asking me if I would like to join the Crafty Individuals Design Team! It took a few seconds to sink in. What? Who, me?? Really?? Then the excitement set in! Wow! Crafty Individuals was one of the first British stamp companies I bought from, many years ago, and they have always been right up at the top of my list of favourites! To be on their DT would be a dream come true! I was so excited! I thought I'd better ask Jean for some time to think about it, because I didn't want to make a commitment unless I was sure I could fulfil it. Jean said that was fine, so I had a think, and about 5 seconds later messaged her back to say yes please! Did I say I was excited?!!

The next development was the arrival of a parcel of the newest stamps and papers! They are all fabulous (you can find them here) and I was so excited to get to play with them. Did I say I was excited?!!

Here are some of my first makes as a DT member! My favourite of the new stamps, which have all been designed by Sharron Bates, is the wonderful "Of The Sea" (CI-559), which is an old boat with a lovely vintage feel. I thought it would make a suitable subject for pyrography.


I stamped the image with Memento Desert Sand ink on to Cass Art 300gsm hot press watercolour card, a good strong card with the ability to take the heat of the pyrography tool. I then used the tool to outline and shade the image. I overstamped one of the papers from the new "Wonderfully Weathered" Set 1 with some text from CI-397 before mounting the image over the paper. I added a few elements from CI-397, CI-272 and CI-349 to complete the project, which is a free standing plaque. Here's a close up of the lovely old boat.


My next play was with the gorgeous "Flower" CI-560, Sharron's stunning interpretation of a cone flower (aka Echinacea). I decided to make a journal. 


I made front and back covers from mountboard and covered the outside of them with papers from the "Aurora Borealis" A4 background paper set and the insides with one of the designs from a brand new paper set "Vintage Style Journaling Papers". The pages are a mixture of watercolour card and black cartridge paper, as you can just about see in the next photo. The covers and papers were bound together with my Bind-It-All machine.


Next, the flower was stamped on to encaustic art card, clear embossed, watercoloured and covered with Ranger Glossy Accents to seal it. Then alcohol inks were sponged over to make a background. An aperture was cut from a piece of textured card with a die from The Works, the image affixed behind it and then matted on to contrasting card to frame it. This was then adhered to the front of the journal, along with a book plate holder which has been in my stash for years! The wording inside it was computer generated. 


My final show-and-tell for now is the utterly fabulous "Pablo the Penguin" CI-557! I had finished all my Christmas cards, so I made a gift bag instead and put him on that.


I stamped Pablo, various elements from CI-257 and CI-326 and the snowflake (which I think was a freebie) onto fabric with Versacraft ink, which I heat set, and then added colour with Arteza fabric pens, which also needed to be heat set. I fringed the edges of the panel and stitched it to the front of the bag. I was quite happy with the result, but felt it needed just a little something else to finish it off. Had a rummage through my stash and found some tiny bells, which I attached to his antlers. Perfect!

Here he is in all his glory!


I've loved working with these fantastic stamps, and have more ideas for future projects, so thanks for looking, and watch this space!

Tuesday, 3 November 2020

Feathers and Paint

I've been playing with some stunning new stamps from Crafty Individuals,  Dawn Serenity and Dawn Hideaway. They were designed by Sandma, who combined various existing Crafty Individuals stamps to make these gorgeous scenes. They are all beautiful, but my favourite is the kingfisher, not only because they are amazing birds and I love their colours, but also because they were my late father's favourite birds too, and they remind me of him every time I see one.


I made an easel card for the kingfisher. The lake scene behind it was created with masks and Memento dye inks, the distant birds being hand drawn. The foreground grasses and the butterfly were stamped separately, cut out and adhered to the upper part of the card. The kingfisher was likewise stamped and cut out, then coloured with Arteza coloured pencils and fixed to the card with foam pads. A stamped sentiment provided the stopper for the card. All stamps used are by Crafty Individuals. The background papers are from my own photos of peeling paint on some old forestry machinery, which had the most wonderful colours and texture. 


My second card shows the lovely robin.


The background for the scene was created first, again with masks and dye inks, then the robin scene was stamped over it. It was stamped a second time on plain white card, the robin was cut out and coloured and adhered over the top of the first one. The sentiment is also by Crafty Individuals, and the background paper is another of my peeling paint photos.

These stamps have gone straight into my list of all time favourites. There are two more in the series, so watch this space!

Here's a photo of some of the old forestry machinery, which I am reliably informed are ditch diggers!


This is one of the original unedited photos of the paint. I have edited the photos for use as backgrounds.


It was a dull, damp day when I saw the old machinery, and I wasn't expecting to get much in the way of decent photos. However, a closer inspection revealed the possibilities! As well as the rust and peeling paint, various mosses and lichens added even more texture. Just goes to show that even if the bigger picture doesn't look promising, it's always worth checking out the details! 

Thursday, 8 October 2020

Sunsets and Friends

One of the best things about blogging is that I have made some wonderful friends through it. There is a group of five of us who regularly chat online together. We have recently formed a chat group, where we natter about crafting, blogging, putting the world to rights and generally have a good laugh. It's very therapeutic! I had posted some photos I'd taken of some of the stunning sunsets we get where I live, and a discussion took place as to what might be the best ink colours etc. to recreate the scenes on a card. I challenged them each to create a card representing one of the photos, and they all accepted the mission!

These were the photos they had to choose from.


The single tree in the second and fourth photos is a wonderful old beech tree which stands alone on top of the hill and is a local landmark. We can see it from our garden, and quite often get people stopping outside our house to photograph it! A few years ago I turned one of my photos of it into a digistamp, but being a stamper at heart I really wanted it in rubber. I sent the photo to Deby at Inkylicious, knowing that she is a kindred spirit when it comes to trees, and hoping to persuade her to turn it into a stamp, and she did! Not only that, she added a couple of buzzards and a sentiment to make a fabulous set, which you can find here.

Having set the challenge, I thought I should also try and make a card myself. I decided to use the photo with the three trees. As luck would have it, I have a Crafty Individuals stamp (sadly no longer on their website) with three trees on it not too dissimilar to the ones in the photo, so I went with that. The sentiment and leaf stamps are still available.


To see what my lovely friends came up with, please do go and have a look at their blogs. You will certainly not be disappointed, their cards are all absolutely brilliant! They are all super-talented crafters who inspire me every day with their amazing creations, and, even more importantly, with their support and friendship. You'll find them here:


Sunday, 20 September 2020

Just For A Change

Much as I enjoy my card making, which I've been doing for over 30 years now, I do like to pursue other crafts as well. The silver lining in the lockdown cloud has been having more spare time to revisit some of my old favourites and also to try new ones. I've been needle felting for quite some time, but it was only recently that I attempted my very first wet felted picture. I used one of my photos for reference. The scene is Criffel (the hill) viewed from Newbie Barns, on the Solway Firth. 


And here is my felted interpretation of the photo. Had to use a bit of artistic licence for the oystercatchers - there are several in the photo, but you'd need a magnifying glass to see them!


It was a steep learning curve, but I was quite pleased with my first effort. I've also become a big fan of Mum's Makery needle felting templates (designed and produced by the wonderfully talented Samantha Loughlin, owner of Mum's Makery), which make it so easy to produce beautiful felted flowers and other items which are 3D rather than flat pictures. These are a few of my makes with the templates.


The templates can also be used for 2D felting, as with the mushroom in the next picture. The conkers, acorn and berries were made freehand, and the small leaves with mini sugarcraft templates.


The beauty of the templates is that they enable consistency in shape and size of the felted pieces.

I returned to 2D felting for a birthday card which featured a detachable bookmark, with the addition of some hand and machine embroidery over the felting. Having made the bookmark, I used coloured pencils to extend the picture on to the base card.


For anyone who would like to take up a new creative hobby which is easy to learn and doesn't require a lot of expensive materials to get started with, I can definitely recommend needle felting. Check out the Mum's Makery YouTube channel  for loads of brilliant tutorials, and also the fabulous and very supportive Mum's Makery Facebook Group to see what it's all about. As well as deriving great satisfaction from being able to produce the finished articles, I also find the process very therapeutic. Must be all that stabbing..........! 😉


Sunday, 6 September 2020

Summer's End, and September Challenge At Stamping Sensations

 I don't know about where you are, but up here it is definitely beginning to feel like the end of summer. The temperature has dropped, leaves are beginning to turn, blackberries are ripening, the barley field opposite our house has been harvested, ploughed and resown (the local gulls have been very interested!), and the new crop is already sprouting. Over the last couple of weeks we have had just about every type of weather except snow, and including much more rain and wind than is usual for this time of year. I am hoping, though, that there will still be a good few fine days for being outside in the fresh air, whether it be on a walk or just in the garden, before the winter starts to close in.

Which brings me nicely to our theme for this month's Stamping Sensations Challenge, which is 

* * * * * THE GREAT OUTDOORS * * * * *

As the title suggests, we want to see outdoor scenes - countryside, mountains, hills, valleys, lakes, rivers etc. Our usual challenge rules apply, in particular the main element of your project must represent the theme, and must be hand stamped, or a hand coloured digital image. 

Our September winner will receive two A4 stamp sheets from the Rare Earth Illuminated Florals Collection, a prize well worth entering for. Full details are on the Stamping Sensations Challenge Blog.

My Great Outdoors scene uses the majestic stag which is part of the Stag & Hare set from Hobby Art.


I stamped and masked the stag, made the background by sponging pigment inks over hand cut hill and valley stencils, and stamped various other images to complete the scene. All stamps are by Hobby Art.

The inspiration for my card was the beautiful scenery around where I live, though I've taken a bit of artistic licence! We don't have far to travel to be out on the moors and hills. We are sometimes lucky enough to see foxes and roe deer in our immediate vicinity, but we would have to go a bit further afield to see a big red deer stag with its magnificent antlers, such as this one! 

Should you need any inspiration for your Great Outdoors projects, my teamies have plenty of stunning vistas to show you over on the Challenge Blog. We look forward to seeing your entries.

I'll leave you with a few photos that I've taken in or from my garden this week.

"You needn't bother tiptoeing, I'm just resting my eyes."

"Three wings? They're just showing off!"

"Oy, you lot, don't forget your masks!"

"It's ok, lads, I think we've got this social distancing lark sorted."