Showing posts with label Britannia Dies. Show all posts

Sunday, 3 November 2019

Red, Green, Gold

Well, it's that time of the year again, you know, the one where I start to panic because it's November and I have made the grand total of 3 Christmas cards! I start the year with the best of intentions to do a few each month, but somehow that never happens. I do manage to get them done in the end. If only it could be in an atmosphere of calm relaxation instead of a frantic rush ! Oh well, maybe next year.....

Were it not for this month's Stamping Sensations Challenge, my grand total thus far would have been two! However, our November theme is to use

* * * * * TRADITIONAL CHRISTMAS COLOURS * * * * *

and so my sample became Christmas card No. 3!

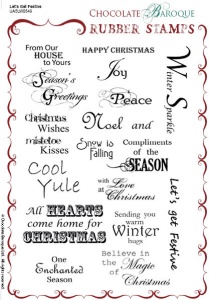
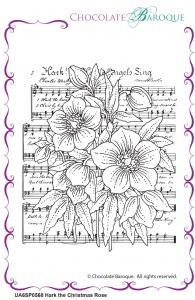
We would like to see your projects in the traditional colours of red, green and gold. You may use any or all of those colours, but the main focal image must be stamped and reflect the theme, otherwise it will not be eligible. This month we are delighted to be sponsored again by Chocolate Baroque, who have very kindly donated these two gorgeous stamp sets for our lucky winner.

         Let's Get Festive Rubber stamp sheet - A5    Hark the Christmas Rose individual unmounted rubber stamp  - A6

I have used the beautiful Christmas rose stamp for my card.

I used the no-line colouring technique, stamping the image with Desert Sand Memento ink, and colouring it with Arteza coloured pencils. I cut it out with a Spellbinders die, sponging a little red pigment ink around the edges before I removed it from the die. I covered the base card with a background paper by Dovecraft, mounted the image to it with foam pads, and added some tartan ribbon, die cut sentiment (Britannia Dies) and holly sprig (magazine freebie) to finish it off.

I love hellebores, they are such elegant flowers, so the Christmas rose is one of my favourite Chocolate Baroque stamps. It's lovely to colour, and in fact I did manage to have quite a relaxing hour or so doing it! Here's another close up.


I must admit to being a bit of a traditionalist when it comes to Christmas, so I am really looking forward to seeing lots of entries in those Christmas colours. I'm sure you won't have any trouble coming up with ideas for this theme, but do go and have a look at my teamies' samples on the Challenge Blog anyway, just to feast your eyes on their loveliness. Meanwhile, I had better make a start on card No. 4........

Sunday, 18 November 2018

Getting there!

Well, I have managed to make a few more Christmas cards!

I'm particularly pleased with this one, because the background is not printed paper, believe it or not, it's stamped! I love tartan and plaid backgrounds, as they are colourful and go with many themes, so when I saw this new stamp set by Concord & 9th, I was delighted! I can now make my own plaid papers in whatever colours I like!

For the topper I've used the Woodware Lino Cut Wren (which I think could also be a robin!) and embellished with poinsettia dies by Marianne Design and pine branch by Britannia Dies. The sentiment is computer generated and cut out with a die by The Works. Stitched circle dies also by The Works.

This card also fits our November challenge at Stamping Sensations, where the theme is "Get Ready For Christmas!" There's still plenty of time to enter. Pop over to the Challenge Blog for all the details.

Now, only another 60 or so Christmas cards to go.............

Sunday, 3 September 2017

Inspiring colours

September already, the nights are fast drawing in and there is a definite autumnal feel in the air up here in rural SW Scotland. Whilst I love to see the autumn colours, I'm not looking forward to the return of the cold and the dark nights of winter, especially after the washout summer we've had. However, it's time for a new challenge at Stamping Sensations, so I am hoping for lots of lovely entries to brighten things up! This month our theme is

* * * * * PHOTO  INSPIRATION * * * * *


You may take your inspiration from the gorgeous colours in the photo, or go floral with the beautiful iris, but as always, your main image/focal point must be stamped if you want your entry to be considered for our prizes or top 3. And we have some lovely prizes for our winners this month, a first prize of stamp sets from Hero Arts, and a second one of lovely ribbons and gems. See the Challenge Blog for full details.

For my card, I've used a stunning Echinacea stamp by Imagination Crafts, sentiment dies by Brittania Dies, Prima flowers, and ribbon and backing papers from my stash.

For even more inspiration, do hop over to the Challenge Blog, where my teamies have some superb samples for your delight. We hope you enjoy our September challenge!

Sunday, 5 October 2014

Mists and Mellow Fruitfulness

Although my favourite season is spring, I do love the glorious autumn colours and misty mornings. And evenings, come to that. When I looked outside last night just before bedtime, it was like looking at a fantasy world. The sky was quite clear, but there was a low mist lying over the fields, with just the tops of the trees peeping above it. Lit by the moonlight, it was an eerily beautiful scene. Just wish I could have photographed it, but my camera sadly isn't up to the job. On Friday we had a day and night of torrential rain, quite a shock after such a dry September, and the river here flooded over its banks for the first time in several months. The weather has turned decidedly chilly too, time to break out the winter woollies, methinks!

Anyway, let's warm things up with our October challenge at Stamping Sensations, where we are celebrating the season with a theme of

WARM AUTUMN COLOURS

We would like to see lots of lovely greens, browns, yellows, oranges and reds.

Our sponsor this month is the fabulous Imagination Crafts, who are donating a very generous £35 voucher to the lucky winner.

I've used the Lillies Decoupage Stamp Sets by Imaginations Crafts for my card.

I began by stamping the image with black Brilliance ink and heat embossing it with clear embossing powder. The background was then coloured with Distress inks. I decided to leave the flowers uncoloured so that they would stand out. The Decoupage stamp sets are, obviously, ideal for 3D decoupaging, which would also have given more prominence to the lillies, but as the card was to be posted, I wanted to keep it quite flat.

I matted the image on to a piece of textured green card and layered it with a diecut by Britannia dies on to to the base card, which had been stamped with one of the stamps from the set, in the same Distress ink colours. The same stamp and inks were also used on the tag, along with a sentiment from the set. Some diecut leaves (Cheery Lynn) and autumn-hued threads completed the card.

For some truly gorgeous autumn inspiration, do hop over to see the wonderful projects my talented teamies have posted on the Challenge Blog. Thanks for looking!

Sunday, 6 April 2014

Dies and Punches at Stamping Sensations

For our April Challenge at Stamping Sensations we would like you to show us what you can do with your

***** DIES AND PUNCHES *****

Your project can be anything you like as long as it uses punched and/or diecut elements. And some stamping, of course!

Our fab sponsor this month is once again PDA Card & Craft, who have very generously donated a whopping £40 voucher to be spent either online or in their shop in Langley Mill, which is on the Notts/Derbyshire border.


PDA are well known for their quality cardstock, which they supply in just about every shade and type you could possibly want, but they also sell a huge variety of craft materials, so the winner of this fantastic prize will be spoilt for choice!

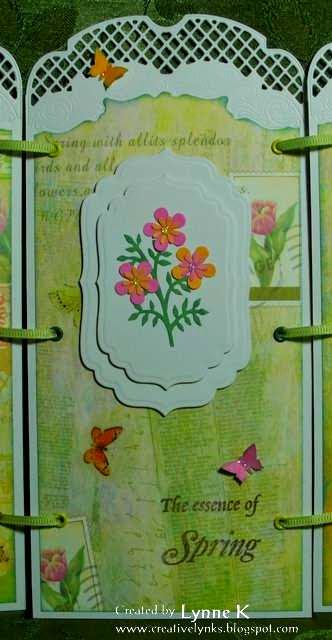
Anyway, on to my project. I've called it "Spring Triptych", and have used both dies and punches.

I began by cutting an A4 sheet of card into three equal pieces and trimming one end of each with the Britannia Dies Small Lattice Edge. While looking through my patterned paper stash, I came across some that I've had for so long I'd forgotten all about it! If I remember correctly it came from Lakeland, when they had a craft section, in a pack with some glittered butterfly and flower stickers. I thought it would be perfect for a Spring project, with its tulips and butterflies, and pretty Spring colours. I traced around the edge of the lattice die to hand cut the paper to fit the top of each panel. (The die only cuts the outer edge.) I didn't want to cover up the paper too much, so I just added some diecut shapes (Spellbinders Labels 4) and some tiny punched butterflies. On the two outer panels I stamped a tulip (Stampin' Up)  and the centre one has some punched flowers and leaves and a sentiment (Inkylicious).


Once each panel was complete, I inserted some eyelets and joined the panels together with narrow ribbon. A spot of glitter glue on the punched butterflies and flower centres provided the finishing touch.

A little aside here! When the trend for diecutting first started, I wasn't interested. I certainly didn't intend to spend a lot of money on something that I might use once or twice and then stick in a cupboard, never again to see the light of day. At the time, I was running a card making class, and some of the members had bought Cuttlebugs. They were soon raving about them, and wanting to use them in the classes. I resisted for a while, but then I discovered Spellbinders dies and was impressed by the effects you could get with them. I gave in and got a 'bug of my own. And promptly fell in love with it! Of course, since then the variety of types and styles of dies has just grown and grown, not to mention that of machines, both manual and electronic. I remain faithful to my 'bug, though. I don't feel any need for larger dies, or electronic cutting. I can do everything I want to with the Cuttlebug, and a great many of my projects contain at least one element produced by it. It has never let me down. I can't see why on earth I would want to trade it in for a smarter model .....


My creative teamies have a gorgeously eclectic selection of samples for you over on the Challenge Blog, so do go over and be inspired. Last month's Pink theme was very popular, and I reckon this one is going to be equally so. I'm really looking forward to seeing lots of entries, so dig out those dies and punches and get cracking! Thanks for looking.

PS. Just realised this also fits the Butterfly Challenge (No. 4), so I'm going to enter it there.

Saturday, 13 July 2013

80 years young

Our choir conductor is a lovely lady who has just celebrated her 80th birthday, though you wouldn't know it to look at her! She doesn't seem a day over 65! I can only wish to have her vitality and joie de vivre when (hopefully!) I get to her age!  I wanted to make her a special card, and this is what I came up with.

 I used a Go Kreate die to cut the components for an easel card, which I covered with papers from Crafty Individuals' Background Papers pad Book 1. The lilac stamp (Toomuchfun Rubber Stamps) is one I've had for nearly 20 years! It was coloured with Promarkers and it and the sentiment (Inkylicious) were cut out with Spellbinders Labels 4 dies. I kept the embellishments quite simple, as I didn't want to cover up too much of the pretty papers.  The butterflies are made with dies by Cheery Lynn, and the flowers with the Small Multi Flower Rose Die by Britannia Dies.

 Here's a closer look at some of the details.


Here's the card in its box.

And here's the box.

The only brief I had for the card was "She likes pink and lilac"! However, I'm pleased to say that she liked it!

Haven't made much else lately. I'm wilting in the hot weather! I suppose we shouldn't complain, but just a few degrees cooler would be lovely! One of the things I've been planning to do in the school hols is reorganise my craft room. My younger grandson (aged 4), who likes to come & do crafty things with me, told me the other day that my craft room needs a good tidy up! (I have a sneaking suspicion that his mum might have said something similar to him about his toys!) However, I must admit he's right. The shelves are all mixed up and things have started to creep on to the floor. Time to make a start, I think.......