Showing posts with label Versamark ink. Show all posts

Sunday, 7 April 2019

Been a bit wet here lately!

This year I think the April showers came along with the March winds! At least, I hope they did, and that we're not going to get them again this month! The river by our house, usually calm and placid, turned into a lake.


Fortunately our house is well above any possible flood level, but it is quite scary to see nonetheless.

February was lovely, much warmer than usual, but March certainly made up for it, and though the daffodils came out a good few weeks early, no doubt spurred on by the warmth of February, they are probably wishing they hadn't, as they are now being battered by the winds, sleet, and hail showers, and shivering in single figure temperatures! And it's only a couple of months until the longest day!

Still, hopefully all that water will be put to good use, which brings me nicely to our theme for our April Challenge at Stamping Sensations, which is

* * * * * APRIL SHOWERS BRING MAY FLOWERS * * * * *

As usual, it is up to you how you interpret this, but the main image of your project must be stamped and relevant to the theme. Please check out our full challenge rules here to ensure your entry is eligible.

Our lovely sponsors this month are Be Creative who are offering a fab £25 voucher for the lucky winner to spend in their online store.

I had a gorgeous new background stamp from Concord & 9th which I was itching to use, and it happened to be perfect for our theme. It's called Lovely Blossoms and is a turnabout stamp. If you've never come across turnabout stamps before, there are many Youtube videos on the subject that are worth watching.

Having stamped and matted the background on to a 6"x 6" base card, I used the emboss resist technique to create the circle element. I stamped all the images with Versamark ink, embossed them with clear powder, and sponged various colours of pigment ink over the top. Wiping away the excess ink with a tissue made the stamping pop. I added a bit of extra colour to the main flowers with brush markers, and the result was nice enough, but didn't quite have the impact I was hoping for. After a few moments thought, I decided to stamp and colour the three large flowers again, cut them out and attach them over the original stamping with sticky pads. That simple addition made a huge difference and gave depth to the picture. It just needed something in the bottom corner to balance the composition. I had a Concord & 9th flower die which was similar to the stamped flowers, so I cut it twice and used the cutouts from one to fill in the other, with a piece of  Card Candi from Craftwork Cards for the flower centre. All stamps by Concord & 9th, except for the raindrops, which was a magazine freebie. Circle dies from The Works. The sentiment is computer generated.

In case you're stuck for ideas, there's some gorgeous inspiration from my teamies over on the Stamping Sensations Challenge Blog. We are looking forward to seeing lots of lovely flowery showery entries!

Sunday, 7 February 2016

Anything Goes for February at Stamping Sensations

It's time for our February Challenge at Stamping Sensations, and we have a free and easy theme of

* * * * * ANYTHING GOES * * * * *

Choice of subject is up to you, but as always, because we are a stamping challenge, we must see a stamped image or sentiment as the focal element of your design if you wish to be considered for the prize or Top 3 place.

Our sponsor this month is the fabulous Visible Image.


It says on their website "Unique designs, awesome stamps" and I would definitely agree with that! If you do too, make sure you enter our February challenge, as Visible Image have donated a very generous £35 voucher for the lucky winner to spend on their site! 

Some of you may remember the song "Colours Of The Wind" from the Disney film Pocahontas. It's a beautiful song which I have used with many of the school choirs and classes I have worked with and they have all loved it. So when I saw the Visible Image stamp set with the same title, I just had to have it! Having said that, being a tree/leaf/nature lover, even without the association it has for me I would still have bought it, as it is such a gorgeous design.

At the Stamp Magic show last October, I watched a demo of Imagination Crafts Starlights paints, and thought the effect obtained with them was stunning. I bought several of the colours, but hadn't got round to using them until now. I thought they would be perfect with the Colours Of The Wind stamp. I stamped the image with Versamark Ink and clear embossed it, to act as a resist. Then I brayered over it with 3 shades of the Starlights paint, which I gently wiped off the image itself with a babywipe to reveal the leaf in all its glory. The small diecut maple leaves (Spellbinders) were painted with the same shades of the paint (Topaz, Turquoise and Dark Orchid). The sentiment was stamped randomly over the base card before the main image was matted on to it, and also on a diecut label (Spellbinders) which was attached to the card with a scrap of ribbon.

On this next photo you can perhaps get a better idea of the lovely shimmer of the Starlights paints.

My teamies have some stunning samples to show you over on the Challenge Blog, and as many of them are also Visible Image fans too, you will not be short of inspiration! However, you do not, of course, have to use Visible Image stamps on your project. The choice of products is entirely yours. We look forward to seeing your creations!

Wednesday, 9 July 2014

One layer at the Butterfly Challenge

Challenge No. 10 at the Butterfly Challenge is One Layer. I decided to see whether I could recreate the card in my previous post in a one layer format. It involved a lot of masking! My base was a 7" x 7" blank card.


To begin with, I outlined the main image area very lightly with pencil, so that I could see where to place the masks. I used a waterproof masking film. The first ones went around the outside of the area so that I could stamp and clear emboss the grasses inside. With the masks still in place, I then sprinkled on some Brusho (this time sandstone rather than black, for a change), lightly sprayed it with water and blotted off the excess. The butterfly was then stamped with Versafine ink. As before, all stamps are by Chocolate Baroque.

I removed the outside masks and then masked the main panel instead. Next I stamped the grasses at the edge of the card. By this stage it was looking okay but a bit untidy where a bit of the Brusho had leaked under the mask. The final step was to draw the black frame around the main image with a drawing pen, which covered the untidy edges and pulled everything together.

Looking at the two cards side by side, I don't think this one is quite as crisp looking as the original version and I think I prefer the effect of the black Brusho rather than the sandstone. Perhaps brown ink rather than black would have gone better with the sandstone. However, given the limitations of the one layer format I was quite pleased with it, and it was an interesting exercise to try.

Monday, 7 July 2014

More Brusho

Here's another card I made while playing with my Brusho paints (see also my earlier post here).


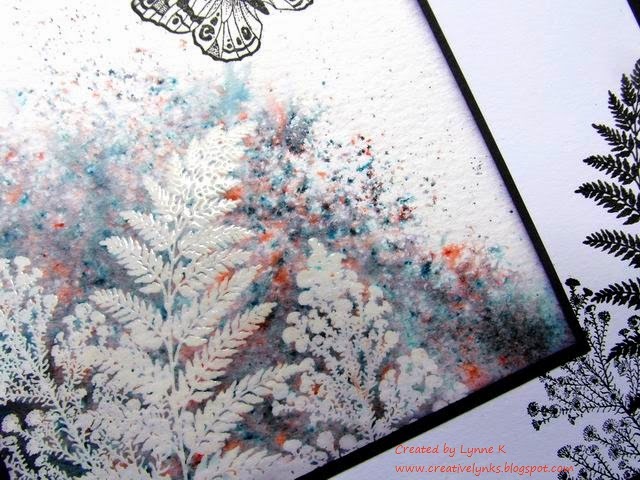
For this one I embossed the ferns first with Versamark ink and clear embossing powder on watercolour paper before sprinkling with the Brusho powder (I used black only) and lightly spraying with water. The embossing resisted the wet paint. I blotted it with a paper  towel to remove the excess ink. Next I stamped the butterfly, followed by the ferns again, this time with Versafine ink on the right hand side of the card blank. I had considered colouring the butterfly, as on my earlier card, but decided not to as I rather liked the graphic quality of the black and white, with just the hint of colour in the Brusho background. I matted the picture with a thin black border and stuck it to the card. All stamps are by Chocolate Baroque.

In this close up you can see the effect of the Brusho more clearly. It's great stuff to work with. Think I'll be playing with it again before long!