Showing posts with label Stampin' Up. Show all posts

Sunday, 4 February 2018

Blooming Marvellous!

Time for our February Challenge at Stamping Sensations, and what better theme to brighten up this cold, gloomy month than

* * * * * ANYTHING WITH FLOWERS * * * * *

I have a feeling this is going to be a very popular topic, and of course, the scope is endless, but please do remember that the main focus of your project must be stamped and must comply with the theme (ie. your creation should be all about the flowers, not just a couple of tiny ones hiding in the background!) if you want it to be eligible for the prizes or top 3.

Our fab sponsor this month is Bee Crafty, who have given us a fantastic £25 voucher for our winner to spend in their online shop. I've used one of their stamps, the Backdrop Frames Splatter Swirl Upright Rectangle for my sample.

 I stamped it directly on to the front of the base card and cut away the inside of the frame. On a separate piece of card I stamped the tulips (Technique Tuesday), coloured them with watercolour pencils, masked them and stamped the text background (Stampin' Up). I then adhered the image behind the frame. The butterflies (Dovecraft) and sentiment (Hobby Art) are also stamped on to the base card.


I love most flowers, and tulips are a particular favourite. My daughter surprised me with this beautiful bunch the other day.

I'm looking forward to seeing lots of lovely flowers in this month's entries, tulips or not! I'm sure you'll have plenty of your own inspiration for your floral projects, but do go and look at my amazing teamies' creations as well, they're absolutely gorgeous! You'll find them here on the Challenge Blog. Let's brighten up this frosty February with some flower power!

Sunday, 1 November 2015

It's getting nearer.....

.... and I have made hardly any Christmas cards yet! Still, at least I have made a start, with a card for our November theme at Stamping Sensations, which is

* * * * * FESTIVE FLOWERS AND FOLIAGE * * * * *

Can't really go wrong with this one - Christmas roses, holly and ivy, poinsettias, mistletoe, winter jasmine, even amaryllis, snowdrops and more! You may use any materials you choose, from any company. All we ask is that you use a stamp as the main focus of your design.

We are sponsored this month by be Creative!, who very kindly have donated a fantastic prize: a great selection (around £60 worth!) of their products, including papers, glitter glues, blending tools and refills, glue wand, tags, loads of embellishments and, to top it all, one of their fabulous totes to keep everything in!


Be Creative! are a new company, in fact so new that their website is not scheduled to go live until December, but you can check them out on their Facebook page. However, if you can't wait that long to get your hands on their stuff, you can buy it now from Once Upon A Stamp. Only some of the products are on their website, but they are all available from their shop, if you're local to them, or by telephoning your order to them on 01623 818910.

I am very impressed by the Be Creative paper pads. The paper is such good quality, and it's also double sided. I used a sheet from the "Winterland" pad for my card.

To echo the printed trees on the paper, I stamped and cut out a tree (from Stampin' Up's "Lovely As A Tree" set) and affixed it to the card with foam pads. I diecut the poinsettias (Marianne Design) from one of the "Winterland" papers and punched out the fern leaves (Leone Em) from metallic green paper (from my stash). I used a Be Creative glue wand to assemble the poinsettias and fasten them and the fern leaves in place. As the glue wand has a fine ball tip, it is very easy to apply the glue to small, delicate or fiddly items. It sticks really well too! I dotted the centres of the flowers and the stamped tree with glitter glue (also from Be Creative) and finished the design with a sentiment from Personal Impressions.

If, like me, you are still needing inspiration for your Christmas makes, you'll find plenty over on the Stamping Sensations Challenge Blog. Please do visit my teamies' individual blogs too, they would really appreciate it. I look forward to seeing all your lovely Festive Floral creations!

Sunday, 1 March 2015

One For The Guys

 Making my sample for our March Challenge at Stamping Sensations was certainly a challenge for me! Our theme for this month is
* * * * * ONE FOR THE GUYS * * * * *

and it is the subject I struggle with the most, being more inclined towards pretty floral or nature motifs than macho masculine stuff !

However, I rose to the challenge and came up with this. I'm on a mission at the moment to revisit some of my oldest stamps, especially those that haven't seen daylight for a long time, in order to justify still giving them houseroom! This lovely Boat Scene (by Stamps Happen, now sadly defunct) was always one of my favourites and I don't know why I haven't used it more often, except that just about all the men in my family have received an example of it at one time or another.

I began by stamping it twice, on white card and a mottled sandy coloured card (another ancient item of stash!). I cut the framed part out of the sandy card, lined it up with the image on the white card, fixed them together and then coloured the whole image with Spectrum Noir pencils. I stamped the birds (Stampin' Up) at the bottom and finally used an old toothbrush to flick various shades of watercolour paint all over the card.

We have a lovely new sponsor for March!  Foil Play have "an extensive choice of over 11,000 products to help you to create beautiful and enjoyable craft projects, including a huge selection of rub on foils, ultra fine glitters, toppers, die cut and traditional decoupage".No minimum order is required, and postage is free if you spend over £10. They are offering the lucky winner a whopping £35 voucher to spend in their online store.

We've had some fantastic entries for our last few challenges, and I'm sure this one is going to be no exception. I'm really looking forward to seeing lots of projects for the men (or boys)! Should you need any inspiration, pop over to the Challenge Blog, where my brilliant teamies have some great stuff to show you. Good luck, everyone, and thanks for looking.

Sunday, 18 January 2015

Five Favourite Stamps!

Our current mid-month challenge for the DT at Stamping Sensations is to choose our five favourite stamps and make something using some or all of them. This month it's my turn. Five stamps??! I have hundreds, if not thousands of stamps in my collection! How can I possibly choose just five favourites?! If I were to think in terms of favourite stamps, it would probably be my newest, or whatever I happened to be working with at the time. However, let's try and narrow it down a bit.

My favourite topics are nature themed - trees, butterflies, flowers, grasses, country scenes, etc.  so my preferred stamps are likely to come from those categories. I could pick any of Chocolate Baroque's flowers or butterflies, for instance, or just about anything at all by Inkylicious. I tried to make a shortlist, but by the time I was on to the third A4 sheet (of narrow-lined paper!) I gave up!

In the end I decided to think about which stamps I find myself reaching for most often and have selected five of those. That was today. Tomorrow it could well be a different five!

Anyway, here's what I've made. As well as the stamps, three of my cards also use diecuts, to reflect this month's challenge theme of Dies and Punches. Don't get me started on favourite dies.....!

My first card uses one of my oldest stamps, a butterfly by Hero Arts. The original is wood mounted, since then I have also acquired the later clear and cling versions! To me it's just the perfect butterfly, both in shape and in scope for colouring.

Backing paper  - Docrafts Papermania, diecuts - Spellbinders, music stamp - Stampington, sentiment - Technique Tuesday, butterfly coloured with watercolour pencils and cut out by hand.

Next another oldie, by Funstamps, bought over 20 years ago in 1994! I still often use this anemone stamp as its fine lines and open areas make it ideal for one of my favourite techniques; using a waterbrush to draw the ink out of the stamped image to colour it in, as I have done here.

Backing paper - Prima, circle die - Joycrafts, border die - Die-namics, butterfly die - Cheery Lynn, sentiment - Prickley Pear, image stamped with Distress Inks.

My third stamp is probably in danger of becoming worn out, I have used it so often! It makes a regular appearance not just on Christmas cards, but all year round, although sometimes you wouldn't recognise it as it can make excellent little bushes or shrubs when turned on its side. The background tree group is from the same set, and I almost chose that stamp as my favourite instead of the single tree. But I think I've used the single one more.

Both tree stamps are from the "Lovely As A Tree" set by Stampin' Up, Sentiment by Inkylicious. I used a Spellbinder die as a mask to make the background, along with my Inkylicious Ink Dusters and Mountain Valley Stencil, and Memento inks.

My final two choices are both by Inkylicious. It was really hard just to pick two of theirs, as I love ALL their nature stamps. Stamp No. 4 is a fairly new one, which combines trees and grasses into a scene but which can have different looks according to how the background is done, so it was high on my list.


Again, I used an Inkylicious Mountain Valley Stencil along with the ink dusters and Memento Inks to make the background before stamping the image. The pheasant is by Clarity Stamp, and it was cut out and added afterwards.

Finally, Stamp No. 5. I've saved the best till last! You probably won't be surprised to find that this one was top of my list right from the start, and if I had to choose my single most favourite stamp ever, this would be it! It is, of course, the Old Beech Tree - "my" tree, (not really mine, sadly, but I see it every day across the fields from my house), which Deby at Inkylicious so cleverly made into a stamp for me.

I used a Spellbinders die as a mask to make the ink dusted background, cut it out with the same die and adhered it to the card with foam pads. "Delicate Vines" stamped around the edge of the card, sentiment cut out with a Spellbinders ribbon tag die (I cut off the ribbon slots).  All stamps by Inkylicious.

Hard though it was, I've really enjoyed choosing my five "favourite" stamps and making my cards with them, and thanks for looking at them. There's still plenty of time to enter the Stamping Sensations January Challenge and be in with a chance of winning the fabulous Sizzix dies. We hope to see you there!


Sunday, 6 April 2014

Dies and Punches at Stamping Sensations

For our April Challenge at Stamping Sensations we would like you to show us what you can do with your

***** DIES AND PUNCHES *****

Your project can be anything you like as long as it uses punched and/or diecut elements. And some stamping, of course!

Our fab sponsor this month is once again PDA Card & Craft, who have very generously donated a whopping £40 voucher to be spent either online or in their shop in Langley Mill, which is on the Notts/Derbyshire border.


PDA are well known for their quality cardstock, which they supply in just about every shade and type you could possibly want, but they also sell a huge variety of craft materials, so the winner of this fantastic prize will be spoilt for choice!

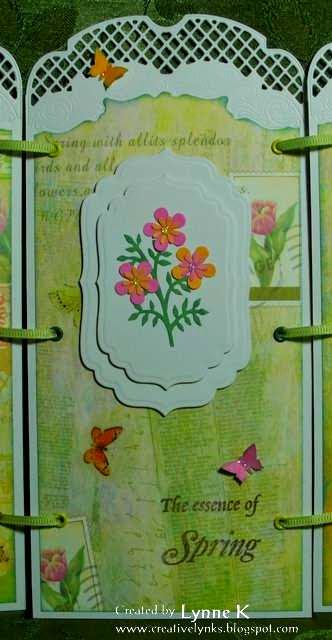
Anyway, on to my project. I've called it "Spring Triptych", and have used both dies and punches.

I began by cutting an A4 sheet of card into three equal pieces and trimming one end of each with the Britannia Dies Small Lattice Edge. While looking through my patterned paper stash, I came across some that I've had for so long I'd forgotten all about it! If I remember correctly it came from Lakeland, when they had a craft section, in a pack with some glittered butterfly and flower stickers. I thought it would be perfect for a Spring project, with its tulips and butterflies, and pretty Spring colours. I traced around the edge of the lattice die to hand cut the paper to fit the top of each panel. (The die only cuts the outer edge.) I didn't want to cover up the paper too much, so I just added some diecut shapes (Spellbinders Labels 4) and some tiny punched butterflies. On the two outer panels I stamped a tulip (Stampin' Up)  and the centre one has some punched flowers and leaves and a sentiment (Inkylicious).


Once each panel was complete, I inserted some eyelets and joined the panels together with narrow ribbon. A spot of glitter glue on the punched butterflies and flower centres provided the finishing touch.

A little aside here! When the trend for diecutting first started, I wasn't interested. I certainly didn't intend to spend a lot of money on something that I might use once or twice and then stick in a cupboard, never again to see the light of day. At the time, I was running a card making class, and some of the members had bought Cuttlebugs. They were soon raving about them, and wanting to use them in the classes. I resisted for a while, but then I discovered Spellbinders dies and was impressed by the effects you could get with them. I gave in and got a 'bug of my own. And promptly fell in love with it! Of course, since then the variety of types and styles of dies has just grown and grown, not to mention that of machines, both manual and electronic. I remain faithful to my 'bug, though. I don't feel any need for larger dies, or electronic cutting. I can do everything I want to with the Cuttlebug, and a great many of my projects contain at least one element produced by it. It has never let me down. I can't see why on earth I would want to trade it in for a smarter model .....


My creative teamies have a gorgeously eclectic selection of samples for you over on the Challenge Blog, so do go over and be inspired. Last month's Pink theme was very popular, and I reckon this one is going to be equally so. I'm really looking forward to seeing lots of entries, so dig out those dies and punches and get cracking! Thanks for looking.

PS. Just realised this also fits the Butterfly Challenge (No. 4), so I'm going to enter it there.

Friday, 21 March 2014

Butterflies and Stitches

Here's my entry for the Butterfly Challenge No. 3, which requires some stitching on your project.

I've stitched the centre panel on to a panel embossed with the Stampin' Up Tulip embossing folder. Papers are by Wildrose Studio and the sentiment is by Chocolate Baroque. Butterfly Punch origin unknown.

And here's a closer view of the details:

Thanks for looking!

Sunday, 2 June 2013

Summer Blooms

There can't be many people who don't like flowers, so I think our June Challenge at Stamping Sensations will be very popular! The theme is

SUMMER BLOOMS

We have a wonderful sponsor this month too - Heartfelt Creations, who have given us a gorgeous prize. Some lovely floral stamps and a set of matching dies.


I decided to make a tag for a change, and have chosen a Dutch Iris as my summer bloom. The matching stamp and die sets are by Heartfelt Creations. (They don't appear to be on their web site now, but there may be some shops which have them in stock still).


Irises were my late mother-in-law's favourite flowers. She had them in her garden in various colours, one of which was a gorgeous deep purply pink. For the background to my tag (which is from Inkylicious), I used a technique shown by Andy Skinner in a video on his blog. He calls it Alcohol Ink Floating Background. Very easy to do, and a lovely subtle marbled effect. I overstamped it with a Texture Fragment stamp and a Floral Edge stamp, both from Chocolate Baroque, and a text stamp by Stampin' Up. The little butterflies are also by Chocolate Baroque, and they and the iris were coloured with Derwent Inktense pencils (which I found at Dunelm Mill last week for half price - a bargain - and I love them!). Having sponged ink around the edges of the tag, I matted it on some green card and finished it off with a sentiment by Hobby Art, some ribbons and fibres and a bit of lace. 

My talented teamies have some bloomin' gorgeous samples for you this month! Do go over to the Challenge Blog and have a look at them, and then show us your summery projects. We can't wait to see them!

Sunday, 17 February 2013

Been playing.....

....with my new Gelli Plate! It's rare these days that I have time just to play and experiment, but I've been itching to get my hands on one of these and couldn't resist any longer, so I had to make some time!

My first attempts at prints were rubbish! Put too much paint on and it just got muddy. I get cross if I can't do things straightaway, and have to keep telling myself that, like most things, it just needs some practice. I wanted to make some backgrounds for cards, and eventually I got one I was happy with, and had to make the card forthwith!

For an earlier print (rejected!) I had used some skeleton leaves as masks, but they didn't show up very well. However, the leaves looked quite good covered with the paint. I decided to try stamping on one, and embossing it. I used an Inkylicious stamp, the same one I used to make the background print, and I think it worked quite well.


 I sprayed over the background with a Crafty Notions spray ink (a gold shimmer, but unfortunately it doesn't really show in the photos) and then overstamped it with a  a Stampin' Up text stamp. The sentiment is also by Inkylicious. The centre picture, which quite fortuitously matched the Inkylicious flower stamp, is from a Crafty Individuals Miniatures book (Flowers and Butterflies), and I framed it with a Nestie die.

The paints I used on the Gelli Plate were old ones (10 years +!) and I think half the problem was that they had become too thick. I couldn't seem to get a smooth thin covering with them. Living up here in the wilds of Dumfriesshire is wonderful, but craft shops are thin on the ground, to say the least. I wanted new paints, but couldn't wait for mail order, so on Friday I made my first solo expedition down into Carlisle since we moved up here, and visited the recently opened Hobbycraft! It's so long since I was anywhere with decent supplies that I was like a kid in a sweet shop! I found the paints I wanted (plus a few other bits and pieces - well, it made sense to get them while I was there and not have to make another journey, didn't it?!) but will now have to make some more time to try them out.

Watch this space!

Ps. Note to Sally, you HAVE to get a Gelli Plate!!

Sunday, 5 June 2011

Shades of purple

The monochrome look is one which I rather like, so I was pleased to see that it is the theme for Week 18 of the Less is More Challenge.  I used an old favourite stamp and an old favourite technique to make my card.


I stamped the poppy (Stampin' Up) with Dusty Concord Distress Ink, and then pulled out the colour from the outline with a paintbrush and plain water to colour the image. I cut it out with a Nestie Labels 4 and mounted it with foam pads. The sentiment is one I've had for many years. I think the company which made it was V.I.P., sadly no longer trading, I believe.

I spent half term up in Dumfriesshire. Apart from visiting my daughter and family, I was also there to do some preparatory work for the new job I will be starting in September. I still can't quite believe that, from then on, my drives to work will be through beautiful countryside, instead of being stuck in traffic going into the city. I daresay there will still be hold-ups, but I think I can cope with the odd tractor or herd of cows....!