Showing posts with label Woodware. Show all posts

Sunday, 2 August 2020

A Difficult Subject?!

Do you, like me, often struggle with cards for men, or boys? If so, never fear, Stamping Sensations is here! Our August challenge theme is 

* * * * * MAKE IT MASCULINE * * * * *

and the Design Team have some fabulous samples for you to give you some inspiration. You can see them on the Stamping Sensations Challenge Blog. Not only that, the prize for this month is this trio of gorgeous stamp sets, all of which would be suitable for male relatives and friends (though I'm sure that anyone would appreciate the beautiful designs).


To be eligible for the prize, the masculine element of your project must be the main image, and it must be hand stamped, or a hand coloured digital image. Please take a few moments to read carefully our challenge rules, which are HERE. It is such a shame when we have to disqualify an otherwise gorgeous entry because it doesn't fit our requirements.

I don't often use clean and simple designs on my cards, though I do like them, but I needed a birthday card in a hurry, and I thought the CAS style would suit this lovely new Oystercatchers image from Woodware.


I simply stamped all the images straight on to the base card and coloured the birds' beaks and feet with Zig Clean Colour pens. A touch of Gelly Roll clear glaze pen gave them a glint in the eye. The large oystercatcher image and the small flying birds are from the Woodware set, the sentiment is a magazine freebie. It probably took me about 10 minutes from start to finish, very simple but I do like the graphic effect, monochrome except for the pop of red. 


Saturday, 18 April 2020

And More Rainbows!

We're midway through the month but there's still plenty of time to enter our April Challenge at Stamping Sensations, where our theme is "Somewhere Over The Rainbow", quite appropriate at the present time. Full details over on the challenge blog.

I've been taking advantage of the extra spare time, during this period of lockdown, to explore some different artforms, one of which is pyrography. I bought a kit a while ago but hadn't had much chance to try it out until now. I've been inspired by Richard Dickson who, as The Pyronautist, does some fabulous work. Do go and have a look at his Facebook page. He mentioned on his page that he had been burning designs on watercolour paper, which made it possible to produce cards with pyrography designs, so I thought I would have a go at that. It works a treat!

I stamped the flowers (Woodware) on to the watercolour card with Desert Sand Memento ink, and then outlined and shaded the design with my pyrography tool. I wanted to add the rainbow background but didn't want the flowers to be coloured, so I used a Versamark pen to cover them completely and clear embossed them to act as a resist.

I sprayed the card with clean water and brushed various shades of Distress inks over in a rainbow shape, drying it with a heat gun so that the colours didn't continue to spread. I wiped away the excess colour from the flowers with a damp cloth.

The watercolour card, which I thoroughly recommend, is Cass Art Hot Press 300gsm. It's called "paper" but 300gsm is actually quite thick, more like card. I don't think I would want to risk burning on to anything thinner! It also takes the water very well and is perfect for stamping on as it is smooth. I wanted to keep the design clean and simple, so I just added a die cut butterfly (Cheery Lynn) and a sentiment (magazine freebie). For a first try, I was quite pleased with how it turned out, and will definitely be doing more.

We have had some absolutely gorgeous entries for our Rainbow challenge so far, but we would still like to see lots more. Let's fill blogland with this symbol of hope!

Monday, 18 November 2019

Mid-month Inspiration At Stamping Sensations

Just popping in with another card for our November challenge at Stamping Sensations, where the theme is Traditional Christmas Colours, ie. red, green and gold.

My main image is a lovely Woodware stamp, which I coloured directly on to the stamp with Arteza brush pens. I then splattered the panel with diluted Distress inks, using a fan brush, and sponged some red ink around the edges. The background stamp is also by Woodware, and the sentiment is a magazine freebie.

There's still plenty of time to enter the challenge, which is sponsored this month by Chocolate Baroque, who have kindly donated two of their stunning stamp sets as the prize.

You'll find lots more inspiration from my teamies on the Challenge Blog, so do go and take a look. Hope you are able to add an entry (or two, or three!), and good luck!

Sunday, 3 March 2019

A Riot of Colour For March!

We have a great theme for our March Challenge at Stamping Sensations, and there'll be no difficult decisions about which colours to choose for your project, as you can use all of them! We'd like to see your take on

* * * * * SOMEWHERE OVER THE RAINBOW * * * * *

You can take inspiration from either the colours of the rainbow or from the well known song. All we ask is that your main image is stamped and that your project adheres to our Challenge Rules, otherwise it will not be eligible for our fab prize, and may not be commented on. Our lucky winner this month will receive a lovely selection of dies.

I've gone for rainbow colours for my card, and kept the design quite simple to let the colours stand out.

I've had this very pretty Woodware flower stamp in my stash for a while and never got round to inking it up until now, but I thought it would be perfect to show off our rainbow theme. The sentiment is part of the same stamp set.

The card was very quick to make. I used ink dusters and Distress Inks to make the rainbow background, and the same inks to colour the flowers. I cut the border with a Spellbinders die and added some sparkle to the flowers with a Spectrum Noir sparkle pen. You can see the effect better in the next photo.

I know I say this often, but my brilliant teamies really have outdone themselves with their projects this month! Go and feast your eyes on the rainbow of stunning samples over on the Challenge Blog, and then see what you can come up with to rival them! We're looking forward to seeing a riot of colourful entries!

Sunday, 18 November 2018

Getting there!

Well, I have managed to make a few more Christmas cards!

I'm particularly pleased with this one, because the background is not printed paper, believe it or not, it's stamped! I love tartan and plaid backgrounds, as they are colourful and go with many themes, so when I saw this new stamp set by Concord & 9th, I was delighted! I can now make my own plaid papers in whatever colours I like!

For the topper I've used the Woodware Lino Cut Wren (which I think could also be a robin!) and embellished with poinsettia dies by Marianne Design and pine branch by Britannia Dies. The sentiment is computer generated and cut out with a die by The Works. Stitched circle dies also by The Works.

This card also fits our November challenge at Stamping Sensations, where the theme is "Get Ready For Christmas!" There's still plenty of time to enter. Pop over to the Challenge Blog for all the details.

Now, only another 60 or so Christmas cards to go.............

Wednesday, 25 November 2015

How shall I colour thee? Let me count the ways!

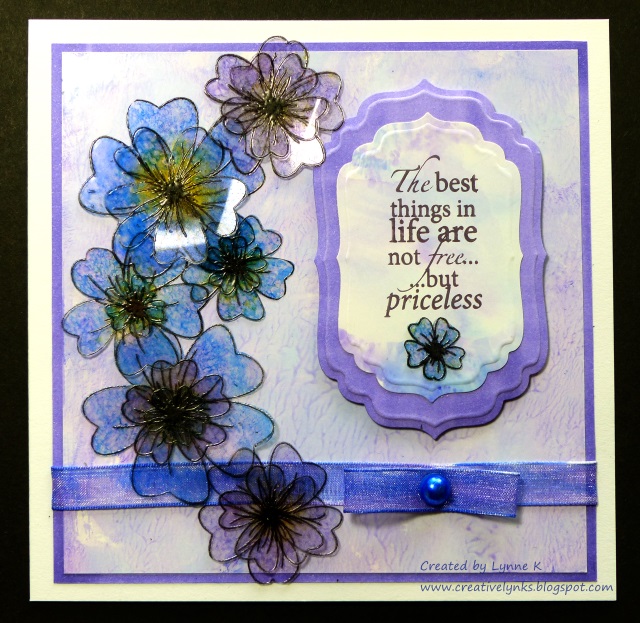
Here's a card. And before you scroll down to see how I made it, here's a question. How many different types of colouring media do you think I used on it?

 The answer is just one! I've been having a play with my Be Creative alcohol based markers, and I wanted to see if I could create a card using only those to colour all the various elements. Of course, I had to use a water based ink to stamp the flowers and sentiment otherwise they would have been smudged by the markers, but everything is coloured with the markers.

I stamped the flowers (Honey Doo Crafts) with black Brilliance ink on to heat resistant acetate, embossed them with clear embossing powder and cut them out. I coloured them by attaching a piece of felt to a Be Creative mini ink blending tool, rubbing ink from the markers on to the felt, and then dabbing it on to the flowers.

To make the main background paper, I scribbled some colours on to my glass mat, added a few drops of hand sanitiser and smooshed it around with my finger to swirl the colours together. Then I pressed a piece of shiny card (eg. encaustic art card) over it to transfer the colour. An added bonus, (depending on the brand of sanitiser!) is that your card will smell nice!

The next job was to make the background for the sentiment. Again, I used the glass mat method, but instead of the hand sanitiser I sprayed the colours lightly with isopropyl alcohol to merge them, which gave a smoother result. Alcohol ink blending solution would work well, but I didn't have any, and anyway, isopropyl alcohol is much cheaper. You can buy it from the chemist, but they may have to order it for you, and you may be required to explain to them what you want it for!

SAFETY NOTE! If using either the hand sanitiser or alcohol spray methods, make sure your work area is well ventilated and do not use near naked flames. Also please note I cannot be held responsible for any problem resulting from your use of my methods.

For the outer border and that around the sentiment I simply coloured a piece of ordinary white card with a marker.The ribbon was coloured in the same way using two complimentary colours. Finally I used a marker to colour the self adhesive pearl (Be Creative), stamped the sentiment (Woodware) with Memento ink and diecut it with Spellbinders Label 4 dies.


I hope my experiment shows the versatility of the Be Creative Alcohol Markers, and also that you don't need lots of fancy stash to create something beautiful!

Thursday, 22 October 2015

New Stash!!

Had a lovely weekend staying with Sally, so we could go to the Be Creative Open Day at Once Upon A Stamp and also the Stamp Magic show in Doncaster. Sally was doing some make & takes for Be Creative, and I endeavoured to assist her, which meant I got to play with some of their lovely new goodies! I'm certainly impressed with the quality of the new range, particularly of the alcohol markers and the paper pads. I was delighted to be asked by Gordon & Justin to make some samples for them, and here is my first card!

I've used both the alcohol pens and some of the papers. The paper pads (8" x 8") are a good weight (180g) and double sided, and the designs are gorgeous. The pens are comfortable to hold, the ink is top quality and they blend beautifully.

I made an easel card, which I covered with two different designs of papers. They are so pretty that I didn't want to cover them up too much. I stamped the large rose (by Woodware) with Memento ink and coloured and shaded it with the alcohol markers. The stamp wasn't made to go with the papers but it could have been, they co-ordinate so well!

I don't have the full range of markers (yet!) but by blending several colours I managed to get the rose to tone with the papers. I found the Blue Grey (code BG5) extremely useful. By shading with it first where I wanted the shadows to be, and then blending over it with other colours, I was able to achieve the depth I wanted. (At least I hope I did!)

Being alcohol based, the markers are very versatile of course. In the new Be Creative range there are some beautiful embellishments, including tags, buttons, pearls and clear gems. No need to buy lots of different colours, they can be coloured with the markers! I tinted some of the gems blue to act as stoppers and scattered a few more randomly on the card. The tag wasn't quite the right colour, being mostly pink and green, so I sponged some Chipped Sapphire Distress Ink over it and then it matched perfectly! A sentiment by Chocolate Baroque, a length of sparkly ribbon and a butterfly cut from one of the papers completed the card. Here's a side view.

The papers are a perfect weight for making paper beads, so I'm thinking a bracelet and gift box to go with the card might be nice. Watch this space!

Sunday, 5 July 2015

Stamping Sensations July Challenge

Another month at Stamping Sensations has flown by! We had some stunning entries for June, but now it's time for a new challenge, in which we would like you to

* * * * * FEATURE A CREATURE * * * * *

Show us your projects featuring a creature (or creatures!) of land, sea or air!

Please do remember that as we are a stamping challenge, your entry must include some stamping if you wish it to be considered for our prize or Top 3 positions. It would be a shame to miss out, as our sponsor this month is once again Little Claire Designs, who have very kindly given us a most generous £35 voucher for the lucky winner to spend on their website.

As soon as I saw our topic for this month, I knew which creatures I would feature! The fabulous owls on Little Claire's Silhouette Owl Tree.

Background papers from my stash were used to create a landscape, over which  the Owl Tree was stamped in Memento ink. It was cut out with a Spellbinders die and the base of the tree design was extended a little to either side to fit the square, using a Memento pen. It was then matted and layered on to the base card, which had first been stamped twice with the Owl Tree, in opposite corners. A suitable sentiment (Woodware), cut out by hand, completed the card.

I love the thought of a treeful of owls, just sitting there, watching, ready for their close up!


However, I'm looking forward to seeing all types of creatures in your entries this month, and of course remember you can enter up to three times with any type of cards or projects. The DT have featured some simply adorable creatures in their samples, so do go over to the Challenge Blog and have a look at them.

I'll leave you with a picture of a recent visitor to our garden, who seemed to be having a very earnest conversation with a hoverfly!


Sunday, 6 October 2013

Stamping Sensations October Challenge

We had some wonderful entries for our poppy photo inspiration challenge at Stamping Sensations last month, but for October we are moving from flora to fauna! Our theme for this month is

ALL CREATURES GREAT AND SMALL

Plenty of scope here, I think. Furry, feathered, scaled, creatures of land, sea or air, cute or realistic, the choices are endless.

We have a fantastic sponsor too - the well known and very popular Penny Black, who have donated a super prize.


For my sample I decided to go for something a bit different for a change and made a screen card.


 All the stamps I've used are by Penny Black, and so are the butterfly stickers. The patterned background papers are by Prima, and the flower diecuts are from Memory Box. The border punch at the top is one of my favourites and I've had it for many years, but I've no idea now where it came from. I used Woodware punches to make the little vellum flowers.


I'm sure this will be a popular theme, and I will look forward to seeing lots of lovely entries! Remember you can enter up to three times, combine with other challenges and make whatever type of project you like, as long as it follows our theme. The DT have some absolutely gorgeous samples for you, so don't forget to have a look at them on the Challenge Blog

Sunday, 16 December 2012

More treemendous inspiration!

We're halfway through our December challenge at Stamping Sensations, where our theme is "Treemendous". I wanted a change from cards and Christmas stuff, so I made a little notebook.


 I cut an aperture with a Spellbinders Nested Maple Leaf die and stamped a little scene to go inside it. The trees are by Inkylicious and the fence and sheep by Hobby Art. The background hills and foreground grasses are hand drawn. The two small maple leaves are from the same die set, and the corners are cut with a Woodware punch.


 I stamped the same trees on each page for a bit of inside interest, bound it all together with my Bind-It-All, and finished it off with a ribbon hanger and fibres for decoration.


I also had to make a quick birthday card. Very clean and simple, it took me about 10 minutes!


Same maple leaf die, a Crafty Individuals tree stamp, a peel off greeting and various layers of paper.


Anyway, I hope that's given you some more tree inspiration. If you haven't entered our challenge yet, there's still plenty of time. Oh, and we have made a couple of slight changes to our rules! We realise  not everyone has time or can afford to make projects just for a specific challenge, so we have removed the restriction of 6 challenges and you can now enter any number of challenges as well as ours. Also you can enter up to three cards or projects of any type (rather than each entry having to be a different type of project). We hope that will help to make entering easier for you, and we look forward to seeing lots of lovely creations!

One more thing! We are getting very close to 1000 followers, so it's candy time at Stamping Sensations! Click on the link on my side bar to take you to the challenge post for all the details!


Tuesday, 22 December 2009

Christmas things


Well, I managed to get everything finished in time to catch the last posting date. Phew! Now that I know that some of them have reached their intended recipients, I can post them here. The Inkadinkado Angel has been one of my favourite Christmas stamps this year. I've kept this card quite simple so as not to detract from the image, which I've embossed with kaleidoscope EP. The greeting is by Craftwork Cards

Here's the angel again, stamped over "Silent Night" by Magnolia. The printed picture is from CraftyIndividuals' Christmas Miniatures book.


Next a few cards inspired by one of the beautiful samples on Sue Nelson's HeartPrints gallery. I liked the simplicity of it. (I needed something quick to do!) The one on the left has a Cuttlebug background and Nestabilities frames, and the image is from Woodware. The one on the right uses a background paper from the Elusive Images "Season's Greetings" CD from Graphicus. Nestie frames again. The image is one I've had for years, by PSX.  Same details for the third card, except that the image is from Woodware. The greetings on all three cards are computer generated.


When we went to the Sir Stampalot demo day, I was really taken with Brenda's    little decorated tins. I bought some blank ones to have a go at doing my own. Here's the one I made for my daughter's mum-in-law. It's coloured with alcohol inks, then stamped and embossed on top. The stamp is by Craftwork Cards. Inside I've put little photos of her three grandchildren, two of whom are also mine!
We will be going up to stay with them for Christmas, so no food shopping or cooking for me to do! I'll be on grandma duties so that my daughter can get on with things, and that's just fine by me!

Anyway, this will probably be my last post before Christmas, so to everyone in Blogland, I hope you all have a wonderful Christmas, and a very happy and peaceful New Year.