Showing posts with label Papermania. Show all posts

Sunday, 4 May 2014

May Challenge at Stamping Sensations

Wow, what a lot of fantastic entries we had for last month's challenge at Stamping Sensations I guessed it would be a popular theme, and I think the same will apply this month, because for May:

*****  ANYTHING GOES  *****

Your project must include some stamping, as we are of course a stamping challenge, but other than that it can be anything you like, on any theme. You can enter up to three times, and combine your entry with any other challenges.


For my card I've used some Crafty Individuals stamps which I bought ages ago but have never inked up until now. I don't know why, as they are really very pretty. Probably just didn't have a suitable occasion to use them. The patterned backing paper is from a recently released Papermania pad called Bellissima, again very pretty in lovely soft shades.

I stamped the main image twice so that I could cut out and decoupage the two hearts. Then I stamped the perfume bottles on a Spellbinders Lacy Circles diecut, having sponged some colour around the inside edge of the diecut with pigment ink.


I added a few glittery highlights here and there with a clear Wink of Stella pen, and some liquid pearls on the "jewels" and in the corners. Other supplies used were a Martha Stewart punch-around-the-page set, a Dovecraft tiny butterfly punch and Promarkers to colour the images.


We're going to keep you guessing for a while as to this month's prize! Rest assured, however, that it will be fabulous as always, and all will be revealed later in the month!


In the meantime, don't forget to check out my lovely teamies' gorgeous samples on the Challenge blog, and we look forward to seeing your entries. Thanks for looking.


Sunday, 18 March 2012

Challenged to Inspire, Part 2

Happy Mothering Sunday, everyone! It's a beautiful morning here, hope the sun is shining for you too. I've just watched a pair of buzzards fly past the kitchen window, and a pair of exceptionally cute baby bunnies are keeping the grass tidy at the back!


Here is the card I made from the second kit which the Stampalot DT were given for this month's "Take Inspiration" Stampalot Challenge. This kit (details of which are on the Challenge Blog) is entitled "A Krafty Affair". I loved these DPs (by My Mind's Eye), which were chosen by Janice, and they and all the items in the kit are available from Sir Stampalot. The papers are double sided, so I took photos to show each side.


I made an easel card, and turned the diecut hinges into posts to hold the bunting, which I cut with Whimsy dies.


I decided I wanted to use the celebrate sentiment, which was a Craft Stamper freebie (I masked off the border which surrounds it), and then searched through my stamps for something suitably celebratory. The only one which seemed to fit the bill was my one and only House Mouse! (Inherited from my late MIL  - as you know, I don't do cute!) The Happy Birthday is by Papermania. The scalloped borders were cut with Nestabilities, and the one around the Happy Birthday was cut by hand.


 Anyway, that's the second part of this month's Challenge. If you haven't entered yet, there's still plenty of time, and Janice has now revealed the prize, which is as stunning as usual!

And I can also let you in on the exciting news that was hinted at earlier. The 1st of April will be Stampalot Challenge's 2nd birthday! It's been a fantastic two years, and the fact that the DT has remained substantially the same since the beginning says a lot about what a great challenge it is, and I'm honoured to be part of such a fab team. However, much of our success is down to Brenda's inspirational leadership and the tremendous amount of work she puts into it. So thanks, Brenda,  and here's to many more Stampalot Challenges. We're going to be celebrating, so don't forget to look in on April 1st and join in the fun!

Monday, 1 August 2011

Stampalot August Challenge

Another "anything goes" theme for Sir Stampalot Challenge this month with

WHATEVER YOU FANCY

I decided to use one of my favourite Penny Black stamps, the poppy, embossed on to an alcohol inked background and coloured with Promarkers. This was then attached over some Papermania background paper with some lace to trim the edges. The sentiment, by The Craft's Meow, was stamped on to a Nestie label.


The prize on offer for August is this fabulous selection of goodies!


So good luck everyone! I'm sorry this is such a short post, but I'm just about to head off up to Scotland to do some house hunting. Wish me luck!

Monday, 27 June 2011

It seemed so simple.....

Week 21 of Less is More Challenge is a sketch.


Very simple, just 3 circles in line on a square card.  They made me think of music notes. Three music notes sitting on a stave, I thought. What could be easier? I'll make the notes into flowers for a bit of added interest, and the sentiment naturally has to be "Just a note..."

Cutting the thin strips of card to make the stave was trickier than I expected. I've got some of those shredding scissors, and thought it would be easy to cut strips with them. It wasn't! Couldn't get them to cut in straight lines. I resorted to ruler and knife. Several strips went in the bin because they weren't even in width. Eventually I had five strips that were similar enough. I managed to stick them in straight lines across the card first time! I punched three small circles from black card, and three flowers, rather proud of myself because I could use up some scraps! Stuck the circles on the flowers, and then cut more thin strips to make the note stems. Stuck the notes on the stave. All going well and looking good! Then I inked up the sentiment (Papermania), and... disaster! I don't quite know how it happened, must have been the heat, lost my concentration, but somehow a large black splodge of ink had appeared on the card! Right in the middle of the white space! Oh, the annoyance, the frustration! Could it be salvaged? Or would I have to start all over again?

I went and made myself a stiff coffee, and came back to think about it. Aha! Maybe I could just cut a piece of white card to cover the stain. I did just that, and it worked! Then just the sentiment to stamp without smudging it....phew! Here it is:


Whenever I order from Crafty Individuals, those lovely people Malcolm and Jean send a few freebie stamps with the order, and I've got quite a few duplicates now. I'll send a couple of them to the first person who can tell me (in a comment), where the join (of the bit I had to stick over the stain) is on my card!

Saturday, 11 June 2011

Vintage with a heart

That's the title of the June Challenge at Crafty Individuals Blog, and what a great theme! I've used their gorgeous ladies in hats for my card, and kept the embellishments simple so as not to detract from the lovely image.


I stamped it on to Papermania printed paper (having slightly distressed the edges of the paper) and coloured it with Promarkers, which I also used to colour the Martha Stewart punched border, the sheer ribbon (just visible under the strip of lace), and the paper which I matted the image with. I love how you can use Promarkers to co-ordinate everything! And that's about it.

Now off to see what the Less is More ladies have got for us this week!

Friday, 25 March 2011

A bit more ...... but not much!

Well, I sat down to make a Less is NOT More card (see previous post!), but when it came to it, I didn't put very much more on it! I think I must have become too used to the minimal style! Need more practice!

I made this card for my niece's birthday. She's not an overly fussy person, so it's probably best I didn't go overboard with it. I was lucky enough to be given a box full of bits and pieces recently. The after-school club at the school where I work had had several boxes full of cardmaking stash donated to them, but some of it wasn't really suitable for them to use. The teacher who runs the club asked me if I would like some! I didn't hesitate for long!

It was mostly paper and card, and embellishments such as the dress on this card. Not something I would have bought for myself, but seeing as I'd got it, I thought I would try and use it. It had a bit of rather naff string tied in a bow around the waist, so I took that off and added the pearls instead. I've just bought a couple of Darkroom Door background stamps, Floral, and Flourish. They're huge (cover the whole of an A6 card), and I've used the Floral one here, stamped in a pale pink Versamagic ink on a cream card.  Unfortunately it doesn't show up very well in the photo. You can see it a little better in the close up.

My camera doesn't seem to pick up creams and pale yellows very well. They come out a mucky looking grey! The spotty paper is by Papermania, with a Martha Stewart border punch and Nestabilities ovals. The sentiment is a very old one by Stamps Unlimited, who I don't think are around now.

It will be back to Less is More tomorrow, but after that.... I've just got some of the gorgeous new printed tags from Crafty Individuals, and they're definitely not clean and simple....


Sunday, 6 February 2011

Sunday again!

How did it get to be Sunday again so quickly? I'm sure time goes faster the older one gets. Even so, I managed to make a scrappy card for Jules's Sunday Scrap challenge.


I've mostly used up scraps of plain paper and card, except for the embossed bit at the bottom, which is by Papermania. It has a very pale pink and white pattern on it (hard to see in the photo).  Stamps are all by Waltzing Mouse, except for the writing in the background which is by Hero Arts. I used VersaMagic and Versacolor inks to stamp the background, and the same inks to colour the roses.

And that's two posts in two days! Must have too much time on my hands! (Or maybe I should go and tackle the ironing instead!)

Monday, 6 September 2010

WOW!!!

What a day! On Friday we decided to have a last day out before I go back to school this week, and as we were heading up the motorway on the way to Robin Hood's Bay I got a text from Sally. It said "You've won the Cuttlebug from the Once Upon A Stamp Design Team Blog!" Well, I had to read it about six times before it sank in. Then I thought, no, it can't be me. Must be a different Lynne K. So I rang Sally, and she said "It's true! No other Lynne K entered the competition. I checked." Woo hoo!!! Now this sort of thing never happens to me, at least it never has until now. I've won the odd raffle prize occasionally, and even 2 sets of  Elusive Images stamps, which was fantastic, but never anything like this. To say I was excited would be like saying the Titanic had a little prang with an iceberg - ie. understatement of the year! How I managed to contain myself for the rest of the day, I'll never know.

We had a lovely time at RHB. The weather was beautiful. We had fish'n'chips, a stroll along the beach, looked in the rock pools, found a few fossils, and enjoyed the fresh sea air.


Then we called on my sister-in-law who lives near Whitby. Home via the North York Moors with all the heather out. It was quite late when we got back, but I had to get the laptop out & see for myself - yes, it was true! I had won the Cuttlebug, along with the new "No More Shims" mat! First thing on Saturday morning I phoned Once Upon A Stamp, as requested, and arranged that, since I'm only half an hour from the shop, I could go up and collect it. Sally came with me.

I'd heard about the No More Shims Embossing Mat, but didn't know all that it can do. It was invented by Gordon himself, and he kindly gave us a demo of its capabilities. I am highly impressed with it. Not only can you emboss through the CB without having to faff about with fiddly extra bits of card (and you get a better result), you can also emboss found objects as long as they are no thicker than a 10p piece. Magic! I tried some real leaves and they came out beautifully. So I made a gift bag to put them on.

The bag is made from an envelope, and it's very quick and easy to do. See the video by Lisa Spangler on the Hero Arts website. The definition on the leaves is amazing. All the veins stand out, even the tiny ones. (Click to get the big picture and see them!) Having embossed them onto plain photocopying paper, as Gordon suggested, I cut them out and then sponged over them with various colours of pigment inks. I thought that doing so might squash them, being on thin paper, but the detail held very well. Then I matted them on to coloured card. The bag is stamped with Hero Arts stamps.

Next I tried embossing some mulberry paper which has a raised embossed pattern on it. Again, it worked really well. I decided to use the one with the flowery pattern and made a card with it, having coloured it with pigment inks to make the detail stand out.

I kept the card simple so as not to hide the background, and just added a Crafty Individuals picture, a flourish (a Marianne Design die) and a Nestabilities label. (Sentiment - Papermania, tiny flower - Rubber Stamp Tapestry).
I've been a big fan of the Cuttlebug for a long time and wouldn't be without it, but have always wondered why they couldn't come up with something better than fiddly bits of card for embossing. Well, Gordon certainly has - and it's brilliant!

I want to say a HUGE thank you to Gordon, Robert and all the team at Once Upon A Stamp for such a wonderfully generous prize. Oh, and it all came in a fab tote bag, also part of the prize. While I was at the shop I bought a Scor-Pal ......... but that's another story!

Thursday, 3 June 2010

Sir Stampalot June Challenge


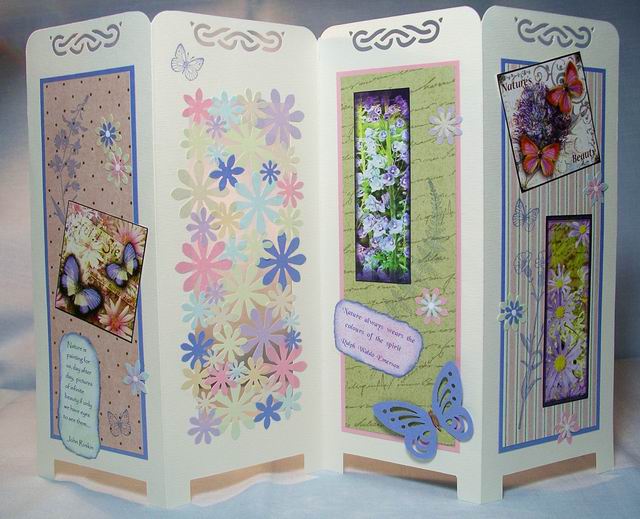
I've been busy lately dealing with my late father's affairs & effects, and clearing out his house, not to mention having had some sort of cold or virus which has left me feeling quite washed out, so I'm afraid blogging has had to take a back seat. When I did have some time to craft, I didn't have the inclination, but now I've been inspired once again by Sir Stampalot's Challenge. For June the theme is "Punch it", so I decided to make a screen card.


I started it off with the punched flower panel, the idea for which came from Julie Hickey's lovely book "Flower Power Papercrafts" (published by David & Charles), where she shows a beautiful wedding card with a flower panel, all in cream. I wanted mine to look summery, so I used multicoloured flowers.The flowers are not stuck on to acetate, as one might suppose, but only to each other, which adds to the lacy effect and allows the light to come through naturally.


The background papers are by Papermania, and the stamps and printed pictures by Crafty Individuals. I finished off the screen with some more punched flowers, a punched butterfly and some computer generated text. Other punches used were a Dovecraft corner rounder and the border at the top, the make of which unfortunately I don't know. 


Sally and I are very much looking forward to the Blog Girl Get-Together at Sir Stampalot this Saturday, when we will get to meet some of our blog friends, play and generally have a good old natter, just what I need after the last few months. Oh, and I should mention we also get to shop afterwards!
I'm also entering this card for the Charisma Cardz Challenge #22, which is "Flowers".

Monday, 8 March 2010

Swirls and curls, and the case for digital stamping

My big reorganisation is still ongoing, but I managed to clear enough space on my desk to make a card for this week's Tuesday Taggers, the theme being Swirls and Curls. For the first time ever, I've used a digital stamp, the Hero Arts butterfly.

I'd previously bought a few digistamps from other companies because a) I thought I ought to try them and b) I liked the pictures. However, subconsciously I think I was reluctant to use them because they were not "real" stamps. I have thought about it for quite a while now, and come to the conclusion that there are parallels here with digital photography. Many people said originally that digital photography was not real photography. Now, especially with the advent of digital SLRs, even some of the diehard darkroom aficionados have embraced it. Photography has been a great interest of mine for many years but I never had the opportunity to have my own darkroom, so I joined the digital revolution with enthusiasm. I decided that whichever way the image was captured, the end result is what counts.

I think that this argument may also be used with stamping. Whether made with ink and rubber, or ink and printer, the image which appears on the paper is to all intents and purposes the same. It's what you then do with it that matters. This is illustrated very well by Jennifer McGuire in her video on the Hero Arts blog. I watched the video, checked out the Hero Arts digistamps, and that clinched it for me. Apart from being very good value for money (because each digistamp set comes with lots of extras) many of the HA digistamps have rubber equivalents (some of which I already have!), giving lots of scope for combining the two. Also, the digistamps can be resized, so there are endless possibilities.


Inspired by Jennifer's butterfly demo, I coloured mine with Distress inks and then overstamped it (real stamp!) with the HA flourish. To fit the swirls and curls theme, I stamped all over the base card with the flourish from Crafty Individuals (who are sponsoring this week's TT with a great prize!) and then added some swirly background papers from the gorgeous new Papermania Capsule Collection. A Martha Stewart punched border and a few Prima flowers completed the design.

I should add (in fact I'm doing just that!) that "real stamping" will always be my preference, and it's not often that I make anything without some stamping on it. However, digital certainly has its place too; it's just a different way of arriving at the end result, and I think we are very lucky to have so many and varied artforms available to us to create with.

I would be very interested to hear any other views for or against digital stamping!

Monday, 1 February 2010

A bit different, and blog candy!

Just managing to scrape in again for this week's Tuesday Taggers, where the challenge is to use a jigsaw piece in your artwork. I puzzled over it for some time, and then decided for a change to make some earrings. Long time ago, before I started cardmaking (ie. about 20 years ago!!), I was into jewellery making, but haven't done any for ages, so this project has definitely used old stash! The two pieces I used to make the earrings are from a real old jigsaw which was destined never to be made up again as it had many pieces missing. I've no idea what the picture was, as the remaining pieces were given to me in a plastic bag, but I'd guess it was an old countryside scene. The colours were quite dark, so first of all I painted them with a white Ranger Acrylic Dabber. Next I coloured them with Brilliance inks and overstamped with my current favourite Hero Arts flourish stamp. The backs and edges were covered with a black Promarker. I gave them a top coat of clear embossing to protect them before making them up into earrings.

They are displayed on an ATC stamped with the same Hero Arts flourish. The words are by Inkadinkado and Papermania, and the tiny butterfly is also by Inkadinkado. The butterfly jigsaw piece was made with a clear peel-off sticker over an image from the latest Crafty Individuals Miniatures book: "Nature's Beauty".

I didn't have a recipient in mind when I made them, so I have decided to give them away as Blog Candy. (I hardly ever wear earrings!) If you'd like to win them, please leave me a comment, (or even better, become a follower if you are not already, though that is optional!) before next Monday, Feb 8th. Mr. Random.org will choose the winner. Please note, if the winner does not have pierced ears, I can change the fittings to suit.

Now I'm off on Brenda's blog hop (see my previous post for details).

Monday, 7 December 2009

Paper Roses

Yes, I know, I should be making Christmas cards, but after seeing Brenda demonstrate her beautiful paper roses at the Sir Stampalot Demo Day on Saturday, I just had to have a go at making some for myself. I bought the required 1" flower punch at the demo, and made a couple with that. Then I remembered that I already had the matching tiny one, so I made a tiny rose too.

I couldn't resist buying another Sarah Kay stamp, and thought that she and the roses would go well together. The tiny rose became a perfect decoration for her hat. She seemed to be looking for something, and just then a butterfly alighted close by. I coloured Sarah and the butterfly with Promarkers. A few leaves and star flowers completed the picture. The background paper is by Papermania, and the butterfly is from Craftwork Cards.

Anyway, must go. Got an owl to shrink......