Showing posts with label Cuttlebug. Show all posts

Wednesday, 6 January 2016

Post Christmas play!

Now that Christmas is over, I'm being creative again with Be Creative! Been doing some more experimenting with the alcohol markers, and also tried out the Wonder Tape. The alcohol markers are not yet on the website, but in the meantime you can order them by contacting the shop directly.

My first project of 2016 was a card, on which I used the alcohol markers, a tag, background papers and the Wonder Tape.

I had some foil tape in my stash, bought originally from a DIY shop to make my grandson a Roman spear, for which it worked very well! I thought it might also work well as an embellishment for cards, and wondered whether it would take the ink from the alcohol markers, and as you can see, it did!

The foil is very thin and delicate, so the first task was to stick a length of it on to some card. I found the best way to colour it was to scribble directly on the foil with the markers (I used 3 different colours in light, medium and dark shades) and then to blend the colours by dabbing very lightly (so as not to muddy the colours) with the ink blending tool to which I had added a drop of isopropyl alcohol (you can of course use alcohol ink blending solution if you have it, but you only need a very small amount).

Having coloured the foil I then embossed it with a Cuttlebug embossing folder and stuck it with Wonder Tape to another piece of card which I had coloured with the darkest shade I'd used on the foil. I do like how you can use the pens to make everything co-ordinate. I then trimmed it down to leave a narrow border on each side. The butterflies (Cheery Lynn dies) and sentiment panel were coloured with the markers in the same way as the foil. Sentiment is by Hobby Art.

With the exception of the butterflies, which were fixed with a spot of glue from the Be Creative glue wand, everything else was adhered with the Wonder Tape, which, I have to say, is every bit as good as it is claimed to be! Very easy to use, but you need to be accurate with placing it, as once stuck, it certainly isn't going anywhere else!

For my second project of the New Year I have been back in jewellery making mode, but I'll save that for another post!


Sunday, 3 January 2016

Happy New Challenge!

Happy New Year everyone! Our first challenge of 2016 at Stamping Sensations is a nice easy one for you!

* * * * * ANYTHING GOES WITH A STAMP AND DIE/S * * * * *

You choose the subject, we just need to see one or more diecuts and as always, as we are a stamping challenge, some stamping on your creations.

I seem to recall that one of my crafty resolutions for last year was to try and use up old stash. As you'll see from my project, I'm still trying!
Whether you're like me and have past purchases that need to be employed, or whether you received some lovely new crafty goodies for Christmas which you can't wait to try out, you could put them all to good use by entering our challenge this month! And just in case you need any further persuasion, we have an amazing prize on offer!


Our fab sponsors Tonic Studios have kindly given us the full range of their new colours of NUVO Crystal Drops (which are similar to Liquid Pearls) along with pots of glitters for the very lucky winner! Who wouldn't want to add those to their stash? I could definitely make room for them!

Anyway, on to my card. The weather has been so depressing lately that I decided to make something to remind myself that this dismal season won't last forever!


My stamp is from the "Picture Perfect 2" set, and the sentiment from the "Spring Awakening" set, both by Inkylicious. The main image was framed with Spellbinder dies, the sentiment was hand cut. I coloured the background of the image with Memento inks using Inkylicious Ink Dusters, masking each section of the image in turn.

The tree die (my new favourite die!), which I cut twice, is by Frantic Stamper (available from Once Upon A Stamp). The background is embossed with a Cuttlebug embossing folder.


I finished the design with some ribbon and some tiny leaf embellishments which have been in my stash for years!


The DT have some gorgeous inspiration for you over on the Stamping Sensations Challenge Blog, and remember you can enter up to three times with any type of cards/projects. Good luck!

Sunday, 6 April 2014

Dies and Punches at Stamping Sensations

For our April Challenge at Stamping Sensations we would like you to show us what you can do with your

***** DIES AND PUNCHES *****

Your project can be anything you like as long as it uses punched and/or diecut elements. And some stamping, of course!

Our fab sponsor this month is once again PDA Card & Craft, who have very generously donated a whopping £40 voucher to be spent either online or in their shop in Langley Mill, which is on the Notts/Derbyshire border.


PDA are well known for their quality cardstock, which they supply in just about every shade and type you could possibly want, but they also sell a huge variety of craft materials, so the winner of this fantastic prize will be spoilt for choice!

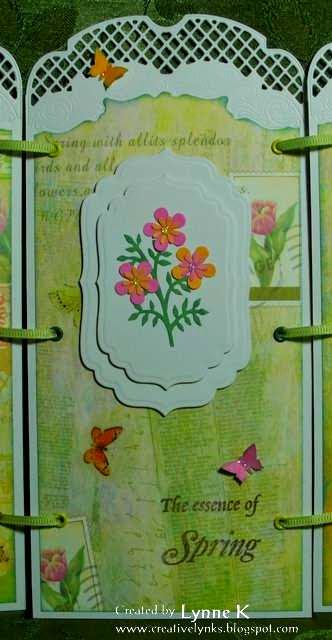
Anyway, on to my project. I've called it "Spring Triptych", and have used both dies and punches.

I began by cutting an A4 sheet of card into three equal pieces and trimming one end of each with the Britannia Dies Small Lattice Edge. While looking through my patterned paper stash, I came across some that I've had for so long I'd forgotten all about it! If I remember correctly it came from Lakeland, when they had a craft section, in a pack with some glittered butterfly and flower stickers. I thought it would be perfect for a Spring project, with its tulips and butterflies, and pretty Spring colours. I traced around the edge of the lattice die to hand cut the paper to fit the top of each panel. (The die only cuts the outer edge.) I didn't want to cover up the paper too much, so I just added some diecut shapes (Spellbinders Labels 4) and some tiny punched butterflies. On the two outer panels I stamped a tulip (Stampin' Up)  and the centre one has some punched flowers and leaves and a sentiment (Inkylicious).


Once each panel was complete, I inserted some eyelets and joined the panels together with narrow ribbon. A spot of glitter glue on the punched butterflies and flower centres provided the finishing touch.

A little aside here! When the trend for diecutting first started, I wasn't interested. I certainly didn't intend to spend a lot of money on something that I might use once or twice and then stick in a cupboard, never again to see the light of day. At the time, I was running a card making class, and some of the members had bought Cuttlebugs. They were soon raving about them, and wanting to use them in the classes. I resisted for a while, but then I discovered Spellbinders dies and was impressed by the effects you could get with them. I gave in and got a 'bug of my own. And promptly fell in love with it! Of course, since then the variety of types and styles of dies has just grown and grown, not to mention that of machines, both manual and electronic. I remain faithful to my 'bug, though. I don't feel any need for larger dies, or electronic cutting. I can do everything I want to with the Cuttlebug, and a great many of my projects contain at least one element produced by it. It has never let me down. I can't see why on earth I would want to trade it in for a smarter model .....


My creative teamies have a gorgeously eclectic selection of samples for you over on the Challenge Blog, so do go over and be inspired. Last month's Pink theme was very popular, and I reckon this one is going to be equally so. I'm really looking forward to seeing lots of entries, so dig out those dies and punches and get cracking! Thanks for looking.

PS. Just realised this also fits the Butterfly Challenge (No. 4), so I'm going to enter it there.

Sunday, 5 May 2013

Stamping Sensations May Challenge

Well, at last it's beginning to feel a bit more like spring up here! I'm looking out of my craft room window on to a bank of beautiful daffodils across the road. They were at least three weeks later opening than last year. It's even getting warmer - we only need two jumpers on now instead of three! Roll on summer, though, we need more sun!


Anyway, we have a lovely new challenge for you at Stamping Sensations, and our theme is

***** EMBOSSING AND TEXTURE *****

Any kind of embossing will be acceptable, dry or heat embossing, and there is endless scope for adding texture to your projects.

Our sponsor this month is the fabulous Tonic Studios, who have donated an awesome prize! A Peruvian Lily Stamp and Punch set and a gorgeous lattice window die, both from the Pick of the Bunch range designed by our very own super-talented Ruth Hamilton!


What a gorgeous prize! I want one! The Punch and Stamp sets really are stunning. Just imagine creating a lovely window box full of flowers in front of that lovely lattice window.

So, on to my card. I have incorporated both types of embossing.

The dry embossing helps to create the texture, as do the layers and embellishments. I stamped the fuchsia (from Tonic Studios' Pick of the Bunch range by Ruth) and heat embossed it with Wow! Neutral Ultra Shimmer embossing powder, which has a gorgeous sparkle. You can just about see it in the next photo. It was then coloured with Promarkers and cut out with a Nestie Labels 4 die. 

It is sitting on a background dry embossed with a Cuttlebug embossing folder. The left hand side of the background has a lily (also from the Pick of the Bunch range) stamped over Gelli printed paper. The join is covered with a strip punched with a Tonic Studios border punch. The diecut butterfly is by Cheery Lynn, and the sentiment by The Craft's Meow.

My lovely teamies have some absolutely gorgeous samples for you this month, so do pop over to the Challenge Blog where I'm sure you'll be inspired!

Sunday, 1 July 2012

Crafty Passions

Time for another Stampalot Challenge, and this month we want to know

What's Your Crafty Passion?

Are you mad about markers, desperate for Distress Inks, a sucker for stamping, or potty about punches? Do you have a favourite technique/colour combo/subject? Whatever you can't live without in your crafting, showcase it on your project, and tell us what it is.

My crafty passions (well, the ones I've managed to fit on my card at least!) are butterflies, Distress Inks, my Cuttlebug and resist techniques.


I stamped the butterfly (by Inkylicious, as is the sentiment) with Versamark ink to act as the resist, and then sponged over the background with the Spring limited edition Distress Inks (love those colours!) The diecut butterfly is made with two dies by Memory Box, and the border is from the Spellbinders Parisian Accents set.


The prize this month won't disappoint. An eclectic mix of gorgeous goodies with which to feed your crafty passions, generously donated as ever by Sir and Lady Stampalot who are definitely passionate about their craft.


Do pop over to the Challenge Blog and check out the DT's fab samples. We look forward to seeing yours!

Thursday, 7 June 2012

Flower Pounding

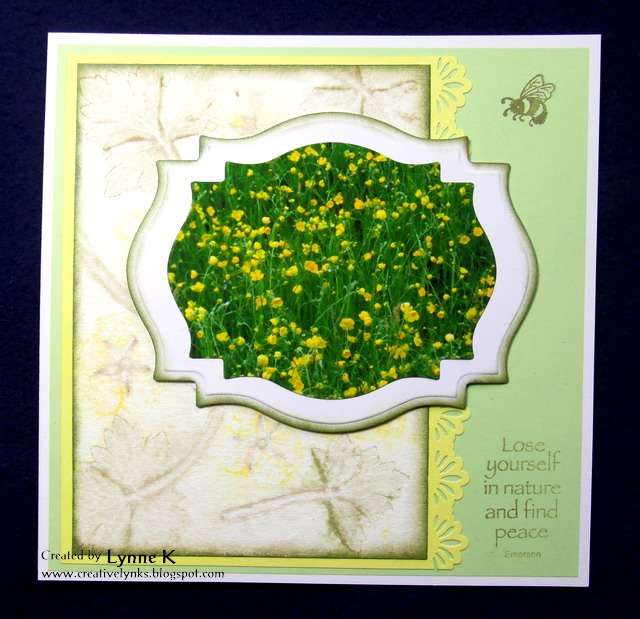
There are many examples of flower pounding about on the 'net, and they're all beautiful! I've been meaning to have a go at it for ages and never got round to it, but when I found out it could be done with the Cuttlebug, I was determined to try it! I won't go into all the details as there are lots of tutorials available, including a good one here (google Cuttlebug & flower pounding for more), but I found I got the best results using a good quality watercolour paper. Thinner papers didn't work so well.

One of the great things about the technique is that it is so quick and easy! Since moving to our new house, we haven't had chance to do much with the garden yet, but there are plenty of wild flowers growing in it! I wouldn't dream of picking wild flowers in the wild, as it were, but I think it's ok if they're from your own garden. Most people would call them weeds there, I guess! Anyway, before I picked them, I photographed them, so that I could use the photos on my cards along with the pounded papers. Here are the results.


Ivy Leaved Toadflax


Red Campion


Cow Parsley


Common Wood Sorrel


Buttercups
(This pic was of a nearby field, though the flowers I used were from the garden. We haven't got that many!)


And my favourite, Germander Speedwell


Supplies used on the cards: The pounded papers for backgrounds, Nestabilities frames and labels, Fiskars border punch, small butterfly punch by Martha Stewart, medium butterfly punch unknown, large butterfly Memory Box dies (two dies), bee stamp by Hobby Art, sentiments by Hobby Art, Paula Pascual, Paper Artsy, and Inkylicious (part of stamp), Prima flowers, ribbons and rainbow paper from my stash.

Can't wait to do some more, but after weeks of gorgeous weather, it's now windy, grey, cold and very wet, so I'll have to wait until the flowers dry up a bit!  We've had some lovely evening walks while the weather's been good. About a week ago we went across the fields opposite our house, and came across these characters, sitting outside the entrance to their den.


There were five altogether, some obviously young ones, and three disappeared down the hole as we approached, but these two seemed unconcerned and stayed there for a while, watching us watching them, until they too went down into the den. We used to get urban foxes in our garden at the old house, but I've never seen more than one at a time before. It was amazing to see a whole family of them together like this! The wonders of living in the countryside. We're loving it more and more. However, there are downsides. A few minutes ago the power suddenly went off. We get occasional power cuts for no apparent reason. Oh no, I thought, I'll have lost all that post I've just spent ages typing in! Fortunately Mr. Blogger had kindly saved it for me, so here it is!

Sunday, 8 May 2011

White on White

White on white is something I've never tried before. I don't know why not, because I really like the look of it. Anyway, it's the theme for Week 14 of Less is More. Two days in to the challenge and there are already lots of stunning entries, so on with the thinking cap!

White on white is all about texture, so it could have been tempting to go a bit overboard with it, but bearing in mind the clean and simple nature of LIM, this is what I came up with.

I dry-embossed the iris (American Traditional Stencils) and created a frame for it from two Nesties. Part embossed the base card with the Cuttlebug Swiss Dots folder, scored two lines below that with my Scor-Pal, attached a Nestie label with sheer white ribbon, and added a peel-off greeting.

I was reasonably pleased with the result, and it's whetted my appetite for more WoW, so if I get time there may be another entry forthcoming!

I've gained a couple of new followers this weekend, so hello and welcome to them, and thanks to everyone who looks at my blog, and for all your lovely comments. I do appreciate them all.

Monday, 11 April 2011

Another great Blog Girl Day at Sir Stampalot

This was our third get-together, and it was lovely to see some familiar faces again and some new ones too, especially Lisa Jane, who I'd been looking forward to meeting for ages. As usual, Brenda and Chris had designed some beautiful projects for us to make, and not only that but they had each made us little gifts. A wallet filled with flowers from Brenda, and a butterfly bookmark from Chris. Thanks, both of you, they are gorgeous! Here they are.


Our first make of the day was a twisted easel card, by Chris. I'd never made a twisted easel before, so I was really pleased to learn how to do it. Next was a card by Brenda, featuring a Penny Black stamp (which was the first thing into my shopping basket!) and a flower (made with Tim Holtz Tattered Floral dies) dipped in UTEE using a Meltpot. A fabulous effect, but I don't think I'll be buying a Meltpot. Sally & I reckoned that we could do it by melting some UTEE in a tinfoil dish with a heatgun. Haven't tried it yet, but I'll let you know if it works when I get round to it!


Once again, Brenda and Chris co-ordinated a delicious lunch, to which we all contributed, but the highlight of it had to be Chris's amazing raspberry cheesecake, which didn't last very long!

Hunger pangs banished, we went back to work on two more pretty cards (which I've yet to finish off), and finally a delightful little divided box designed by Chris for holding stamped images waiting to be used, or paper snippets, or recipes, or photos, etc etc. Chris had put Molly Bloom on the front of hers, but not being a fan of cute characters I decided to be different and have a butterfly on mine instead. We made the flowers with the Cuttlebug quilling dies, which are good but very expensive! (They didn't make it into my shopping basket!) A Marianne swirl die completed the decoration.


The day flew by, but we managed to save a bit of time for some retail therapy at the end! Huge thanks to Brenda and Chris (and Janice and Andy) for another fantastic Blog Girl Day. Can't wait for the next one!


Thursday, 28 October 2010

Feasting on Phonemes!

Or, to put it another way, eating my words! I said I wouldn't be making any Christmas cards before December. I hate the fact that Christmas is so commercialised these days, with stuff in the shops before we've even got the summer holidays over with. And starting the preparations too soon seems to be wishing time away. It goes fast enough as it is.

However, the ladies who come to my card class wanted to do some Christmas cards sooner rather than later, so I thought that since I had to make samples for them, I might as well carry on and get more done for myself  while I was at it. They asked for quick and easy, which was fine by me. I don't have much time to spend on making cards at this time of year. It's my busiest time at school, with all the Christmas concerts to prepare for. When we're back next week, after half term, we'll be starting rehearsals, with the first concert only five weeks away! Maybe next year I should start making the cards in January!

Anyway, here are some I've done so far. Plain and simple, and certainly quick and easy. I don't like doing "production line" cards, but needs must, and by using different papers I've managed to get a bit of variety. I bought the Holly Frame embossing folder by Crafts Too, which I embossed straight on to the card blank. It made adding texture very quick, and only needed a stamp in the centre to finish it off.  It's a bit hard to see in the photo, but I also used the Cuttlebug Swiss Dots folder on some of the cards.


Stamps by Crafty Individuals, Hero Arts, Elusive Images, PSX, Inkadinkado. Other items used: Nestabilities dies, Promarkers, Dovecraft papers, various inks.

I'm sorry I haven't been getting round everyone's blogs lately. My grandsons came to stay (with parents, though plenty of babysitting was involved!). We had a great time, even though I also had to go to work as unfortunately our half term didn't coincide with theirs this year. Then I went up to stay with them for a few days. The weather was mixed, but one day was absolutely gorgeous, so we went for a walk by the loch close to where they live, and got some photos.


And one other I can't resist sharing, my elder grandson puddle jumping! The joys of being 5! (The carrier bag was to collect fallen leaves in, with which he and his mum made a mobile.)


Anyway, I will try to catch up with the blogs soon. Hope everyone is having a good week.


Sunday, 12 September 2010

Cards for men

I struggle a bit with cards for men. I send fewer cards to men than I do to women, so I don't have many male-oriented stamps. Can't justify buying a stamp that I might only use a few times, and I don't feel, really, that I can use the same one each year, even though the recipient probably wouldn't remember it from one year to the next! Though I suppose they might if they got it EVERY year!

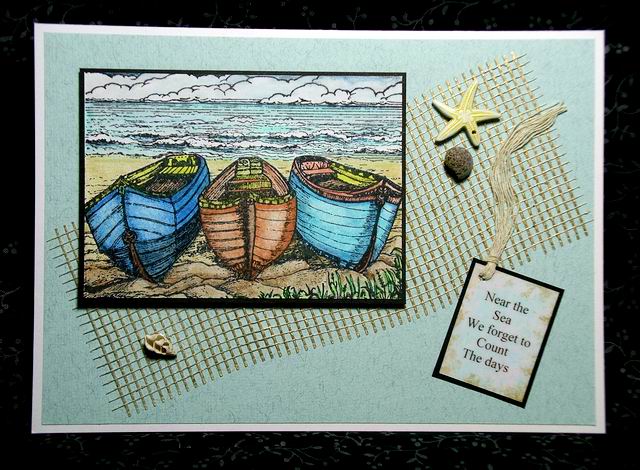
However, I couldn't resist some lovely stamps from Innovative Stamp Creations which I think are equally suitable for men or women. Both images are striking enough not to need much in the way of background or embellishments, so I kept those to a minimum.

The boat scene (the stamp is entitled "On The Shore") is coloured with watercolour pencils, and attached to the card with foam pads. The mesh, shells and starfish are all very old stash. I knew I'd find a use for them one day! The text is computer generated, printed on to acetate and sponged with alcohol inks.


The next one, called "Picturesque", reminds me of various beaches I have visited, and I think it's going to become one of my favourite images. I coloured it with Promarkers and mounted it over a background which was embossed with a Cuttlebug folder and inked with Versamagic inks.. Again, computer generated text  and another very old starfish embellishment, with a recycled bit of string separated into its component strands to tie it all together. I'm feeling really good about getting some old stash used!


As well as the two stamps I've used in these cards, I also bought a new ISC set called "Mini Ledger", which I think is going to be very versatile, though I haven't made anything with it yet....

Innovative Stamp Creations is owned and run by the very talented Betsy Griffin, who calls her design team the Creative Architects Group. They all have many samples, using ISC stamps, on their blogs, links to which can be found here, as does Betsy on her blog. All worth a look. (FTR, I have no connection with ISC, other than that I like the stamps!)