As a very proud member of the Be Creative Design Team, I'm delighted to announce that we now have our own Be Creative DT Blog, where we will be featuring our Be Creative projects and cards, along with hints and tips and product news. We'd love you to take a look at the new blog and become a follower. Justin has promised that when we reach 100 followers we can have a blog candy draw, so what's not to like?!
It's a close run thing, but I think my favourite Be Creative product is probably the alcohol markers, as they are such good quality and there is so much you can do with them. I've used them on the card I want to show you today.
Ever since I saw on Pinterest some stunning cards using Altenew stamps, just about all their floral sets have been on my wishlist! I managed to resist their lure for quite a while, but eventually gave in and ordered the Vintage Flowers and Painted Poppy. Couldn't wait to try them out, so here's my first card, using the Vintage Flowers.
As you will see, I need more practice in lining up the stamp layers, which I found quite tricky, but I think it's not too bad for a first attempt.
The roses and leaves were stamped with Versamagic inks in Sea Breeze, Turquoise Gem and Ocean Depth, and the small flowers with Versacolor Heliotrope, Violet and Grape. All other colouring on the card (except for the ribbon) was done with Be Creative alcohol markers.
Having completed all the stamping, I masked all the flowers and leaves. To make the speckled background, I scribbled the markers on to my glass mat and mixed the ink with Spray M Boss (Once Upon A Stamp), which has, amongst its many other uses, the effect of turning the alcohol ink into paint. I picked it up on an old toothbrush and flicked the paint on to the card, then removed the masks. I wanted the edges of the picture to be a bit darker, so I dabbed some ink directly from a marker on to a felt pad and stippled it around the edges.
The matting layers were cut from white card and coloured with the markers, as were the butterflies (Cheery Lynn dies). A little bit of sparkle was added to the small flower centres and butterflies with some Be Creative glitter glue. The border was cut with a Martha Stewart punch.
I love the versatility of the Be Creative markers, in that they can be used to co-ordinate all parts of a project. I don't know whether by accident or by design, but the two colours I used here, Pale Blue (which is actually purple!) and Peacock Green, perfectly match the ink colours Violet and Turquoise Gem! Probably coincidence, but a lucky one!
Anyway, I'm off to get some more practice lining up the layers. Think a MISTI would be very useful. Did I mention that's on my wishlist too...........?!
Showing posts with label Martha Stewart punch. Show all posts
Friday, 5 February 2016
Sunday, 4 January 2015
A New Challenge For A New Year!
Happy New Year, everyone! Are you ready for our first challenge of 2015 at Stamping Sensations? Our theme for January is
We'd like you to show us what you can do with your dies and/or punches, either one or the other, or a combination of both, it's up to you.
Our lovely sponsor this month is the ever popular Sizzix, who I'm sure need no introduction. They have kindly donated a fabulous selection of their dies and embossing folders. The lucky winner will also receive a bonus prize of some gorgeous ribbons from Crafty Ribbons.
* * * * * DIES AND PUNCHES * * * * *
We'd like you to show us what you can do with your dies and/or punches, either one or the other, or a combination of both, it's up to you.
Our lovely sponsor this month is the ever popular Sizzix, who I'm sure need no introduction. They have kindly donated a fabulous selection of their dies and embossing folders. The lucky winner will also receive a bonus prize of some gorgeous ribbons from Crafty Ribbons.
For my card I have used both dies and punches.
The background paper is by Bo Bunny. On top of that I placed the white punched square (using both the border and corner punches from a punch around the page set by Martha Stewart), followed by the scalloped and plain circles (both cut with Spellbinders dies). I stamped the sentiment (from Hydrangea set by Inkylicious) and the branch and flower (from the Majestix Oriental Blossom set by Card-io) and finally added the butterfly (stamp by Hero Arts) which was cut out with the matching Sizzix Framelits die, coloured with Promarkers and affixed with foam pads. Here's a close up.
One of my crafting resolution for this year is to break out of my comfort zone and try new things, so for this card I've gone for a colour combo I wouldn't normally use. The jury is still out on whether I like it or not! Another resolution is only to buy crafty stuff that I really need, as opposed to want, and to get some of my existing stash used up instead. Hmm. Wonder how long I'll stick to that one! Of course, the definition of "need" is open to interpretation........!
Anyway, I hope one of your resolutions is to join in our challenge every month, and we can't wait to see all your lovely creations! If you should need any inspiration, hop over to the Challenge Blog where my talented teamies have all made excellent use of their dies and punches. Thanks for looking!
Tuesday, 3 September 2013
Vintage Nature
Thanks to Brenda and her gorgeous projects (see here and here) using their products, I've recently become a fan of Nicecrane Designs, owned by the lovely Ignacio. Once I saw his gorgeous butterflies, I knew I had to have them, and on browsing the site I discovered so many more equally lovely designs. They are all in the form of downloads (instant gratification!) and many have a vintage feel.
Like Brenda, it is unusual for me to make cards with little or no stamping on them, but Ignacio's designs are so pretty, I had to make an exception for them! I ordered several sets, and Ignacio also very generously sent me some freebie sets too. (NB. I have not been asked to promote his products, I'm just telling you about them because I like them!)
Anyway, once I'd got them downloaded, I set to work to make a few cards. Now, I struggle with cards for men. Or rather I did! Nicecrane has some lovely Old Map images. They're sold as bookmarks, but I made mine into a card.
I did do a bit of stamping here! The base card was stamped all over with an old freebie map stamp from Craft Stamper Magazine, with the bookmark image matted on to a thin gold border and placed on top. I didn't want to detract from the image, so the only embellishment is a little sentiment banner. (Banner stamp:Waltzing Mouse, sentiment: Clarity Stamp, a freebie from a show.)
Nicecrane has several sets on a nature theme, which is right up my street. My favourite is called "Colorful Nature", with vintage-style images of birds and animals. I used the four bird pictures to make a set of cards. It looks as though I cut them out with a Nestie label die, but though I have one of those it was the wrong size, so I just cut away each corner with a round hole punch.
The eagle-eyed amongst you will spot just a teeny-weeny bit of stamping (a tiny border by Waltzing Mouse)! Apart from that, the images are simply mounted on to a background cut with Martha Stewart punch-around-the page punches, and each is matted on different coloured Bazzil card which I inked around the edges to continue the vintage feel. I think they make a pretty set.
Thanks for looking!
Like Brenda, it is unusual for me to make cards with little or no stamping on them, but Ignacio's designs are so pretty, I had to make an exception for them! I ordered several sets, and Ignacio also very generously sent me some freebie sets too. (NB. I have not been asked to promote his products, I'm just telling you about them because I like them!)
Anyway, once I'd got them downloaded, I set to work to make a few cards. Now, I struggle with cards for men. Or rather I did! Nicecrane has some lovely Old Map images. They're sold as bookmarks, but I made mine into a card.
Nicecrane has several sets on a nature theme, which is right up my street. My favourite is called "Colorful Nature", with vintage-style images of birds and animals. I used the four bird pictures to make a set of cards. It looks as though I cut them out with a Nestie label die, but though I have one of those it was the wrong size, so I just cut away each corner with a round hole punch.
The eagle-eyed amongst you will spot just a teeny-weeny bit of stamping (a tiny border by Waltzing Mouse)! Apart from that, the images are simply mounted on to a background cut with Martha Stewart punch-around-the page punches, and each is matted on different coloured Bazzil card which I inked around the edges to continue the vintage feel. I think they make a pretty set.
Thanks for looking!
Sunday, 4 December 2011
Stampalot December Challenge
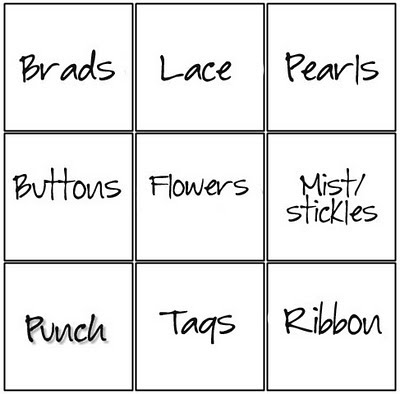
Here we are with the first Sunday in December, and so it's time for the last Stampalot Challenge of the year. This month we're playing Bingo and here's your Bingo Card!
The idea is to select one line (in any direction) from the grid and use those items on your creation and tell us in your post which line you have followed.
For a change, I decided to make a criss-cross card, and I've followed the bottom line : Punch - Tags - Ribbon.
The papers are part of a freebie from Simply Cards & Papercraft magazine. I've used a Fiskars border punch, an unidentified large snowflake and tiny Tonic Studios snowflake punches. The sentiment was also a freebie, from Cardmaking & Papercraft magazine, and I've stamped it on a Nestie Ribbon Tag.
This just happens to be the first Christmas card I've made this year! And so far, the only one! We're still busy sorting out the new house, but slowly getting organised.
Anyway, I'm sure you want to know all about this month's prize! Well, it's a cracker! Who wouldn't want to find these goodies in their Christmas stocking? Janice & Andy have really surpassed themselves this time.
To be in with a chance of winning, just get playing Bingo, and if you need any inspiration, pop over to the Challenge Blog and have a look at the gorgeous creations the DT have made for you. I look forward to seeing yours!
The idea is to select one line (in any direction) from the grid and use those items on your creation and tell us in your post which line you have followed.
For a change, I decided to make a criss-cross card, and I've followed the bottom line : Punch - Tags - Ribbon.
The papers are part of a freebie from Simply Cards & Papercraft magazine. I've used a Fiskars border punch, an unidentified large snowflake and tiny Tonic Studios snowflake punches. The sentiment was also a freebie, from Cardmaking & Papercraft magazine, and I've stamped it on a Nestie Ribbon Tag.
This just happens to be the first Christmas card I've made this year! And so far, the only one! We're still busy sorting out the new house, but slowly getting organised.
Anyway, I'm sure you want to know all about this month's prize! Well, it's a cracker! Who wouldn't want to find these goodies in their Christmas stocking? Janice & Andy have really surpassed themselves this time.
To be in with a chance of winning, just get playing Bingo, and if you need any inspiration, pop over to the Challenge Blog and have a look at the gorgeous creations the DT have made for you. I look forward to seeing yours!
Tuesday, 23 August 2011
Quick update!
Ages since I last posted anything, I know, but things have been moving pretty quickly here! The house hunting was very successful, I'm glad to say! We found just the sort of place we wanted, with wonderful views across the countryside (pics to follow!), and couldn't believe our luck when we found we could actually afford it! We hope to be able to move in by the middle of October. In the meantime, I start my new job up in Scotland next week! So I'm now staying with my daughter and family, but will be travelling backwards and forwards for a while until we have got our things packed up ready for the move. Blogging will have to take a back seat for the time being, I'm afraid, but I will try to keep in touch as often as I can. I managed to bring enough stash with me to keep me going (I hope!!), not that I will have much spare time to craft, but should be able to cope with cards for family & friends and my DT work.
For the anniversary card I used my new cameo stamps from Waltzing Mouse, cut out with Nesties. The papers are some I've had in my stash for years, not sure now who made them. I used a Martha Stewart border punch to trim them, and then inked around the edges. It wasn't until I looked at the photo that it occurred to me that the two cameos and the greeting made a face!
For my niece's card, the dog stamp and patterned papers were all freebies from magazines. I coloured the dog with Promarkers, and framed it with Nestie diecuts. The ticket stamp and die are by Whimsy Stamps. Now, I know this is cute, and I don't do cute, but my niece likes cute, and dogs, and pink, so I gritted my teeth and did it!
I had a couple of cards to make before I came up north, a wedding anniversary card for my daughter and son-in-law, and a birthday card for my niece, so here's a quick share of those.
Sunday, 1 May 2011
Sir Stampalot May Challenge
This month at Sir Stampalot Challenge Brenda has chosen the theme of "Magical Worlds". That could mean anything from a single butterfly to a complete scene, so the scope is pretty wide! I'm really looking forward to seeing the entries for this one!

Here's the fantastic prize on offer this month!
I decided to go with a scene, with reference to ancient Celtic myth and magic. Stamps used: Celtic circle with eagle, cross, mountain background - Non Sequitur; deer - Stampscapes; birds - Inkylicious; foreground foliage - Chocolate Baroque. Background sponged with pigment inks.
Here's the fantastic prize on offer this month!
Don't forget to hop over to the Challenge Blog and have a look at the wonderful samples my very talented teamies have made. Hope you can join in too, and good luck everyone!
Going back to the Stampalot Challenge Birthday competition last month, where you had to guess which DT member made which card, this was mine:
It didn't occur to me when I made it, but it too could fit this month's theme. All stamps by Chocolate Baroque. I used a rainbow Adirondack inkpad to swipe the background, and the same pad to stamp the butterfly. Martha Stewart punched border, and a peel-off sentiment.
Subscribe to:
Posts (Atom)