Showing posts with label Lavinia Stamps. Show all posts

Friday, 19 February 2021

A Day At The Zoo!

Here are some more of my samples for Crafty Individuals. The new stamps, designed by Ellie Mulligan,  have now been released and will be on their website very soon. All stamps are by Crafty Individuals.

The background for this easel card was made with Distress Oxide inks using blending brushes. I hand cut a stencil for the footprints.


I had some lovely handmade paper in my stash, which I thought would go well with the elephants. I stencilled some hearts on to the background piece (stencil by Bee Crafty) and used the same paper, minus stencilling, to stamp the elephants on. I matted and layered them on to the background with some patterned paper from Crafty Individuals "Wonderfully Weathered 2" set of A5 papers.


Pink again for the flamingo, but this time with a stencil from Lavinia Stamps for the background. The feathers die was a magazine freebie.


Another Distress Oxide background, with a bit of shading on top using Arteza coloured pencils. The giraffe was coloured with Arteza Fineliner pens.


A simple Brusho background for this zebra portrait.


The elephants again! I was playing with some spray inks (Dylusions shimmer sprays and Distress Oxide sprays) and a stencil by That's Crafty (available from Crafty Individuals), and the resulting papers reminded me of Indian fabrics. I thought they would be perfect as a background for the elephants. I stamped them with Versafine Clair ink on Crafty Individuals white satin stamping card and embossed them with clear powder. I carefully coloured them with Arteza Fineliners, and then managed to smudge ink on to the white areas surrounding the image, having forgotten that it wouldn't dry over the embossed parts! What to do? I didn't want to just throw it away as it had taken ages to colour! I suddenly realised that it would be the perfect opportunity to try out my new Posca brush pen with gold ink, which I used to colour over all the white areas. I think it actually enhanced the image. Happy accident! A sentiment from Crafty Individuals CI-464 stamp set, and a little bit of bling, finished off the card nicely.


Hope you have enjoyed this little trip to the zoo! Thanks for looking!

Sunday, 7 May 2017

My favourite themes!

I'm loving the Stamping Sensations May Challenge, as our theme combines three of my favourites! Of course, it's

* * * * * BUTTERFLIES, FAIRIES, AND FANTASY * * * * *

So much scope for beautiful designs and colours. It's the perfect opportunity to ink up all those butterflies, fairies, and other magical images, the choice is up to you. However, we do need to see something stamped and associated with the theme as the focal point (ie. the main image) on your artwork: a small punched or die cut butterfly will not suffice. We don't have many challenge rules (check them out here), but there are a few things we insist on to make it fair for everyone, so please do make sure your project qualifies if you want to be considered for our prize or top three.

And it is a superb prize this month! The stunning Mariposa Butterfly Collection of dies by Couture Creations.


Couldn't resist making two samples this time. My first is a card.

All stamps by Lavinia Stamps. (The tiny birds were hand drawn,) I think this fairy is my all time favourite fairy stamp! The background was made with Distress Oxide inks. They were great for this theme as I found I could get lovely misty, ethereal effects with them.

The idea for my second project came when I saw some logs that my DH was chopping for the fire. One had a sloping face, which I then sanded smooth, stamped on to (stamps by Inkylicious), and coloured with Distress Oxide inks. Once it was all dry, I polished it with wax polish to seal and protect it, covered the base with a piece of self adhesive baize, and I now have a handy paperweight!


Needless to say, I can't wait to see this month's entries! And my teamies have come up with some stunning samples to inspire you, so check them out on the Challenge Blog and then see what you can come up with. Good luck everyone!

Sunday, 2 April 2017

Stamping Sensations April Challenge

First Sunday of the month, so time for a new challenge at Stamping Sensations, and we have a very easy one for you this month as our theme is

* * * * * ANYTHING GOES * * * * *

The choice of subject is entirely up to you, but of course, as we are a stamping challenge, the main element of your design must be hand stamped (or a hand coloured digital image). Please do check that your project fits our rules (see them here), otherwise it will not be eligible for the prize or top 3 and may not be commented on, in fairness to others who do follow the rules.

Our wonderful April sponsor is PDA, who have given us a fabulous £40 voucher for the winner to spend in their store!

I managed to get my hands on some of the new Distress Oxide ink pads last week, and I've used some of them for the background of my card. Think they are going to be my new favourite inks! I'm only just beginning to explore all their possibilities but I'm loving them already!

I stamped over the background with Lavinia stamps (flower border, pods and butterflies), a text by Inkylicious and a sentiment by Visible Image.

Good luck everyone, I'm looking forward to seeing lots of lovely creations!

Sunday, 5 February 2017

February Challenge at Stamping Sensations, and a strange phenomenon

Since Christmas, my mojo seems to have disappeared. I reckon it's taken itself off to warmer, sunnier climes, given the cold, grey, wet and dreary weather we've been having here lately, and I can't say I blame it. However, I need it back, but how to attract it? One look at the state of my craft room was enough to suggest the answer!

A mega clear out was long overdue. The task was so daunting, I'd kept putting it off but I knew that a good tidy up would go a long way towards making me feel like crafting again. One of the main problems was not being able to find anything I needed without having to shift piles of stuff out of the way first. I store all my unmounted stamps in A5 ringbinders, and when I first set up my craft room, five years ago, they all fitted into a small bookcase. Not any more! As my collection grew, the extra binders had to be crammed into odd spaces here and there on other shelves, which was really annoying.

Then, a few weeks ago, my daughter announced that she had a large, tall bookcase that had become surplus to her requirements, and would I like it? Would I??! Of course, that meant I had to bite the bullet and start the grand clear out! To cut a long story short, what once looked like this


now looks like this!


So much tidier and more efficient, don't you think? Anyway, the clear out is just about finished, (as well as the stamp shelves I have two walls of built-in floor to ceiling shelves and drawers to store everything else) and I now know where everything is again.

But - and here's the strange thing - although I have removed a considerable amount of rubbish and stuff I didn't want to keep, and have gained more storage space with the new bookcase, there doesn't seem to be any more room on the other shelves than there was before! If anyone has an explanation for this odd phenomenon, I'd be very interested to hear it!

Fortunately I managed to clear enough space on my desk in time to make my sample for this month's challenge at Stamping Sensations, where our theme for February is

* * * * * ANIMAL MAGIC * * * * *

As usual, you may interpret this however you wish, as long as the main element of your design is hand stamped (or a hand coloured digital image) and reflects the theme. Please do check that your project fits our rules, otherwise it will not be eligible for the prize or top 3, and may not be commented on, in fairness to others who do follow the rules. And you will not want to miss out on this month's fabulous prize, kindly donated by our lovely sponsors Tattered Lace.


For my card I have used some of the latest new Lavinia Stamps, which are absolutely gorgeous. The range includes badgers, foxes, squirrel and snail, all perfect for our challenge theme, as well as some beautiful fairies.


All stamps on my card are by Lavinia Stamps. I stamped and masked the moon before creating a background with an Inkylicious mountain and valley stencil and pigment inks. The badger, fairy, flowers, foliage and distant trees were then stamped over the top, and a bit of sparkle added with some glitter glue to finish.

I'm entering this card in the Lavinia Stamps Creative Challenge for February, where the theme is "The Full Moon".

There's some stunning Animal Magic by my lovely teamies over on the Challenge Blog, so do go and take a look, and they would be delighted if you had time to visit their individual blogs too. I think this will be a popular theme, and am looking forward to seeing your entries.

Sunday, 29 May 2016

Bits And Pieces

Just some recent projects, starting with a few cards for friends and family.

Stamps: Altenew & Inkylicious. Stencil: Crafters Workshop.


Stamps: Altenew, Crafty Individuals & Inkylicious. Stencil: Crafters Workshop.


Stamps: Lavinia Stamps & The Craft's Meow (sentiment)


 Stamps: Inkylicious & Lavinia Stamps.

And  few DT makes for Be Creative, using their stunning new embossing crystals.

Butterfly stamp on notebook: Hero Arts. Butterfly diecut on tealight holder: Frantic Stamper. Background papers: Be Creative.


Thanks for looking!

Sunday, 7 September 2014

Come and have a flutter!

Last month at Stamping Sensations we had a bumper crop of entries - over 350 - which was fabulous, and huge thanks to everyone who joined in. This month our theme is

***** THINGS WITH WINGS *****


One of my favourite topics, of course! My winged thing is a beautiful fairy by Lavinia Stamps. I've set her against a background created with Inkylicious ink dusters and Memento inks, surrounded her with foliage by Inkylicious and Lavinia Stamps, and glittered her wings. The gorgeous poppy ribbon was bought at the Stamp Magic show earlier this year, but unfortunately I can't remember the name of the company selling it.

Here's a close up of the fairy, gazing at the moon!

Our lovely sponsor for September is Crafty Devils, who have donated a very generous £35 voucher to be spent on their website, and I can promise you that the lucky winner will be spoilt for choice!


As always, do have a look at the stunning projects my brilliant teamies have made to inspire you. Thanks for looking, and I will be looking forward to seeing lots of beautiful Things With Wings fluttering by to join our challenge.


Sunday, 10 August 2014

"The Shire"

Proud Grandma alert!! My young grandson, Andrew, aged 5, saw the picture I made with my tree stamp and Brusho paints (see here) and he wanted to make one.


First he punched a circle from a post-it note to make a mask for the moon. Next  he made the Brusho background by dipping a paintbrush into the powders and tapping it over the paper where he wanted the colour. Then he sprayed water over the picture until the colours had merged to his satisfaction. He did all of that with instruction but no physical help.

Having finished his background, he compared it with mine and decided that my picture was too plain, as it only has the tree and a bird. We looked through my stamps, and he found the Hobbit Door (Lavinia Stamps) and said that he wanted his to be a picture of The Shire (from Lord of the Rings. He's a big LOTR fan!) He chose some other stamps to go with the Hobbit Door (from Lavinia, Inkylicious & Hobby Art) and decided where they all should go. I helped him to hold the stamps as he was stamping them, just to make sure that he didn't smudge the images, because it would have been a shame to spoil his lovely background, but everything else was entirely his own work. He finished by colouring the door surround and the tree with coloured pencils.

We both decided that his artwork was far superior to mine!

Sunday, 6 July 2014

Summer at last!

Just hoping the last two weeks aren't all we're going to get! For once, Scotland seems to have had better weather than the rest of the country but as we start our school holidays this week, I fear things will probably revert to form before long!

Anyway, it's a new month, and at Stamping Sensations we are brightening things up whatever the weather with a theme of

***** SUMMER BLOOMS *****

Garden glories or wildflowers or weeds, we don't care which, just show us flowers galore! But please do remember, as we are a stamping challenge there must be some hand rubber stamping on your project. Entries containing only digital images will not be considered for the prize or top 3.
 
Making a return visit as our sponsor for July is the wonderful Heartfelt Creations, who are generously offering a voucher to the value of $60 to spend in their online store.
 
 
They have asked us to point out that should the prize winner live outside the USA, a charge for postage, packing and shipping will apply.
 
For my card I've taken inspiration from the masses of beautiful wildflowers adorning our hedgerows just now.
 
The background was colour washed with diluted Distress Inks on water colour paper, then various flowers and a couple of butterflies were stamped over. Some of the flowers were coloured with Inktense watercolour pencils. Stamps used were from Lavinia Stamps, Chocolate Baroque and Crafty Individuals. The sentiment is by Inkylicious.
 
Flowers are, of course, one of my favourite topics for cards, so I am really looking forward to seeing lots of lovely entries full of summer blooms! My fabulous teamies have definitely excelled themselves this month with their gorgeous creations, so don't forget to check them out on the Challenge Blog if you are in need of inspiration. Thanks for looking!

Saturday, 5 July 2014

Just playing

Woo hoo, it's the school holidays! No work to prepare, nowhere I needed to go, nothing I needed to do for the time being, so I decided it was time for a play!

Recently on Pinterest I've been admiring various artworks (some of which I've pinned on my Bister and Brusho Art board) using something called Bister, or Bistre. Having never heard of it before, I had to investigate! It seems to be popular in The Netherlands, and there are some great examples using it on the Stampinback Blog. I really fancied having a go at something similar, but I don't have any Bister. Then I remembered that, quite some time ago, I bought some Brusho powder paints, although I didn't do much with them at the time. As far as I can tell, Brusho and Bister appear pretty much to be the same kind of product. I'm not quite sure whether to call the Brusho paints or inks, as they behave similarly to both.

Right, I thought, I'll have a go with the Brusho and see whether I can get similar results. The trouble was, I couldn't find them! I knew they must be somewhere in my craft room. So I spent a whole day and a half (yes really!) going through all my stuff with a fine tooth comb, so determined was I to find them. I even looked in cupboards in other rooms in the house, just in case for some strange reason they had migrated elsewhere. By last night they still hadn't turned up, but at least I now have a very tidy craft room!

Anyway, to cut a long story short, I eventually realised there was one box I hadn't looked in, one I keep under my desk. It used to house a mixture of bits and pieces, a microcosm of my stash, if you like, that I could just pick up and take with me if I was going away anywhere. Since we moved up here there are very few occasions now when that would happen, so during my last reorganisation I had put all the bits and pieces away with their fellow bits and pieces and the box underwent a change of use. And, of course, that's where I finally found the Brusho!

It's brilliant stuff. So many different ways it can be used. I won't go into them all just now, but there's lots of info here. For my first card, I sprinkled some Brusho (sparingly - it's very concentrated) over watercolour paper and lightly sprayed it with water. The powder magically turned into paint and spread out over the paper.


I overstamped  it with stamps from Art Journey, Stampinback, Lindsay Mason and Hobby Art and filled in the gap at the side with a Memory Box diecut. I used a white gel pen to add highlights to the flowers.

For the second card my method was similar, except that I used plain smooth card instead of watercolour paper and coloured just part of the card with Brusho. The interesting thing here is that I only used black Brusho. When you mix it with water to use as a paint  it comes out black, but as a powder it's a composite of different colours which separate out when you spray it or drop it on to wet paper. The butterfly and grasses are by Inkylicious. I mixed a little turquoise Brusho with water to use as a paint to colour the butterfly.

The third card uses watercolour paper again, but this time I dampened the paper first before sprinkling the Brusho on to it. I stamped the flowers and butterflies (Lavinia Stamps) and painted the flowers as above. Sentiment is by Indigo Blu. Flower border punch by X-Cut.


The fun of the sprinkled backgrounds is seeing how they turn out. No two will be the same. I guess it may be possible with practice to control it a little more, but I'm not sure I'd want to. I like the randomness of it.

I've barely yet scratched the surface of what can be done with Brusho, and I'm sure I'll be doing some more experimenting, so thanks for looking, and watch this space!

Sunday, 2 February 2014

Fairy Nuff!

We have a new challenge for you at Stamping Sensations, one which I've really enjoyed making a card for, and I hope you will too! A bit of escapism, just the thing to take our minds off the miserable weather we've been having lately! We'd like you to show us your creations on the theme of

*** WINGS, FANTASY AND FICTION ***

We're thinking butterflies, fairies and mythical or fictional characters here, but you are of course free to interpret the theme however you like.

Our fantastic sponsor this month is Crafty Devils, see the Challenge Blog for details of the prize they have generously donated.

Anyway, on to my card. I bought the Lavinia Stamps Hobbit Home stamp ages ago, but had been waiting for a suitable occasion to use it. It was perfect for this challenge!


All the stamps I've used here are by Lavinia Stamps. As you can see, I partially cut around the door so I could open it, and made a little scene to put behind it. (The tree, hill and birds are hand drawn.)

 Background papers are Bo Bunny "Autumn Song", butterfly and leaf dies by Cheery Lynn, and sentiment by Stampingallday. Circle and scallop circle dies are Nestabilities.


Butterflies and fairies are two of my favourite things, so I can't wait to see all your gorgeous projects! Thanks for looking at mine, and keep those entries coming in!

Sunday, 30 June 2013

Citrasolv-ed!

Whilst browsing Pinterest one day recently, I came across some artwork that I really liked. Diffuse, mystical backgrounds, to which various elements had been added. I followed the links to see how it was done, and thus discovered Citrasolv art. It involved using a cleaning solvent (Citrasolv) to break up the inks in a printed picture, giving amazing effects!

Here's the Citrasolv website, where you'll find lots of info and examples.  

I couldn't wait to try it! The only problem was I didn't have any Citrasolv! It is, of course, an American product. Anyway, back in about 1995 while visiting the USA, I bought some stuff called Goo Gone. Like Citrasolv it is a citrus based cleaner, albeit made with petroleum distillates, which Citrasolv doesn't have. My American host was using some to get rid of the sticky mess left by labels when you try to get them off, and because at that time I had never found anything here which would do that easily, I bought some to bring home.
 
I didn't know whether Goo Gone would work in the same way as Citrasolv, but decided it was worth a try. I had about a third of the bottle left (been using it very sparingly!) First I tried it with an old magazine, but nothing happened. The inks didn't shift at all. Apparently many of the artists on the website use National Geographic mags, something to do with the type of ink and the fact that the photo pages are clay coated. So I scrounged a couple of old copies from my daughter.
 
They worked a treat! The Goo Gone produced some great papers, which I then scanned on the computer. Just wish I'd thought to scan the original photos too before I altered them, to compare. I'll remember next time! Since you'll never get the same result twice, it makes sense to scan your original altered pic, which you can then keep, and use a printed copy in your project. Once you've got your printed copy, you can then enhance it however you wish.

These are a few of the best results. 


And here's a card I made with the first one. I used my graphics programme to add the butterfly (one of my own photos) , and stamped the sentiment (by The Craft's Meow).


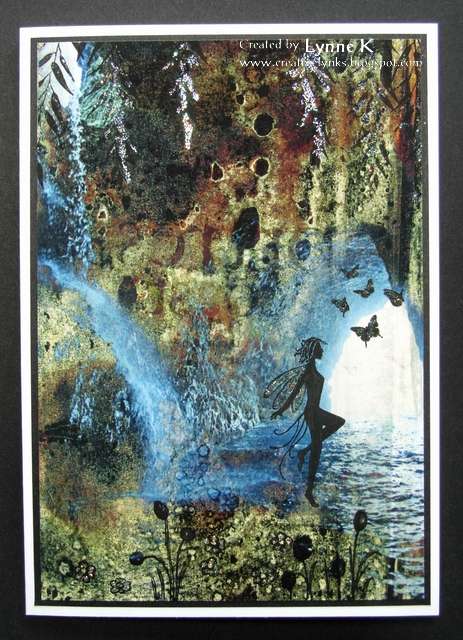
To the second paper I added a stamped fairy, some leaves hanging down from the top (both Lavinia Stamps) and some tiny butterflies (The Craft's Meow). I used a fine drawing pen to turn some of the blobs into flowers, and enhanced some of the elements, including the fairy's wings, with glitter glue.


Knowing I would want to do more, (and by then having only a few drops of my precious Goo Gone left!) I went online to see if I could get hold of some Citrasolv. Found it on Am*z*n, and ordered some forthwith. 

There's a very good YouTube video by Cathy Taylor, one of the artists profiled on the Citrasolv website. Once you find that one, which is a good one for the basic instructions, it will then lead you to others. 

I haven't yet had time to try it with the Citrasolv, but I have high hopes for it! And if it doesn''t work, at least I have a replacement for the Goo Gone!