No, not congratulatory notes for newborns. It's the missives themselves that are miniature! I found some cute little 3" x 3" blank cards in The Range the other day and couldn't resist them. I like making things on a miniature scale. I also wanted to try out some new stamps I got recently, from Art Journey and Stampinback, so I decided to see if they and the cards would work together.
The cards are so small that they would be swamped by lots of embellishments. Instead, I opted for one-layer designs. Having first masked a border around each card, I sponged the backgrounds with pigment inks and then, with the masks still in place, stamped over with various meadow/grasses type stamps (mostly by Inkylicious apart from one which I've had for years which has no ID, though several companies now produce the same image in varying sizes).
Next I removed the masks and stamped the main foreground images. The bottom ones in the above picture are by Stampinback, the top ones are by Art Journey. Had to have a butterfly in there somewhere (Justrite), and finished the cards with sentiments by Personal Impressions.
Here are a couple of them close up.
Having finished the baby cards I thought I would make a larger version. Same details, except that the sentiment is by Hobby Art.
And here is the big one and a baby one! Cute or what?!
Tuesday, 29 April 2014
Wednesday, 9 April 2014
A Butterfly Stepper Card
Following my win on the Butterfly Challenge, I was thrilled to be invited by Mrs A to make something for a guest DT slot. So here it is. The theme for the challenge is to use a charm on your project (along with a butterfly, of course!). I haven't made many stepper cards before, and the design for this one evolved by trial and error!
Having got the base sorted, I covered it with papers by Prima (Fairy Belle collection) and then simply added various elements to complete the design. The circle & butterfly circle were cut with Nestability dies, the larger butterfly dies are by Cheery Lynn, and the tiny one is a Dovecraft punch. Leaf punch by Leone Em, flowers by Prima. The sentiment was a freebie from Simple Cards & Papercraft magazine. I added some glitter glue to the butterflies, and brads to the flower centres. The little charm says "believe". I've had it in my stash for years, just waiting for the right project to add it to!
I really enjoyed making this project, so thanks, Mrs A for letting me be a guest DT for you!
Labels:
Butterfly Challenge,
Cheery Lynn dies,
Dovecraft,
Leone Em,
Nestabilities,
Prima
Sunday, 6 April 2014
Dies and Punches at Stamping Sensations
For our April Challenge at Stamping Sensations we would like you to show us what you can do with your
Your project can be anything you like as long as it uses punched and/or diecut elements. And some stamping, of course!
Our fab sponsor this month is once again PDA Card & Craft, who have very generously donated a whopping £40 voucher to be spent either online or in their shop in Langley Mill, which is on the Notts/Derbyshire border.
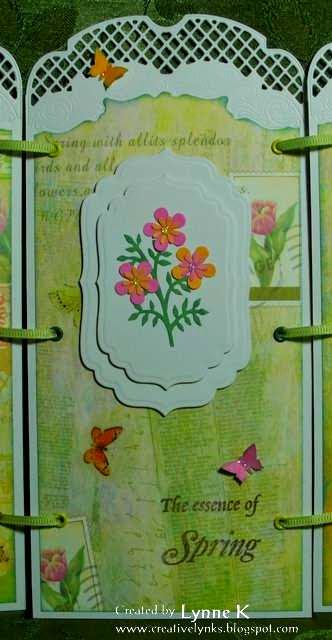
Anyway, on to my project. I've called it "Spring Triptych", and have used both dies and punches.
I began by cutting an A4 sheet of card into three equal pieces and trimming one end of each with the Britannia Dies Small Lattice Edge. While looking through my patterned paper stash, I came across some that I've had for so long I'd forgotten all about it! If I remember correctly it came from Lakeland, when they had a craft section, in a pack with some glittered butterfly and flower stickers. I thought it would be perfect for a Spring project, with its tulips and butterflies, and pretty Spring colours. I traced around the edge of the lattice die to hand cut the paper to fit the top of each panel. (The die only cuts the outer edge.) I didn't want to cover up the paper too much, so I just added some diecut shapes (Spellbinders Labels 4) and some tiny punched butterflies. On the two outer panels I stamped a tulip (Stampin' Up) and the centre one has some punched flowers and leaves and a sentiment (Inkylicious).
Once each panel was complete, I inserted some eyelets and joined the panels together with narrow ribbon. A spot of glitter glue on the punched butterflies and flower centres provided the finishing touch.
A little aside here! When the trend for diecutting first started, I wasn't interested. I certainly didn't intend to spend a lot of money on something that I might use once or twice and then stick in a cupboard, never again to see the light of day. At the time, I was running a card making class, and some of the members had bought Cuttlebugs. They were soon raving about them, and wanting to use them in the classes. I resisted for a while, but then I discovered Spellbinders dies and was impressed by the effects you could get with them. I gave in and got a 'bug of my own. And promptly fell in love with it! Of course, since then the variety of types and styles of dies has just grown and grown, not to mention that of machines, both manual and electronic. I remain faithful to my 'bug, though. I don't feel any need for larger dies, or electronic cutting. I can do everything I want to with the Cuttlebug, and a great many of my projects contain at least one element produced by it. It has never let me down. I can't see why on earth I would want to trade it in for a smarter model .....
My creative teamies have a gorgeously eclectic selection of samples for you over on the Challenge Blog, so do go over and be inspired. Last month's Pink theme was very popular, and I reckon this one is going to be equally so. I'm really looking forward to seeing lots of entries, so dig out those dies and punches and get cracking! Thanks for looking.
PS. Just realised this also fits the Butterfly Challenge (No. 4), so I'm going to enter it there.
***** DIES AND PUNCHES *****
Your project can be anything you like as long as it uses punched and/or diecut elements. And some stamping, of course!
Our fab sponsor this month is once again PDA Card & Craft, who have very generously donated a whopping £40 voucher to be spent either online or in their shop in Langley Mill, which is on the Notts/Derbyshire border.
PDA are well known for their quality cardstock, which they supply in just about every shade and type you could possibly want, but they also sell a huge variety of craft materials, so the winner of this fantastic prize will be spoilt for choice!
Anyway, on to my project. I've called it "Spring Triptych", and have used both dies and punches.
I began by cutting an A4 sheet of card into three equal pieces and trimming one end of each with the Britannia Dies Small Lattice Edge. While looking through my patterned paper stash, I came across some that I've had for so long I'd forgotten all about it! If I remember correctly it came from Lakeland, when they had a craft section, in a pack with some glittered butterfly and flower stickers. I thought it would be perfect for a Spring project, with its tulips and butterflies, and pretty Spring colours. I traced around the edge of the lattice die to hand cut the paper to fit the top of each panel. (The die only cuts the outer edge.) I didn't want to cover up the paper too much, so I just added some diecut shapes (Spellbinders Labels 4) and some tiny punched butterflies. On the two outer panels I stamped a tulip (Stampin' Up) and the centre one has some punched flowers and leaves and a sentiment (Inkylicious).
Once each panel was complete, I inserted some eyelets and joined the panels together with narrow ribbon. A spot of glitter glue on the punched butterflies and flower centres provided the finishing touch.
A little aside here! When the trend for diecutting first started, I wasn't interested. I certainly didn't intend to spend a lot of money on something that I might use once or twice and then stick in a cupboard, never again to see the light of day. At the time, I was running a card making class, and some of the members had bought Cuttlebugs. They were soon raving about them, and wanting to use them in the classes. I resisted for a while, but then I discovered Spellbinders dies and was impressed by the effects you could get with them. I gave in and got a 'bug of my own. And promptly fell in love with it! Of course, since then the variety of types and styles of dies has just grown and grown, not to mention that of machines, both manual and electronic. I remain faithful to my 'bug, though. I don't feel any need for larger dies, or electronic cutting. I can do everything I want to with the Cuttlebug, and a great many of my projects contain at least one element produced by it. It has never let me down. I can't see why on earth I would want to trade it in for a smarter model .....
My creative teamies have a gorgeously eclectic selection of samples for you over on the Challenge Blog, so do go over and be inspired. Last month's Pink theme was very popular, and I reckon this one is going to be equally so. I'm really looking forward to seeing lots of entries, so dig out those dies and punches and get cracking! Thanks for looking.
PS. Just realised this also fits the Butterfly Challenge (No. 4), so I'm going to enter it there.
Friday, 4 April 2014
Spring Butterflies
It's a Spring theme for the Butterfly Challenge No. 4, so Mrs. A would like to see yellow on our projects. Had to think about this one for a while, as yellow is not a colour I use very often. However, though I don't like bright acid yellows, I do love the spring flowers, such as daffodils and tulips, and I think that the more muted shades of yellow, coupled with fresh spring green, can be very pretty.
I decided to use a technique which I first saw done by Julie Hickey in her book "Flower Power Papercrafts". Julie used punched flowers for her card, but I have used my favourite butterfly dies (by Cheery Lynn) to make the openwork panel. A simple sentiment (Hero Arts) was all that was needed to complete the card.
Here's a closer look at the butterfly panel.
And another view of the card.

The daffodils are all out here now, both in our garden and along the bank across the road from our house. Not much sun in evidence lately though, so the cheery daffs are doing a sterling job of brightening up the view!
I decided to use a technique which I first saw done by Julie Hickey in her book "Flower Power Papercrafts". Julie used punched flowers for her card, but I have used my favourite butterfly dies (by Cheery Lynn) to make the openwork panel. A simple sentiment (Hero Arts) was all that was needed to complete the card.
Here's a closer look at the butterfly panel.
And another view of the card.
The daffodils are all out here now, both in our garden and along the bank across the road from our house. Not much sun in evidence lately though, so the cheery daffs are doing a sterling job of brightening up the view!
Labels:
Butterfly Challenge,
Cheery Lynn dies,
Hero Arts,
yellow
Friday, 21 March 2014
Butterflies and Stitches
Here's my entry for the Butterfly Challenge No. 3, which requires some stitching on your project.
I've stitched the centre panel on to a panel embossed with the Stampin' Up Tulip embossing folder. Papers are by Wildrose Studio and the sentiment is by Chocolate Baroque. Butterfly Punch origin unknown.
And here's a closer view of the details:
Thanks for looking!
I've stitched the centre panel on to a panel embossed with the Stampin' Up Tulip embossing folder. Papers are by Wildrose Studio and the sentiment is by Chocolate Baroque. Butterfly Punch origin unknown.
And here's a closer view of the details:
Thanks for looking!
Tuesday, 11 March 2014
Butterfly Challenge No. 2
I was delighted and very lucky to find out that my entry for the very first Butterfly Challenge was drawn as the winner! I have been extremely busy with work and other non-crafty things lately, but didn't want to rest on my laurels, as it were, so I was determined to get an entry in for Challenge No. 2, for which Mrs. A would like to see Butterflies, Buttons and Bows.
It was very quick and very last minute, but here it is!
Background paper: Prima
Butterfly stamp: Prickley Pear
Sentiment: Stampingallday
Ribbon & old button from my stash.
A couple of close-ups:
Must dash! Thanks for looking!
It was very quick and very last minute, but here it is!
Background paper: Prima
Butterfly stamp: Prickley Pear
Sentiment: Stampingallday
Ribbon & old button from my stash.
A couple of close-ups:
Must dash! Thanks for looking!
Labels:
Butterfly Challenge,
Prickley Pear,
Prima,
Stampingallday
Sunday, 2 March 2014
Pink!
It isn't often that you'll see much in the way of pink from me, at least not as the dominant colour on a project, but it so happens that pink is going to feature very heavily in this month's challenge at Stamping Sensations. Our theme for March is
As long as your creation fits our challenge rules (see them here if you need a reminder of them) you can interpret the theme however you like. Oh, but don't forget that as we are a stamping challenge, we do need to see some stamping on your artwork.
Our lovely sponsor is once again adhesive specialists Styx2Anything (though as you will see on their website they sell all sorts besides the sticky things!) who have given us a great prize, along with which the lucky winner this month will also receive some gorgeous goodies from the Stamping Sensations DT. Have a look at them on the Challenge Blog, and don't say we don't spoil you!
Anyway, here's my pink card!
The background paper is some I've had in my stash for years, ditto the braid which I've tied to the tag. The lattice diecut is from Memory Box. Unfortunately I can't credit the manufacturer of the butterfly punch as there is no ID on it so I've no idea who made it. If anyone knows, please advise me. The border and butterfly stamps are all by Chocolate Baroque. The tiny Happy Birthday on the tag was a magazine freebie.
The printed tag is from the Botanica collection by Craftwork Cards. I wanted to use it as the focal point on the card but at first it just didn't look right. Then I coloured the flower heads in pink with Promarkers and inked around the edge of the tag with pigment ink, and it was amazing the difference those little touches made. It became a part of the card instead of something just stuck on top.
Here's a close up of the tag. It's hard to tell from the photo, but the flower heads and the flourish at the bottom are foiled in silver. Very pretty.
My talented teamies have some absolutely gorgeous samples for you, so do go and check them out on the Challenge Blog, and I will look forward to see all your pretty pink projects!
Thanks for looking!
***** PRETTY IN PINK *****
As long as your creation fits our challenge rules (see them here if you need a reminder of them) you can interpret the theme however you like. Oh, but don't forget that as we are a stamping challenge, we do need to see some stamping on your artwork.
Our lovely sponsor is once again adhesive specialists Styx2Anything (though as you will see on their website they sell all sorts besides the sticky things!) who have given us a great prize, along with which the lucky winner this month will also receive some gorgeous goodies from the Stamping Sensations DT. Have a look at them on the Challenge Blog, and don't say we don't spoil you!
Anyway, here's my pink card!
The background paper is some I've had in my stash for years, ditto the braid which I've tied to the tag. The lattice diecut is from Memory Box. Unfortunately I can't credit the manufacturer of the butterfly punch as there is no ID on it so I've no idea who made it. If anyone knows, please advise me. The border and butterfly stamps are all by Chocolate Baroque. The tiny Happy Birthday on the tag was a magazine freebie.
The printed tag is from the Botanica collection by Craftwork Cards. I wanted to use it as the focal point on the card but at first it just didn't look right. Then I coloured the flower heads in pink with Promarkers and inked around the edge of the tag with pigment ink, and it was amazing the difference those little touches made. It became a part of the card instead of something just stuck on top.
Here's a close up of the tag. It's hard to tell from the photo, but the flower heads and the flourish at the bottom are foiled in silver. Very pretty.
My talented teamies have some absolutely gorgeous samples for you, so do go and check them out on the Challenge Blog, and I will look forward to see all your pretty pink projects!
Thanks for looking!
Friday, 21 February 2014
Altered Mirror
Still in altering mode. I've had some Ik*a mirrors in the cupboard for at least a few years but never got round to doing anything with them. However, when I saw the new Botanica collection from Craftwork Cards I just couldn't resist it and thought it would be perfect for a mirror.

I had prepared one of the mirrors ages ago by giving it a base coat of paint (which was as far as I got with it at the time!), so all I had to do was cover it with Botanica papers and add a few extra elements cut from the papers, which I attached with silicone glue to give them a bit of dimension.
I also stamped some sentiments (by Paper Artsy and Katzelkraft) over the paper, and inked around the edges with gold Brilliance ink. Finally I lined the inner edges of the mirror with some gold German scrap, which just happened to be exactly the right depth.
The large butterfly and the bird were cut from the toppers which are part of the collection, and the small butterflies from the papers.
The Botanica collection is so pretty, and with its nature theme of butterflies, birds and flowers it is right up my street! Might have to send for another pack so I can keep one just to admire!
PS. Just realised this is also eligible for the Butterfly Challenge, so I've entered it!
Thanks for looking!
I had prepared one of the mirrors ages ago by giving it a base coat of paint (which was as far as I got with it at the time!), so all I had to do was cover it with Botanica papers and add a few extra elements cut from the papers, which I attached with silicone glue to give them a bit of dimension.
The large butterfly and the bird were cut from the toppers which are part of the collection, and the small butterflies from the papers.
The Botanica collection is so pretty, and with its nature theme of butterflies, birds and flowers it is right up my street! Might have to send for another pack so I can keep one just to admire!
PS. Just realised this is also eligible for the Butterfly Challenge, so I've entered it!
Thanks for looking!
Saturday, 15 February 2014
Tissue Box Covers
I saw these pretty tissue box covers, by Angela Barkhouse on the JustRite Stamps blog and thought what lovely gifts they would make.
Angela shares her tutorial for making them on the JustRite blog (see link above), but my tissue box wasn't quite the same size as hers, so I decided to design my own.
They are actually very simple to make. I assembled the box from offcuts of mountboard and covered it with scrapbook paper (K & Co. and Hot Off The Press). I used Nestie dies (Labels 5) to cut the hole in the top and make the side decorations, along with a Cheery Lynn die (the butterfly) and Leone Em punch ( the fern). The sides opposite each other are identical. The top and bottom borders were cut with the Die-namics Scallop Ribbon Border which makes a double sided strip, but I wanted just a narrow border so I cut it in half lengthways.
And that was it done! Easy peasy! The scrapbook papers were some I had had for years, and everything else was offcuts and snippets, so I even managed to use up some more old stash!
It would make a great gift, but I think I might just keep this one! However, I'm entering it in ValeryAnne's inaugural Butterfly Challenge, which began last week and which will be running fortnightly. I really hope it takes off (!), it's the perfect challenge for me!
Thanks for looking.
Sunday, 2 February 2014
Fairy Nuff!
We have a new challenge for you at Stamping Sensations, one which I've really enjoyed making a card for, and I hope you will too! A bit of escapism, just the thing to take our minds off the miserable weather we've been having lately! We'd like you to show us your creations on the theme of
We're thinking butterflies, fairies and mythical or fictional characters here, but you are of course free to interpret the theme however you like.
Our fantastic sponsor this month is Crafty Devils, see the Challenge Blog for details of the prize they have generously donated.
Anyway, on to my card. I bought the Lavinia Stamps Hobbit Home stamp ages ago, but had been waiting for a suitable occasion to use it. It was perfect for this challenge!
All the stamps I've used here are by Lavinia Stamps. As you can see, I partially cut around the door so I could open it, and made a little scene to put behind it. (The tree, hill and birds are hand drawn.)
Background papers are Bo Bunny "Autumn Song", butterfly and leaf dies by Cheery Lynn, and sentiment by Stampingallday. Circle and scallop circle dies are Nestabilities.
Butterflies and fairies are two of my favourite things, so I can't wait to see all your gorgeous projects! Thanks for looking at mine, and keep those entries coming in!
*** WINGS, FANTASY AND FICTION ***
We're thinking butterflies, fairies and mythical or fictional characters here, but you are of course free to interpret the theme however you like.
Our fantastic sponsor this month is Crafty Devils, see the Challenge Blog for details of the prize they have generously donated.
Anyway, on to my card. I bought the Lavinia Stamps Hobbit Home stamp ages ago, but had been waiting for a suitable occasion to use it. It was perfect for this challenge!
Background papers are Bo Bunny "Autumn Song", butterfly and leaf dies by Cheery Lynn, and sentiment by Stampingallday. Circle and scallop circle dies are Nestabilities.
Butterflies and fairies are two of my favourite things, so I can't wait to see all your gorgeous projects! Thanks for looking at mine, and keep those entries coming in!
Subscribe to:
Posts (Atom)


.jpg)